

Outdrive stand and lift homemade no welding
 11-08-2010, 09:27 PM
#81
VIP Member

Join Date: Nov 2008
Location: Bend Oregon
Posts: 503
Likes: 0
Received 0 Likes
on
0 Posts
 11-09-2010, 04:01 AM
#82
Registered
i started a thread about mine in the Kryptonite section, guess I can put it up here also.
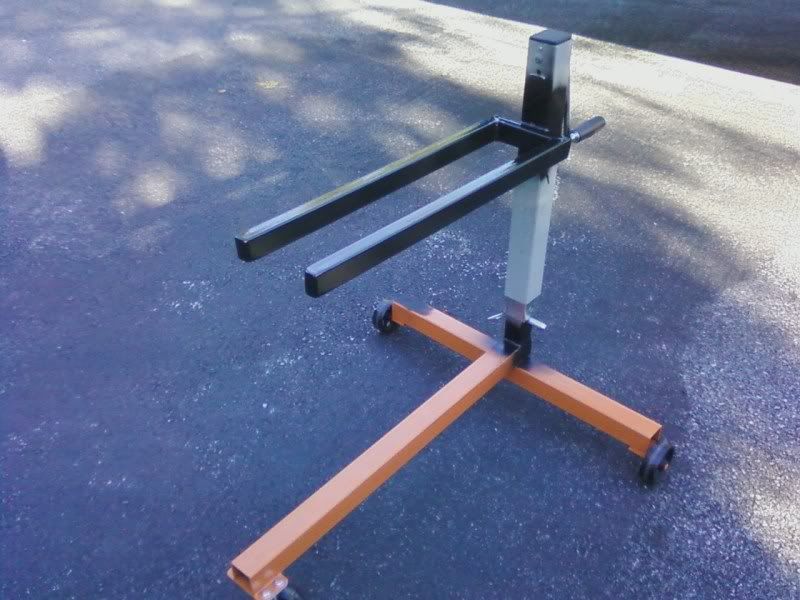
I went as cheap as I could with mine. All told I have $78 in it, not counting the welder of course. Bought the cheapest engine stand that harbor frieght had in stock, a square tongue jack from HF, and some 1x1 1/2" square steel tubing. used the measurements that someone else posted in this thread. Took a total of about 2 hours to completely assemble. I welded the fork on mine at a slight reaward angle, so when the weight of the drive is on it, it is just about level. The whole upper assembly is removable by pulling a pin out.
I am considering putting pneumatic wheels on it, but right now, it works perfectly.
If you have never used a stand to R/R a drive, I owuld highly recommend it. I can install my drive with the ITS shaft in under 5 minutes, and that is including the time it takes to tighten all six nuts. It is fantastic.
 11-09-2010, 02:49 PM
#84
Are we having fun, yet?
Join Date: Mar 2001
Location: Chesterfield, Va.
Posts: 782
Likes: 0
Received 0 Likes
on
0 Posts
Thanks TF! Like I have said before, I put things together like this to make my life easier. It isn't perfect, but it works great. I have loaned mine out a bunch......
Philm - I have about the same $$$ in mine.
Philm - I have about the same $$$ in mine.
__________________
Jay
Jay
11-09-2010, 02:51 PM
#85
Registered
Join Date: Nov 2009
Posts: 672
Likes: 0
Received 0 Likes
on
0 Posts
this one looks great think i am going to coppy it like the simple way it it goes up and down thanks for pic paul england sent this befor i got to all the other threads praising you idea seems every body likes your one my check is already in the post
Last edited by paul buckner; 11-09-2010 at 02:59 PM.
11-09-2010, 04:36 PM
#86
VIP Member
Join Date: Nov 2008
Location: Bend Oregon
Posts: 503
Likes: 0
Received 0 Likes
on
0 Posts
i started a thread about mine in the Kryptonite section, guess I can put it up here also.
I went as cheap as I could with mine. All told I have $78 in it, not counting the welder of course. Bought the cheapest engine stand that harbor frieght had in stock, a square tongue jack from HF, and some 1x1 1/2" square steel tubing. used the measurements that someone else posted in this thread. Took a total of about 2 hours to completely assemble. I welded the fork on mine at a slight reaward angle, so when the weight of the drive is on it, it is just about level. The whole upper assembly is removable by pulling a pin out.
I am considering putting pneumatic wheels on it, but right now, it works perfectly.
If you have never used a stand to R/R a drive, I owuld highly recommend it. I can install my drive with the ITS shaft in under 5 minutes, and that is including the time it takes to tighten all six nuts. It is fantastic.
11-24-2010, 09:54 PM
#87
Registered
Join Date: Mar 2007
Location: Lake Dallas, TX
Posts: 1,087
Likes: 0
Received 0 Likes
on
0 Posts
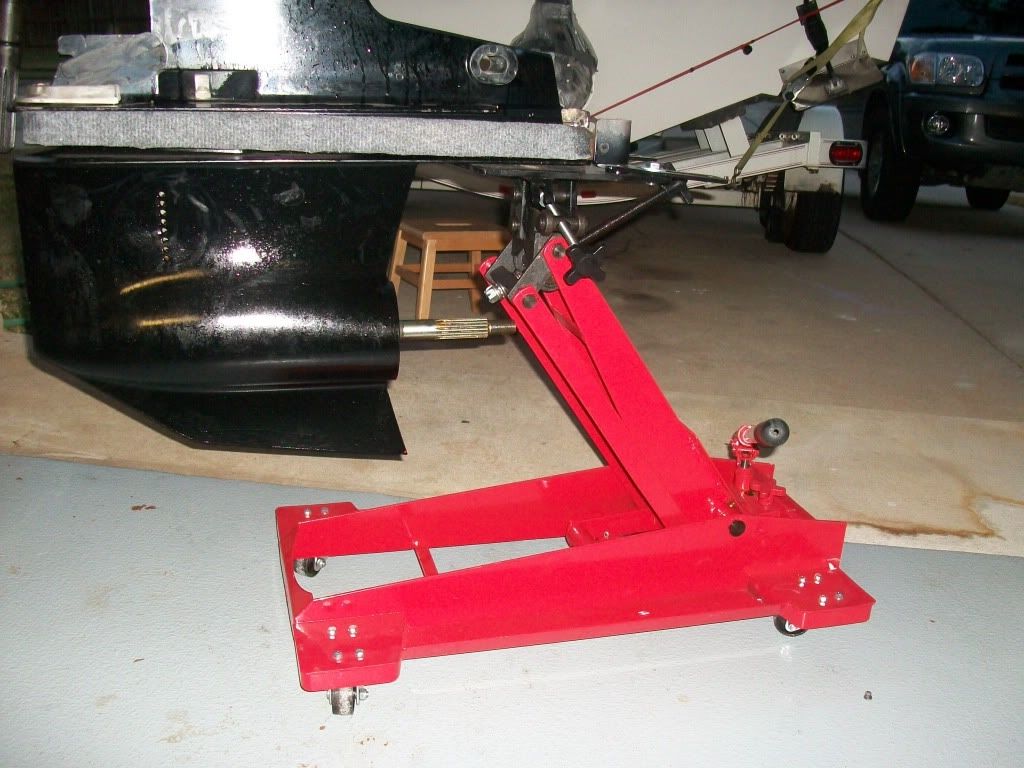
I've been trying to duplicate the Yardarm for a while. I made a drive stand like the everyone else, but my problem has always been getting the correct horizontal & vertical alignment of the drive to slide it in. So I tore down the old drive stand and created a new one from a transmission jack. This give me a 3 dimension adjustment so I can just slide it back in with now issues. Cost: $140.00
11-09-2011, 12:51 PM
#88
Registered
Join Date: Apr 2005
Location: michigan city in.
Posts: 62
Likes: 0
Received 0 Likes
on
0 Posts
https://picasaweb.google.com/32veloc...eat=directlink
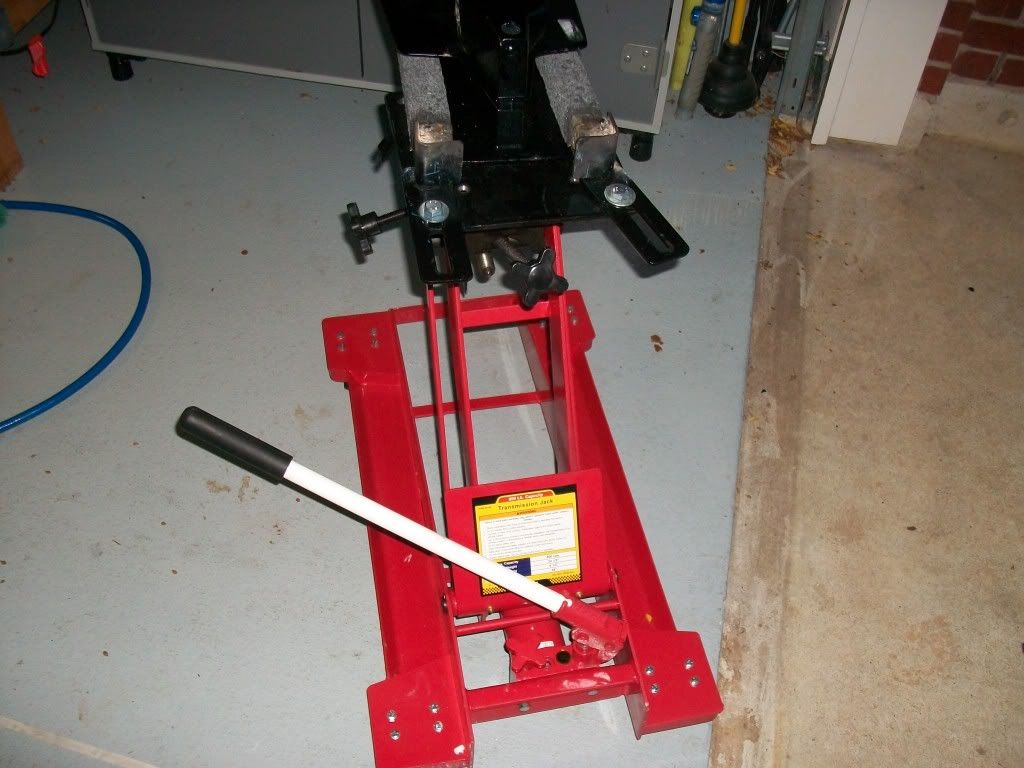
heres one I threw together,, the head will tilt/pivot on the center bolts it goes up and down using socket and ratchet , breaks down for storage, if anyone needs any info just reply or pm. I have about $16 in it for casters ,everything else came from scrap were I work
Credit to Gizmo for his original
Last edited by 32velocity; 11-09-2011 at 12:59 PM.
11-09-2011, 01:07 PM
#89
Banned
i started a thread about mine in the Kryptonite section, guess I can put it up here also.
I went as cheap as I could with mine. All told I have $78 in it, not counting the welder of course. Bought the cheapest engine stand that harbor frieght had in stock, a square tongue jack from HF, and some 1x1 1/2" square steel tubing. used the measurements that someone else posted in this thread. Took a total of about 2 hours to completely assemble. I welded the fork on mine at a slight reaward angle, so when the weight of the drive is on it, it is just about level. The whole upper assembly is removable by pulling a pin out.
I am considering putting pneumatic wheels on it, but right now, it works perfectly.
If you have never used a stand to R/R a drive, I owuld highly recommend it. I can install my drive with the ITS shaft in under 5 minutes, and that is including the time it takes to tighten all six nuts. It is fantastic.
I went as cheap as I could with mine. All told I have $78 in it, not counting the welder of course. Bought the cheapest engine stand that harbor frieght had in stock, a square tongue jack from HF, and some 1x1 1/2" square steel tubing. used the measurements that someone else posted in this thread. Took a total of about 2 hours to completely assemble. I welded the fork on mine at a slight reaward angle, so when the weight of the drive is on it, it is just about level. The whole upper assembly is removable by pulling a pin out.
I am considering putting pneumatic wheels on it, but right now, it works perfectly.
If you have never used a stand to R/R a drive, I owuld highly recommend it. I can install my drive with the ITS shaft in under 5 minutes, and that is including the time it takes to tighten all six nuts. It is fantastic.
ROCK ON !!!!!!!!!!!

ITS A SKATER NATION !!!!!!!!!!!!!!!!!!!!!


