

Transom/Stringer Replacement
 10-03-2007, 01:09 PM
#51
Registered
Join Date: Jan 2007
Location: SW Ohio
Posts: 272
Likes: 0
Received 0 Likes
on
0 Posts
mtnrat, all true, and if you did ever decide to sell your boat the composite is a selling point to a lot of people. The cost of the composite is higher than wood, but what you replaced on your boat amounted to basically the entire structure. If done right with marine plywood vs the Coosa, the cost difference really isn't as drastic as it might seem. When I figured out the materials I'm getting ready to order for my Stinger, the cost difference between the two was about 35% if I used a quality marine plywood vs the composite. The fact that I didn't have to laminate the transom from two pieces of 3/4 ply made the difference worth it to me.
Audiofn is right about wood being installed properly shouldn't rot, but, if we look at the threads in this site there are tons of guys that put in new transoms, stringers, bulkheads, etc. on boats that shouldn't have been rotted. Some may be because that's just how the company made them originally, and some are from neglect. In any case, there are probably as many in the age range of my boat that have been repaired as have not.
Audiofn is right about wood being installed properly shouldn't rot, but, if we look at the threads in this site there are tons of guys that put in new transoms, stringers, bulkheads, etc. on boats that shouldn't have been rotted. Some may be because that's just how the company made them originally, and some are from neglect. In any case, there are probably as many in the age range of my boat that have been repaired as have not.
 10-03-2007, 02:48 PM
#52
Registered
Join Date: Sep 2006
Posts: 29
Likes: 0
Received 0 Likes
on
0 Posts
I agree, as mine is an 1981 and almost every boat I get in of the same vintage and type need work, whether the owner knows it or not. Mine only had a small 4" in diameter soft spot. When I cut that out I saw fungus growing on the stringers. I then started cutting bigger and bigger. The floor was the strongest part. The stringers looked like this:
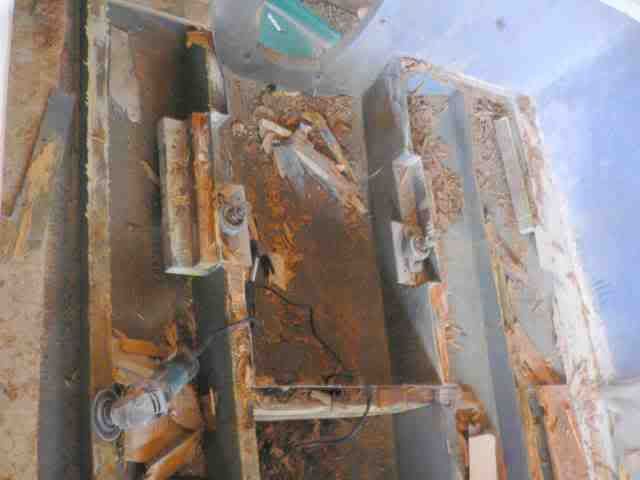
The transom was pretty much ok but since I was there it was very easy to replace. Some parts of the stringers were just powder and mush. There was no indication that this was happening, except for that small soft spot in the floor. What started out as just replacing a part of the floor turned into a full restoration.LOL
I had never worked on a boat before, but found that thankfully, all the info one needs to do the job is on the internet.
10-03-2007, 05:24 PM
#53
Registered
Join Date: Apr 2004
Location: New Jersey
Posts: 1,007
Likes: 0
Received 0 Likes
on
0 Posts
Great job, mtnrat! Thanks for posting pics & taking the time to explain your process and materials. Like previously stated, your rig is an inspiration to get my arse in gear & start my own.
Thanks!
Dan
Thanks!
Dan
10-04-2007, 12:33 AM
#54
Registered
Thread Starter
Join Date: Sep 2004
Location: Sydney, Australia
Posts: 209
Likes: 0
Received 0 Likes
on
0 Posts
Yeah thanks Mtnrat. What was the tool you used for most of the cutting work? Was it the small angle pictured?
Can you elaborate on the procedure for coosa including the resins used?
Thanks
Can you elaborate on the procedure for coosa including the resins used?
Thanks
10-05-2007, 01:50 AM
#55
Registered
Join Date: Sep 2006
Posts: 29
Likes: 0
Received 0 Likes
on
0 Posts
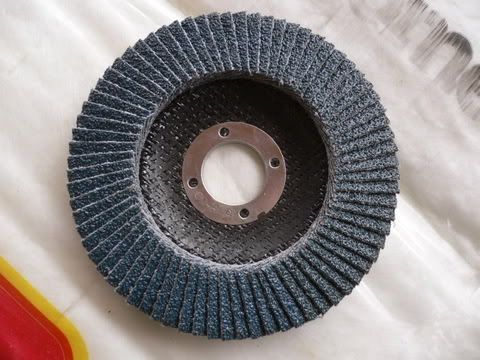
I used alot of these 40 grit.
Took the hull down to the original hull.
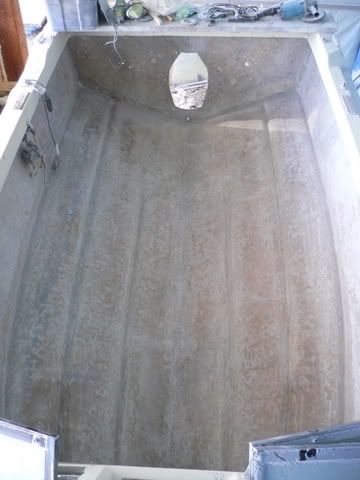
Go slow. I went through three 4/1/2" angle grinders and one 7" angle grinder. That does not include the 4 1/2" and 7" that still work. Did not seem to matter if they were quality ones or not they burnt out in about the same time. This boat had been "repaired" before but a terrible job was done and there was alot of extra resin that needed to be removed.
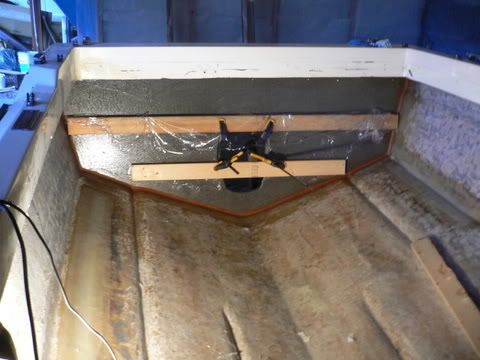
For the transom I actually used a chainsaw to help get down to the hull. I knew the transom was 1 5/8 -1 3/4" thick so I measured the chainsaw tip 1 1/2" in at the tip, marked lines on the chainsaw tip with a felt pen, and cut a grid 2" grid over the whole transom and then chiseled the material out. Finished with the grinder to the skin. Put in a layer of biax and epoxy to the skin. Let that cure then slathered on a layer of epoxy and thixotropics and pressed on the transom. Make sure there is a gap between the transom material and the hull. About 1/8" to 1/4" seems good.
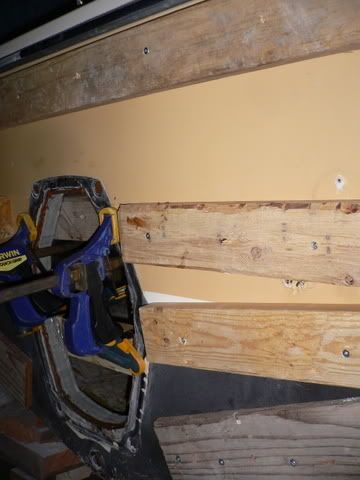
Clamped from the inside:
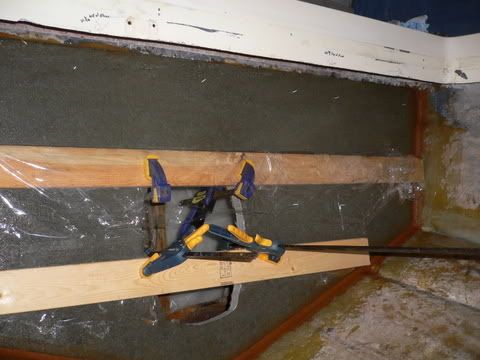
Form the outside, Clamped and screwed: You can see the screws going right through the transom in the previous picture. Must get it relatively tight but not so tight that you squeeze out all the epoxy mixture. It is important that the epoxy mixture is not squeezed too thin. Too thin and you lose strength. Not like a wood glue joint at all.
Make a good fillet and make sure that the thixotropic agent gets all the way into the gap between the transom and the hull. This gets a little messy but using an empty caulking tube and caulking gun helps. If you cannot det that then cut the corner off a super heavy duty green garbage bag and use it like a bakers squeeze bag.
to be continued....
Took the hull down to the original hull.
Go slow. I went through three 4/1/2" angle grinders and one 7" angle grinder. That does not include the 4 1/2" and 7" that still work. Did not seem to matter if they were quality ones or not they burnt out in about the same time. This boat had been "repaired" before but a terrible job was done and there was alot of extra resin that needed to be removed.
For the transom I actually used a chainsaw to help get down to the hull. I knew the transom was 1 5/8 -1 3/4" thick so I measured the chainsaw tip 1 1/2" in at the tip, marked lines on the chainsaw tip with a felt pen, and cut a grid 2" grid over the whole transom and then chiseled the material out. Finished with the grinder to the skin. Put in a layer of biax and epoxy to the skin. Let that cure then slathered on a layer of epoxy and thixotropics and pressed on the transom. Make sure there is a gap between the transom material and the hull. About 1/8" to 1/4" seems good.
Clamped from the inside:
Form the outside, Clamped and screwed: You can see the screws going right through the transom in the previous picture. Must get it relatively tight but not so tight that you squeeze out all the epoxy mixture. It is important that the epoxy mixture is not squeezed too thin. Too thin and you lose strength. Not like a wood glue joint at all.
Make a good fillet and make sure that the thixotropic agent gets all the way into the gap between the transom and the hull. This gets a little messy but using an empty caulking tube and caulking gun helps. If you cannot det that then cut the corner off a super heavy duty green garbage bag and use it like a bakers squeeze bag.
to be continued....
Last edited by mtnrat; 10-05-2007 at 02:05 AM.
10-05-2007, 06:27 AM
#56
Charter Member #232
What did you do to sapport that boat once you took out all those stringers and bulkheads at once? I hope that the boat did nto loose its shape.
__________________
Put your best foot forward!
Put your best foot forward!
 10-08-2007, 02:12 AM
#59
Registered
Thread Starter
Join Date: Sep 2004
Location: Sydney, Australia
Posts: 209
Likes: 0
Received 0 Likes
on
0 Posts
Yeah good one Mtnrat. Looks fantastic & very neatly performed. I'm sure mine will look messier. Keep the project log open & contribute as you near completion. It makes very interesting reading. Great stuff.

