

Infusion explained
 04-20-2018, 07:06 PM
#1
Registered
Thread Starter
I have been doing infusion for over 10 years. I've infused hundreds of parts large and small. I've been asked what is the difference between infusion and vacuum bagging. Essentially, vacuum bagging is used mostly for installing core onto a fiberglass laminate. By vacuum bagging it you apply equal pressure to the core pressing it into the bonding material. The amount of pressure is determined by the inches of mercury that you achieve. Resin infusion is where you load all the fiberglass material and core dry into the mold, put it under vacuum and infuse resin into the part. Its a very simple but complicated process.
How does resin infusion work? I've read about it on the internet, but not in a very long time. Here's my version. I'm going to tell you how I build a 46 sport fish hull with just myself (I'm 63) and 2 helpers. I'll show you the photos and explain how its all done. The reason why I infuse everything is because its easier, makes a perfect part and I only need a couple of people to do it. With infusion there is only one laminate with multiple layers of fiberglass and core. With a typical wet lay up there are multiple laminates that all have secondary bonding. The bond between laminates is determined by how well the previous laminate has been prepped. Another words, grinding the fiberglass. Who grinds the fiberglass? The lowest paid guy. Its the most critical part of boat building. We have all heard of delamination. Essentially, its because the laminate was not prepped properly. Its impossible to have that with resin infusion. More to come.
How does resin infusion work? I've read about it on the internet, but not in a very long time. Here's my version. I'm going to tell you how I build a 46 sport fish hull with just myself (I'm 63) and 2 helpers. I'll show you the photos and explain how its all done. The reason why I infuse everything is because its easier, makes a perfect part and I only need a couple of people to do it. With infusion there is only one laminate with multiple layers of fiberglass and core. With a typical wet lay up there are multiple laminates that all have secondary bonding. The bond between laminates is determined by how well the previous laminate has been prepped. Another words, grinding the fiberglass. Who grinds the fiberglass? The lowest paid guy. Its the most critical part of boat building. We have all heard of delamination. Essentially, its because the laminate was not prepped properly. Its impossible to have that with resin infusion. More to come.
 04-20-2018, 07:58 PM
#2
Registered
SUBSCRIBED !
very easily could be the best technical thread in a long while
very easily could be the best technical thread in a long while
04-22-2018, 09:10 AM
#4
Registered
Thread Starter
With resin infusion all of the laminates are loaded into the mold dry along with the core. The exception would be if you're building a molded part. In that case you would gel the mold and skin it. On a hull mold sides I'll skin it with 3 oz.of mat to prevent print through. The bottom I don't care about so I use 1 1\2 mat. On bulkheads, soles and parts like that I don't skin or gel coat. I'll also infuse stringers into the boats. On the 46 I don't infuse it at the same time because the measurements are to critical and if they move at all I'm screwed. On a center console, I'll infuse the bulkheads and stringers all at the same time with the hull. Its so much easier to do at the same time. Installing stringers by hand after is difficult and a pain. Also you get a much better product if its done all together.
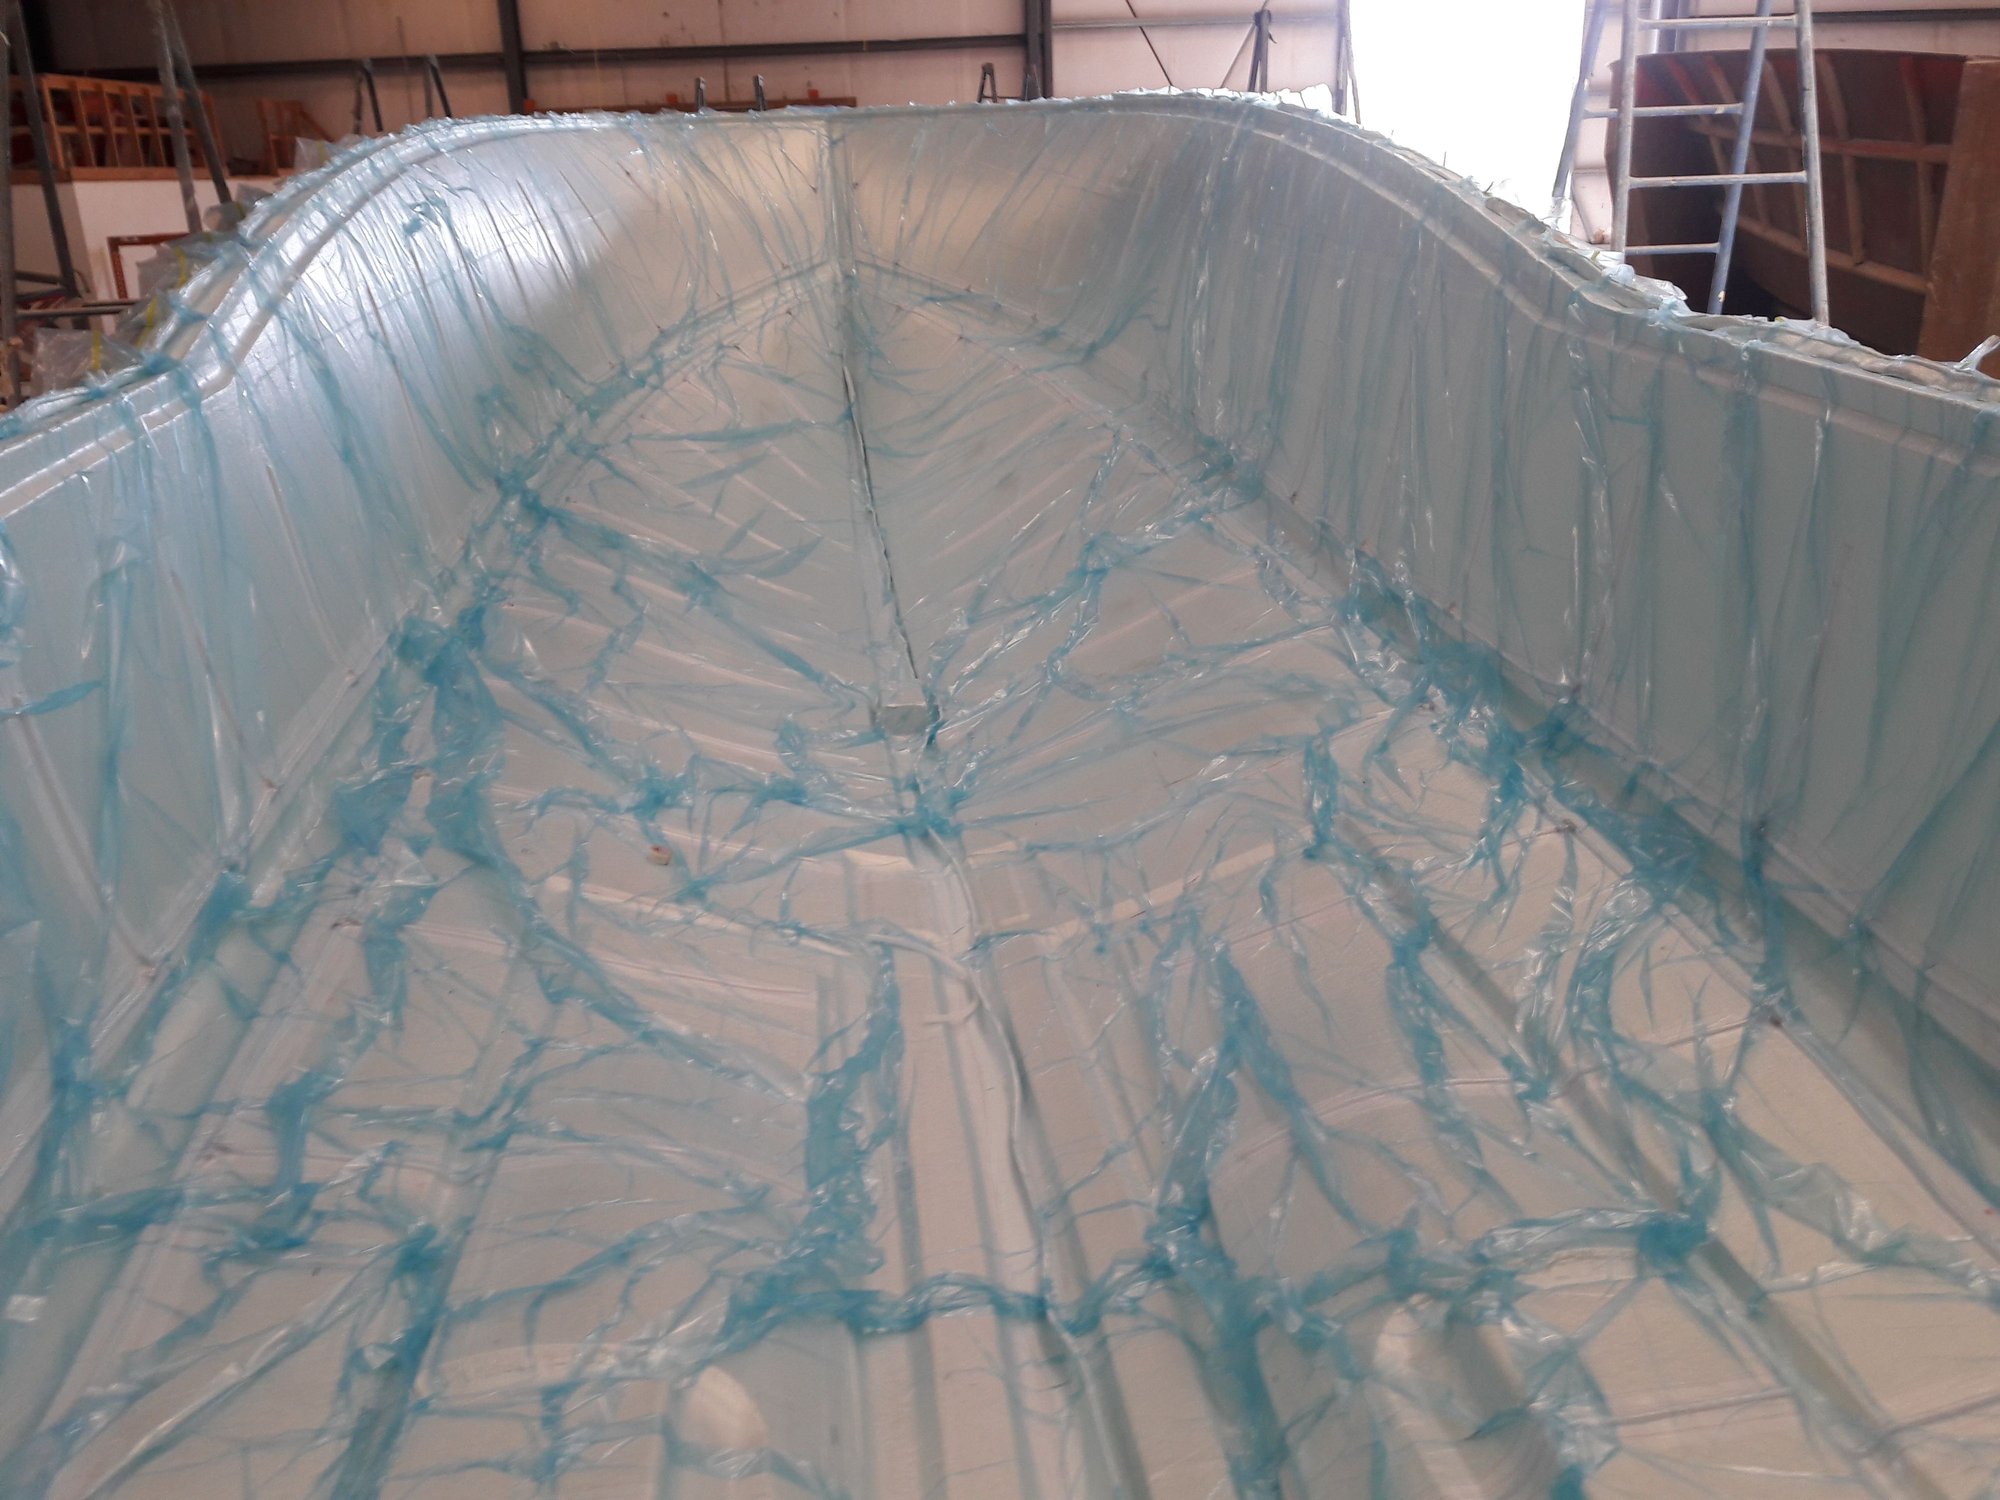
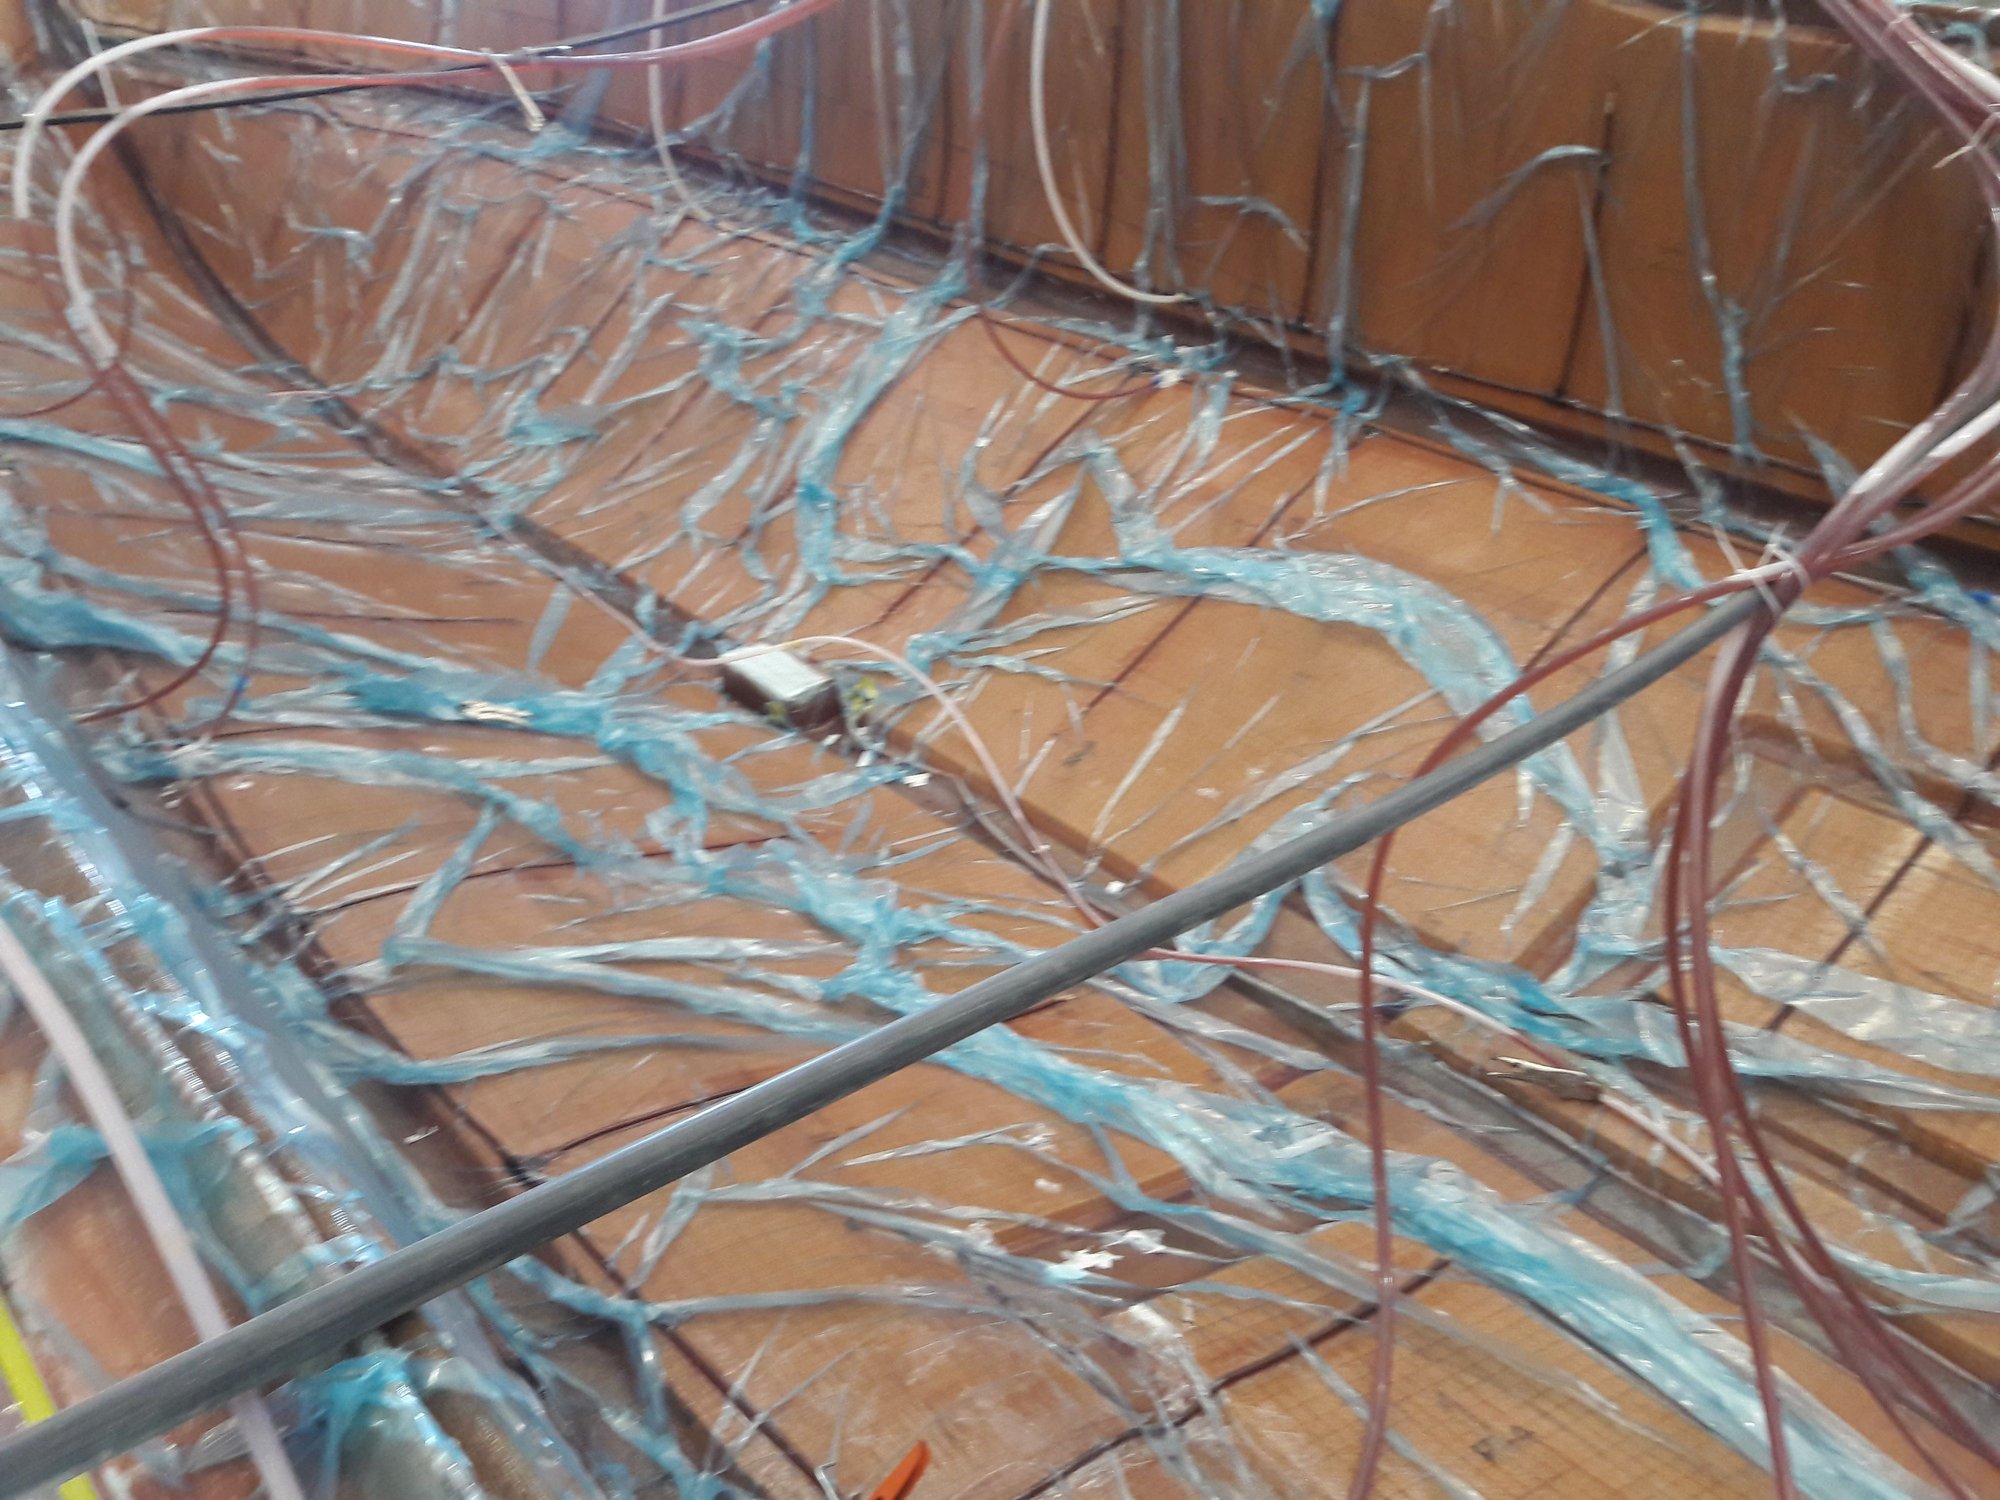
Here's how infusion works. Once the glass and core is loaded, you add feed lines and vacuum lines. The vacuum lines are located in different positions depending upon what you are infusing and also how the feed lines are positioned, Keep in mind that the vacuum lines are used to manipulate the direction of flow of the resin.They are always on the flange. If I'm infusing the stringers at the same time then they are on the top of the stringers. Here the reason why. The stringers are sitting on top of the hull fiberglass. Without vacuum lines on top, the resin will flow under the stringers but not up the stringers. There are other ways to do this but it would only confuse people if I go into other ways to do it. I'm just trying to explain the basics of this. There are different ways to make vacuum lines. Many people do it the same way that I do. I use scrap fiberglass that I cut at least 8 inches wide and 10 feet long. You use 1\2 inch spiral with a 1\2 inch T. The T will be in the middle of the vacuum line. The spiral is layed in the middle of the glass, sprayed with 3M glue (red can) and folded over tight. Now you repeat this for how ever many you need. For this explanation we are just putting them on the flange of the hull. When I include the photos I'll include more detail.
Next the feed lines are installed. There is a material for infusion called Inca. This is a flat 4 inch wide material that resin flows through. They can run the full length of the hull and are usually about 30 inches apart. So if we start at the keel we are infusing out towards the hull sides. You open the keel first let the resin flow to the next feed line and then open that one. You keep doing this until the hull is filled. The important part is how many feed lies you use. I use 5\8 feed lines. You always want to have to many not enough. keep in mind that the resin is going to gel at certain time. If you don't feed enough resin it can gel before the part is filled. I make 4x8 test panels so I know exactly what the flow rate will be. If you don't know this, you're probably going to fail. You can also use spiral as feed lines. I use both for different parts. You have to put peel ply under them to be able to remove them after the part is infused.
Once the feed lines and vacuum are installed the bag goes in. As a rule of thumb, the bag is usually 15% longer and wider than the part you are infusing. This can vary according to the part and experience. Being to big is better than being to small. If its to small you just wasted a very expensive bag and time. The bag is held own with tacky tape around the edge of the flange. You also use it to make pleats in the bag. The pleats assures that the bag lays flat everywhere. If it doesn't lay flat then you have whats called bridging. This will be an area that's filled with resin. Also the pleats take up the excess bag because its larger than the part. The bag doesn't just go into place. It has to be worked into place. You put a little vacuum on it, then move it into place. To much vacuum and it doesn't move. Once its in place you put a full vacuum on it. Full vacuum is 29 inches of mercury. You'll never get this in the beginning because there are always leaks. You'll pull 15 or 20 inches. Now you go around the bag, find the leaks in the flange and pleats and slowly the vacuum goes up. this can take hours, or longer. Once you reach 29, the vacuum is closed off to see whether it drops. If it drops there are still leaks. Ideally it should hold vacuum for at least 5 minutes before it starts to drop. it will probably drop immediately, meaning you still have leaks. There can be a leak in the bag somewhere. I always find them. Once you have full vacuum its ready to be infused. You cannot move the bag once its under vacuum. heres the reason why. When you have vacuum the atmosphere inside the bag has been removed. it creates a low pressure inside the bag. Outside the bag is a high pressure that wants to fill the void. So its pressing on the bag. The formula is 1/2 of the inches of mercury equals pounds of pressure per square inch. So at 29 we have 14.5 pounds of pressure per square inch. A square is foot is 12x12=144 square inches times 14.5 =2,088 pounds of pressure per square foot. This pressure compresses the laminates and core. This is the reason why you use less resin in the part.
How do we get the rein in. The feed lines all go into a 55 gallon drum that's been cut down for a hull or other large parts. Small parts can be a 5 gallon bucket. The resin is not sucked in from the vacuum. The outside atmosphere wants to fill the void left by the vacuum. The only way to fill the void is by pushing the resin through the feed line when its opened. The more feed lines the faster it fills. The vacuum keeps the bag tight. That's how it works. Very simple. I manipulate how fast and where the resin flows.
That's the basics. There are variations of all of this. next I'll show you every step of building a 46 foot hull. I'll start at the beginning with a bare hull mold. I'm sure a lot of people have never seen this before. Most people I show are amazed and think its pretty cool. I hope you do also.
04-22-2018, 09:28 AM
#5
Registered
Thread Starter
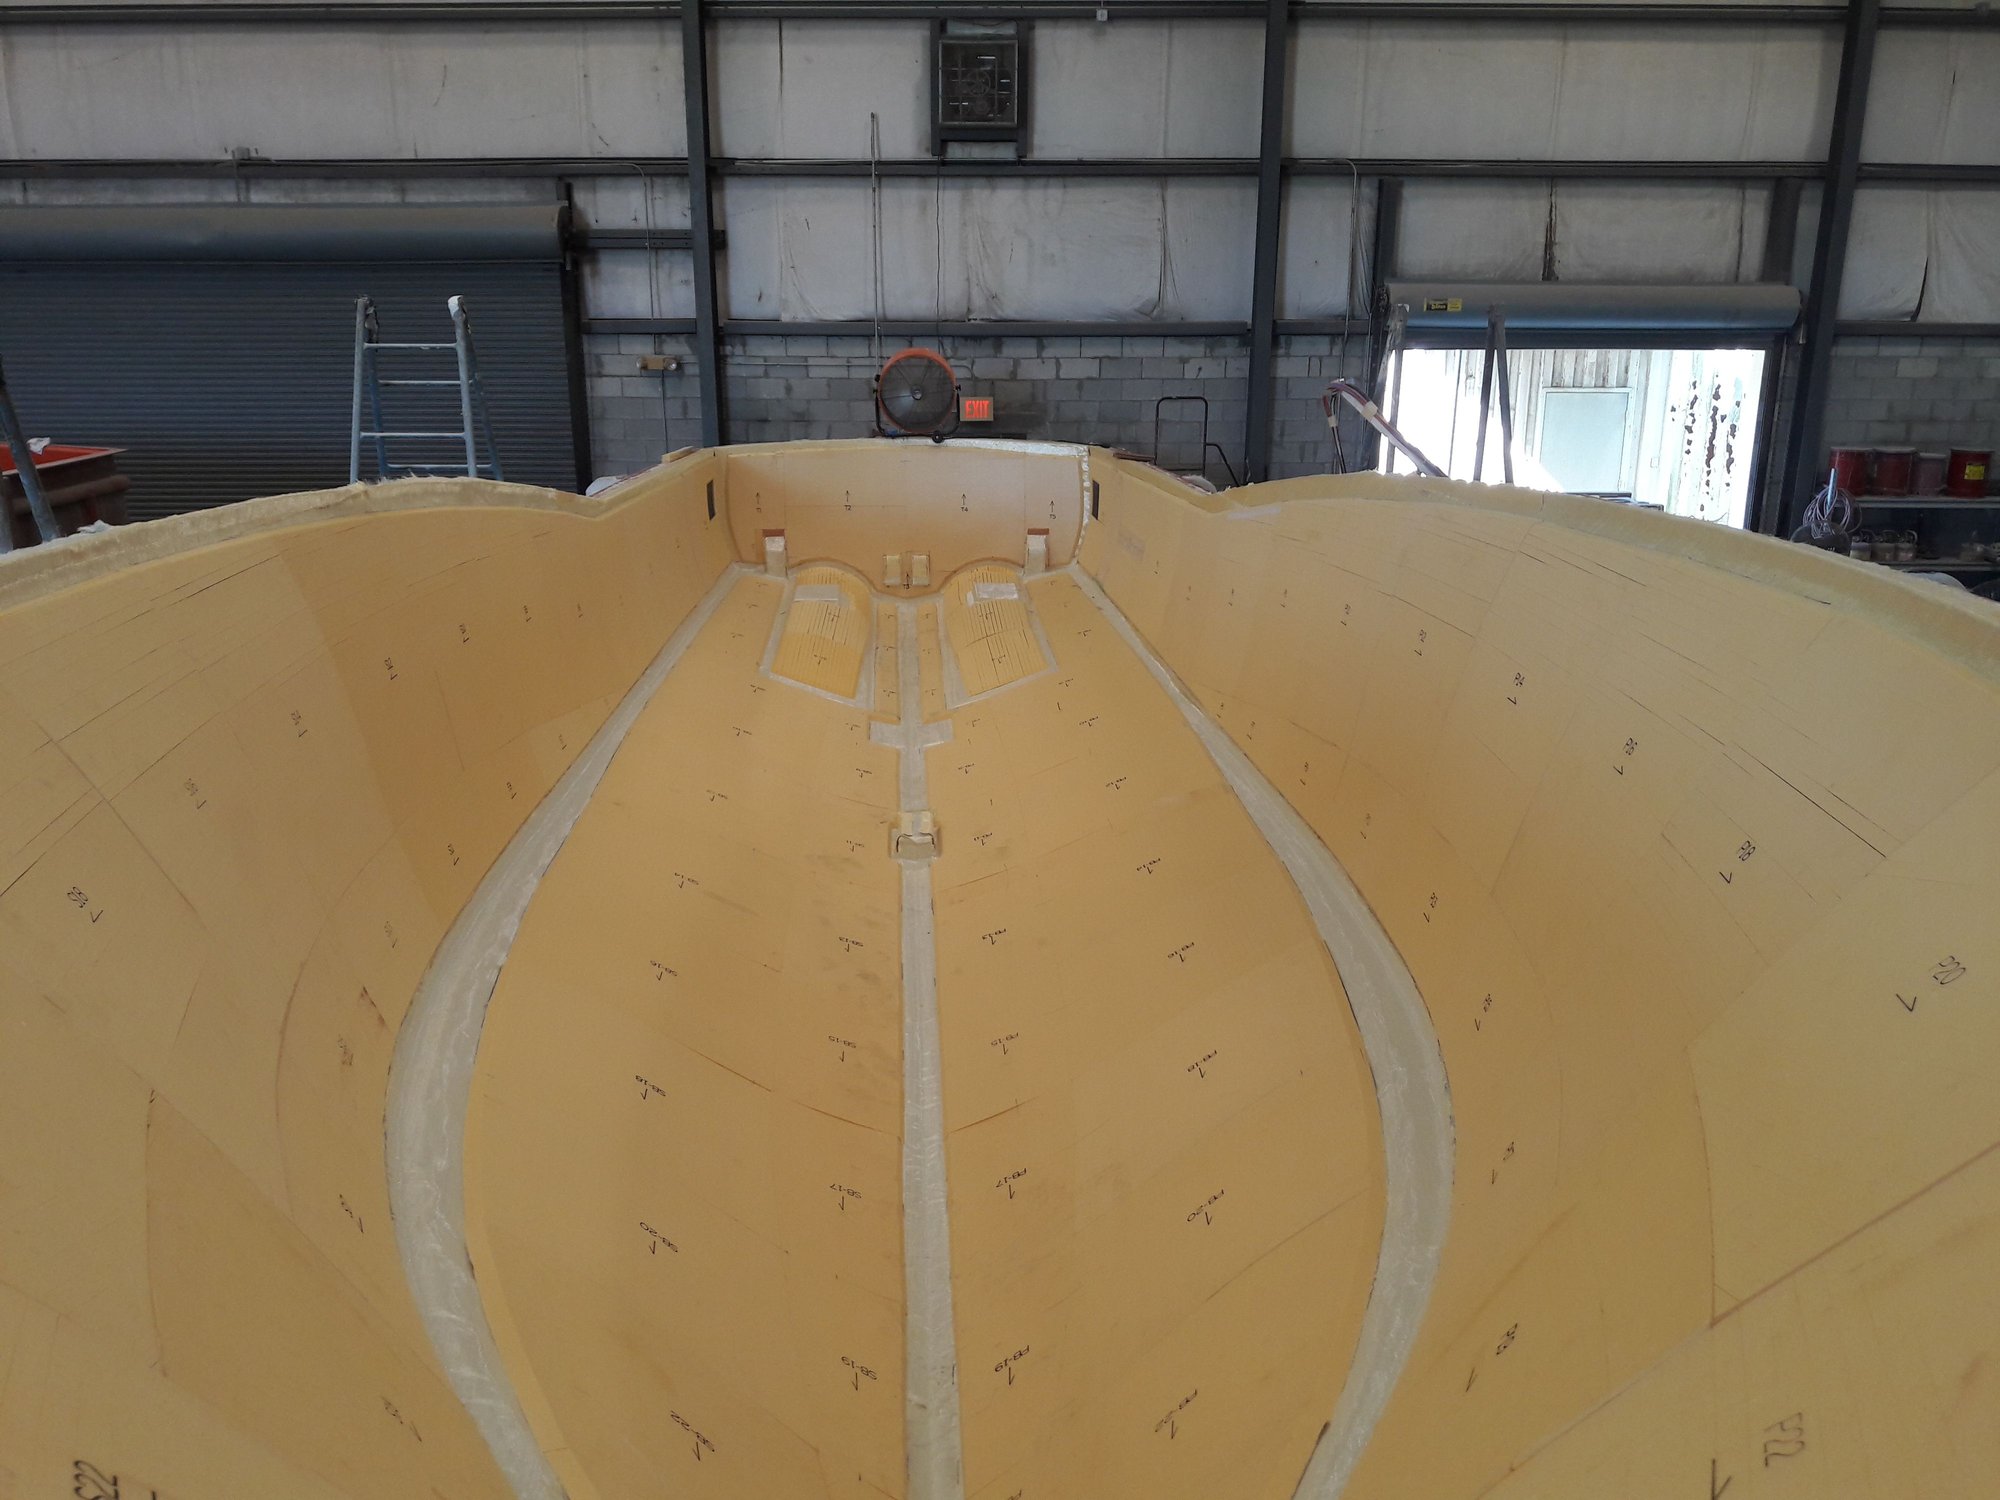
This gives you and idea of the size of the mold.
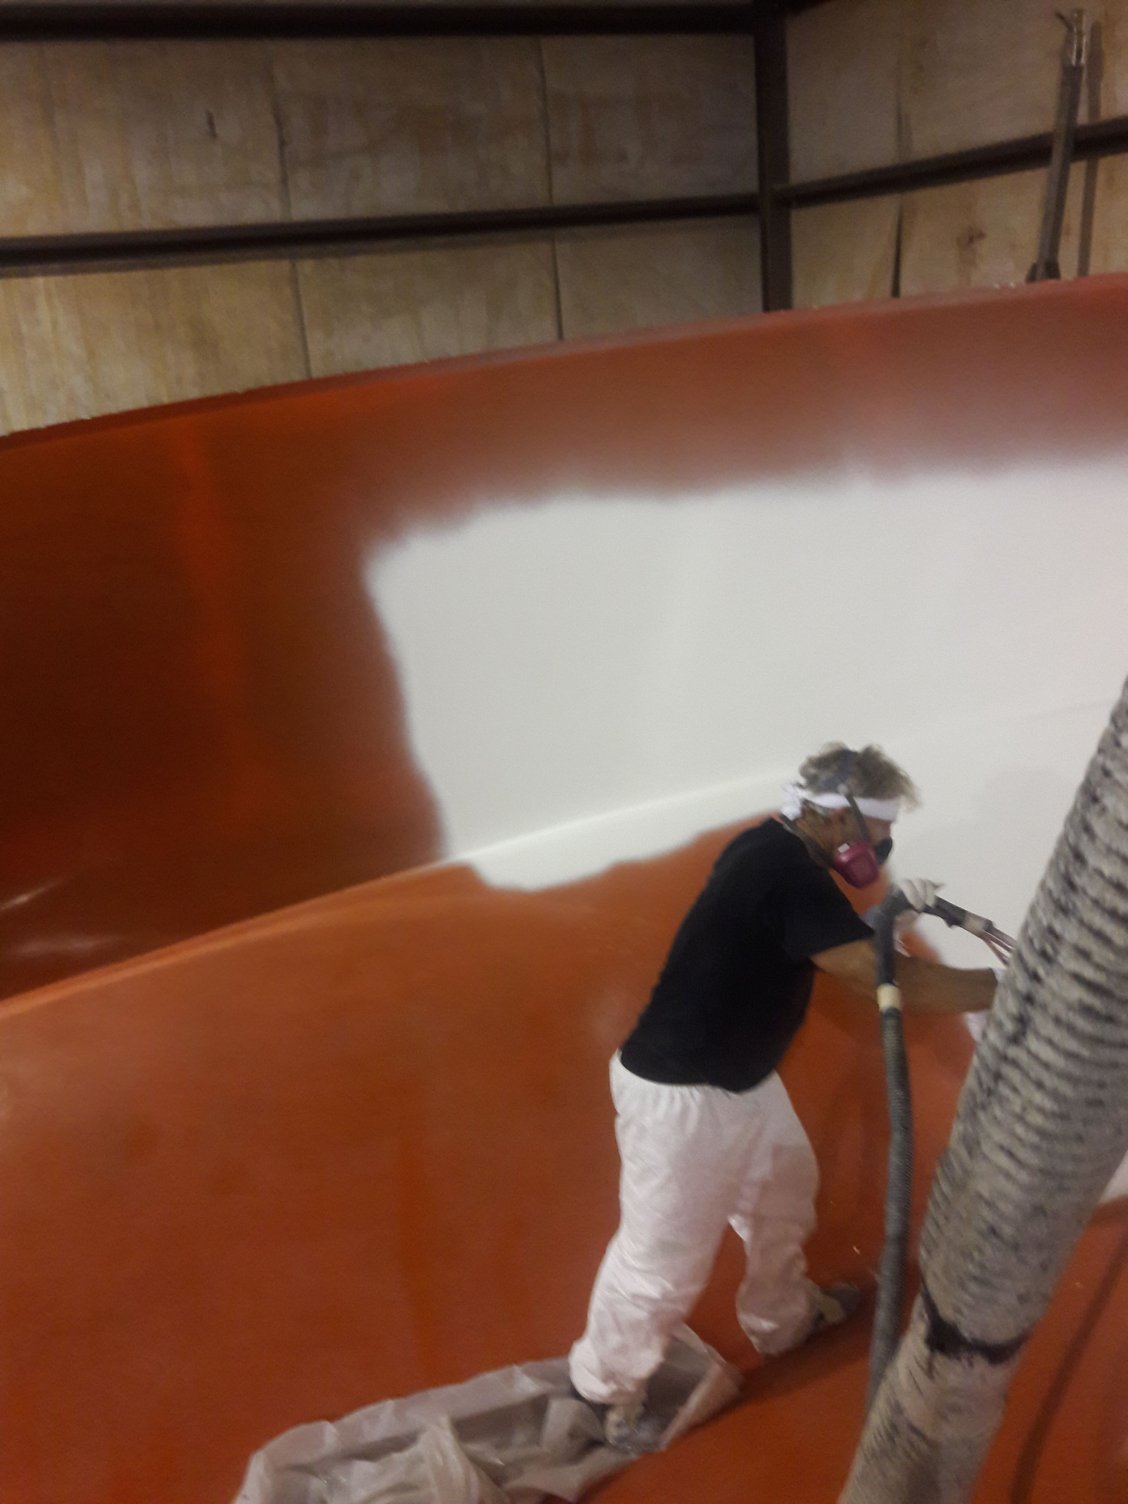
I spray the entire mold. It takes several hours. Not a fun job.
The bottom is skinned with 1\2 oz matt. Sides are 3 oz
I start with the mold that is waxed and prepped to be gel coated. We have a gel coat gun that I spray the mold with. Once the mold is sprayed. its skinned. The next step is to load the material.
04-22-2018, 10:46 AM
#6
Registered
Thread Starter
Glass, Kevlar and core
under vacuum
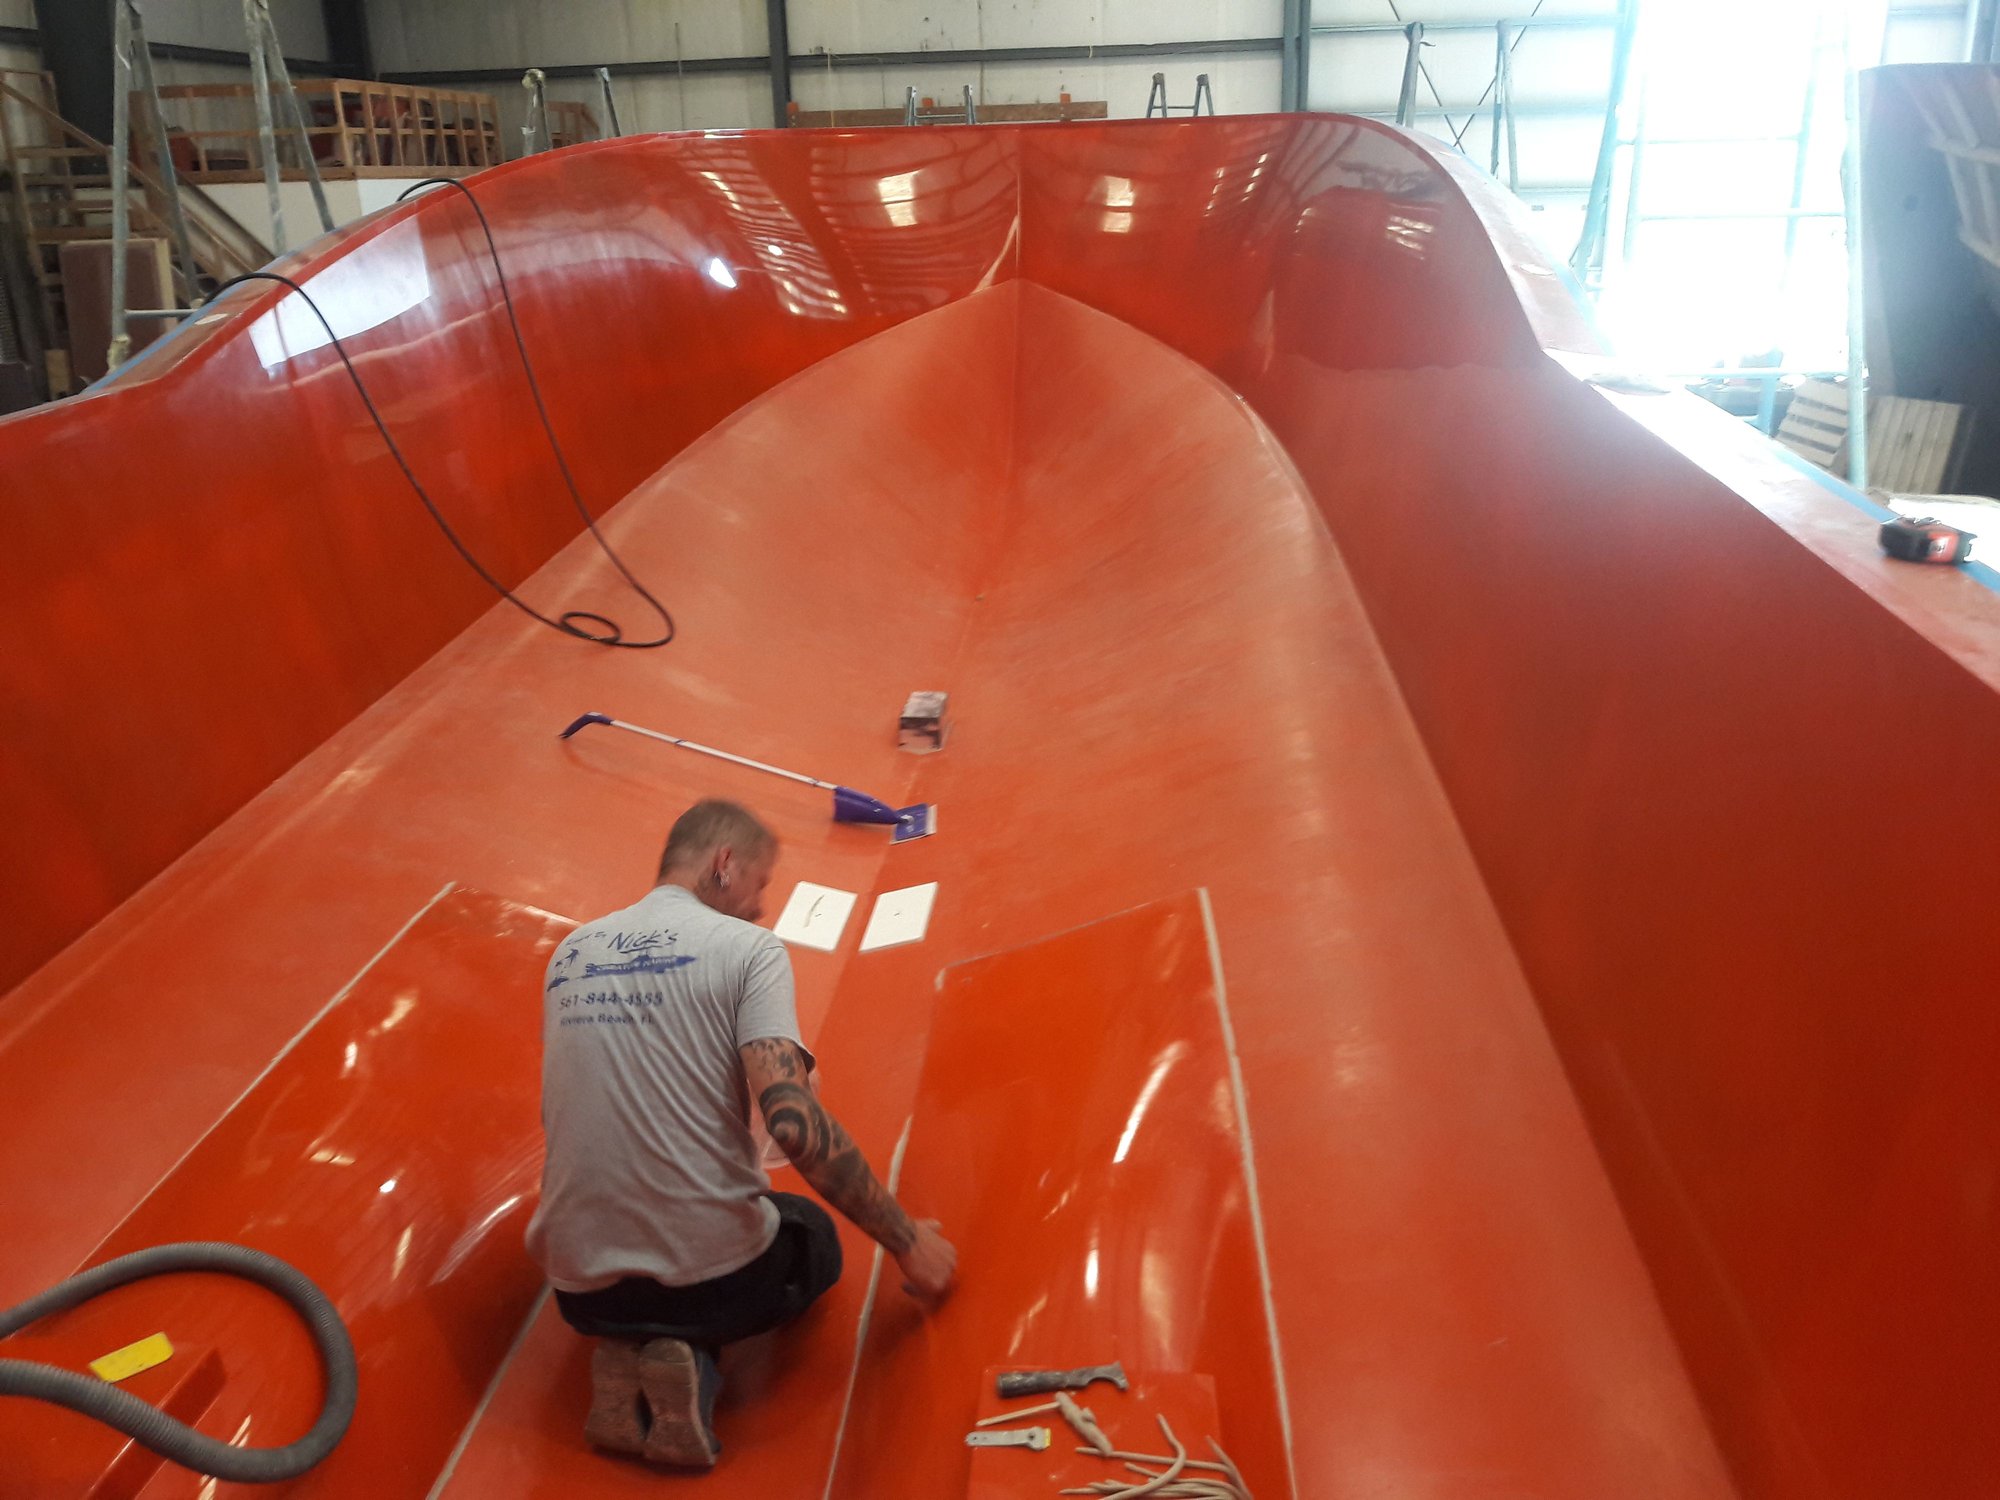
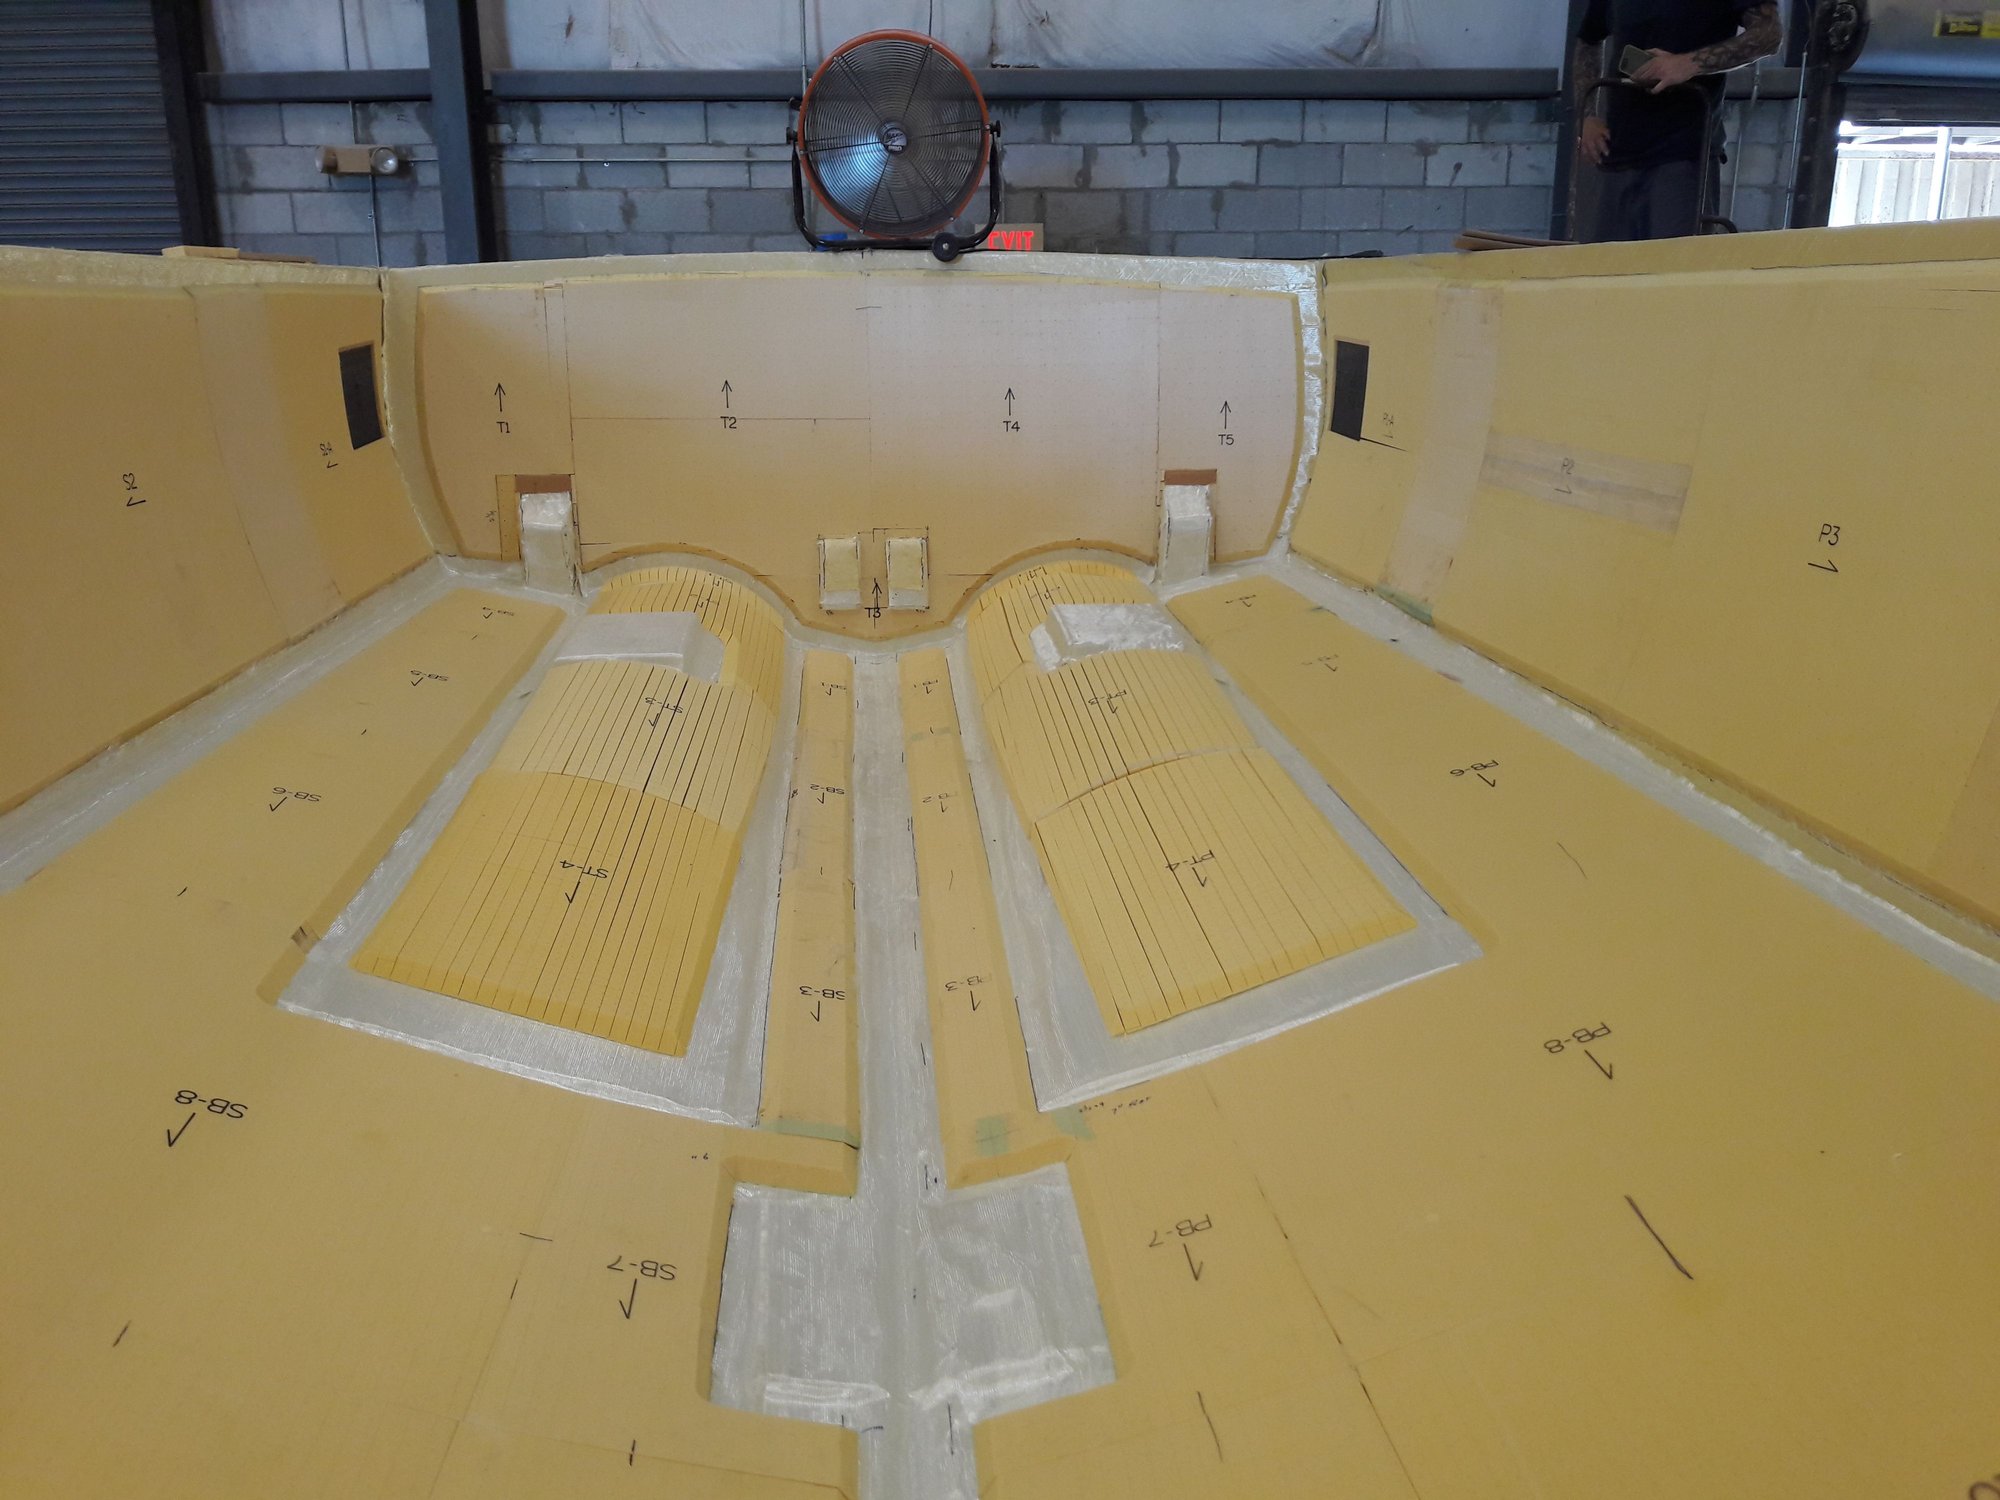
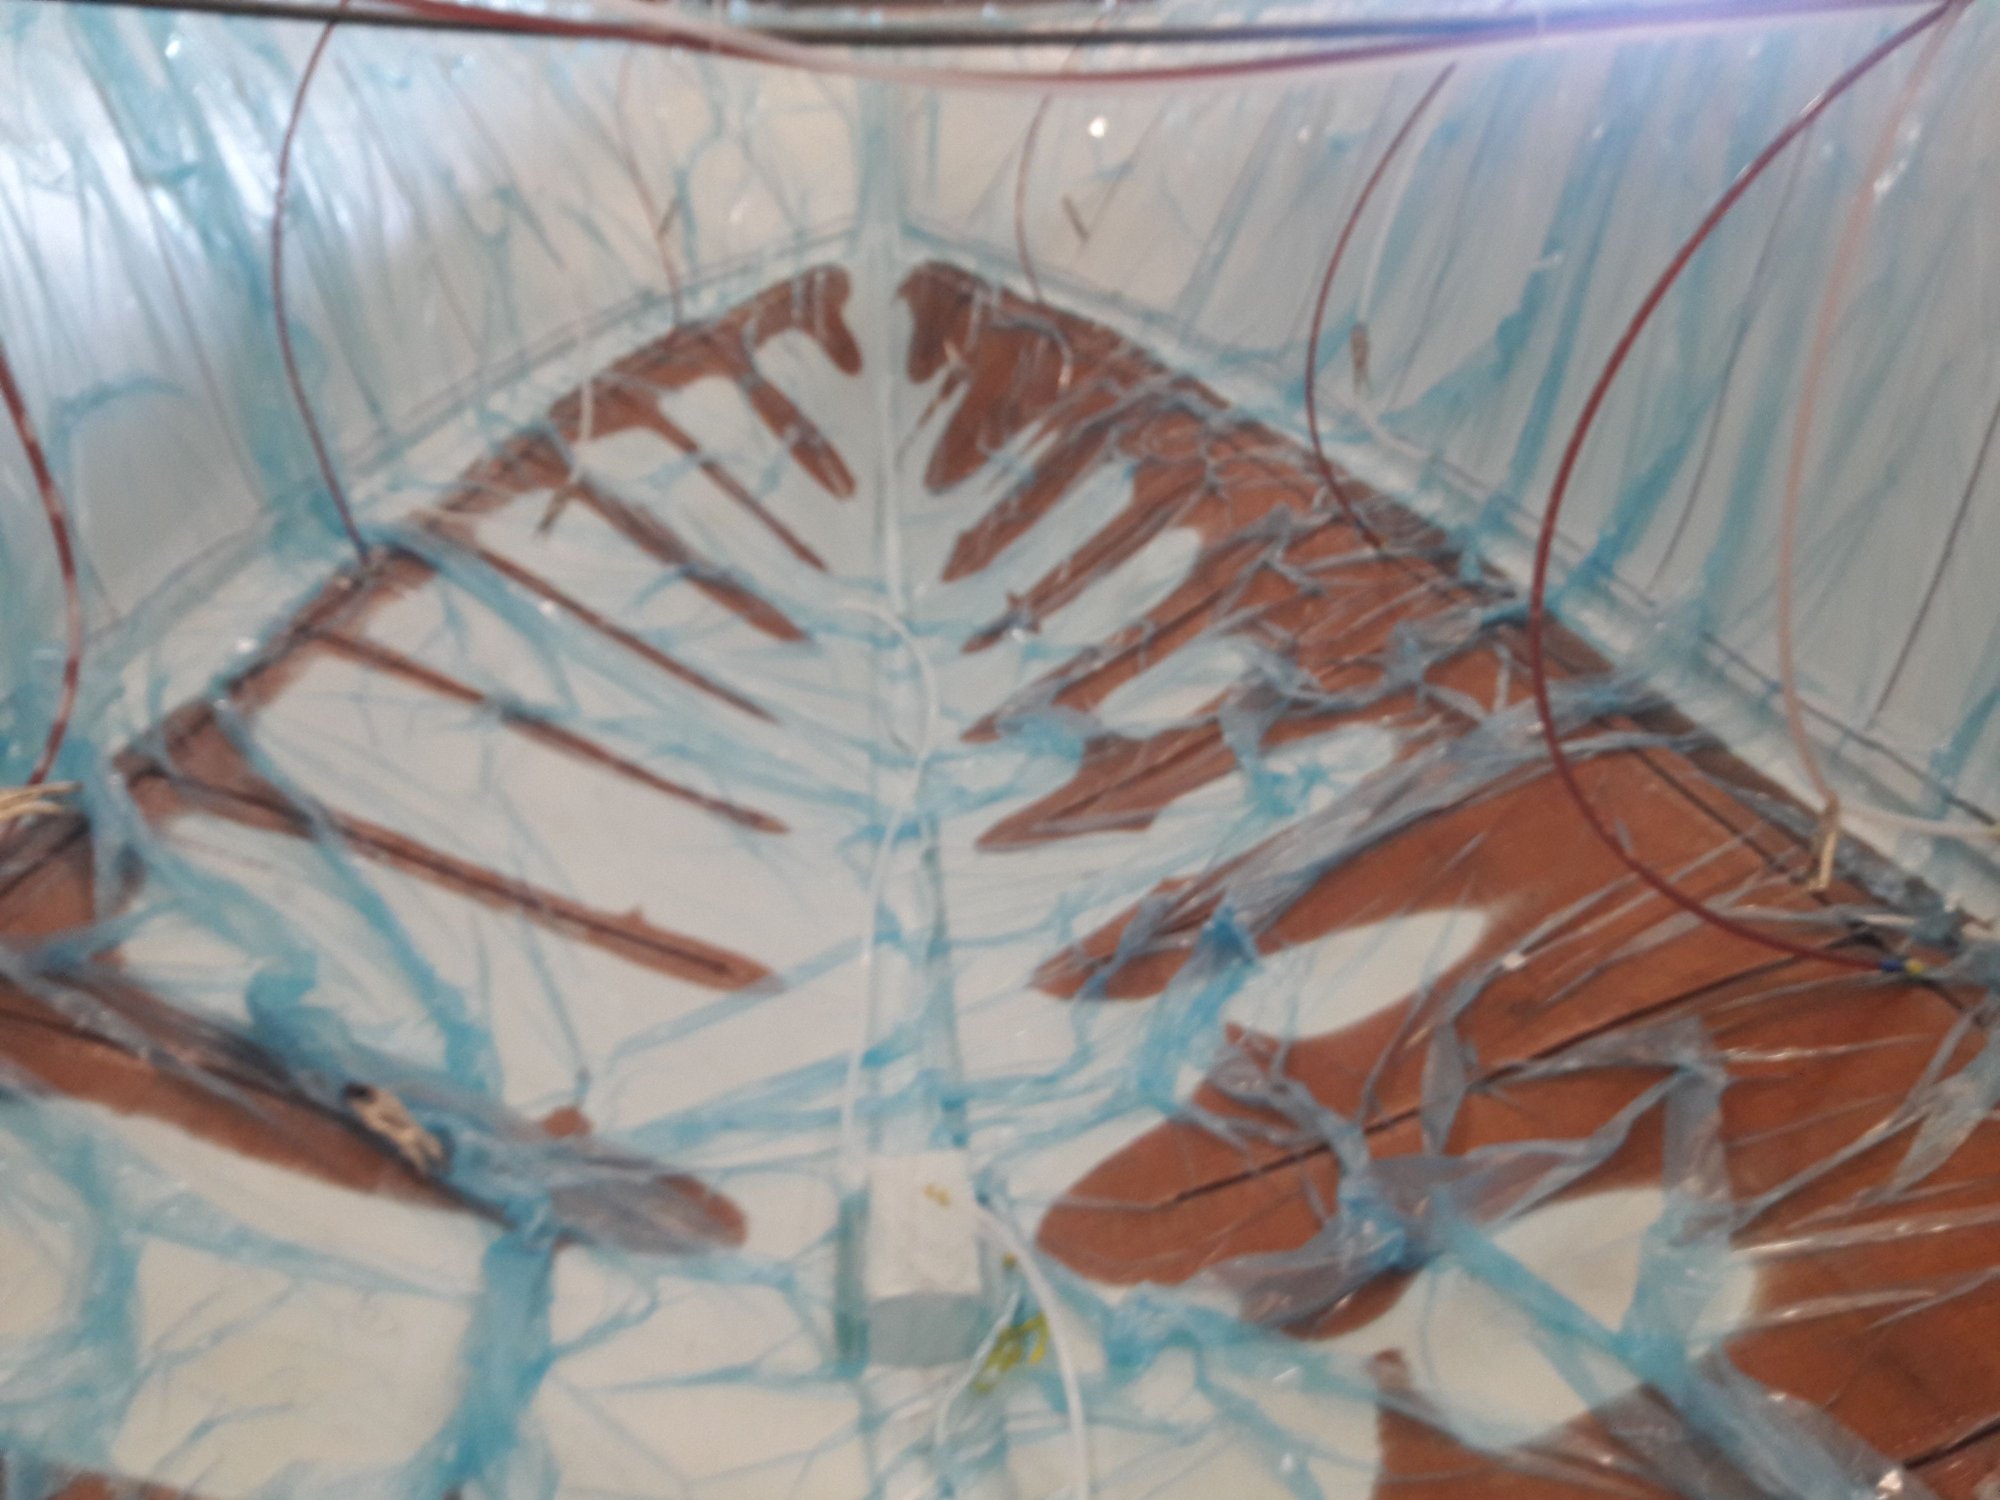
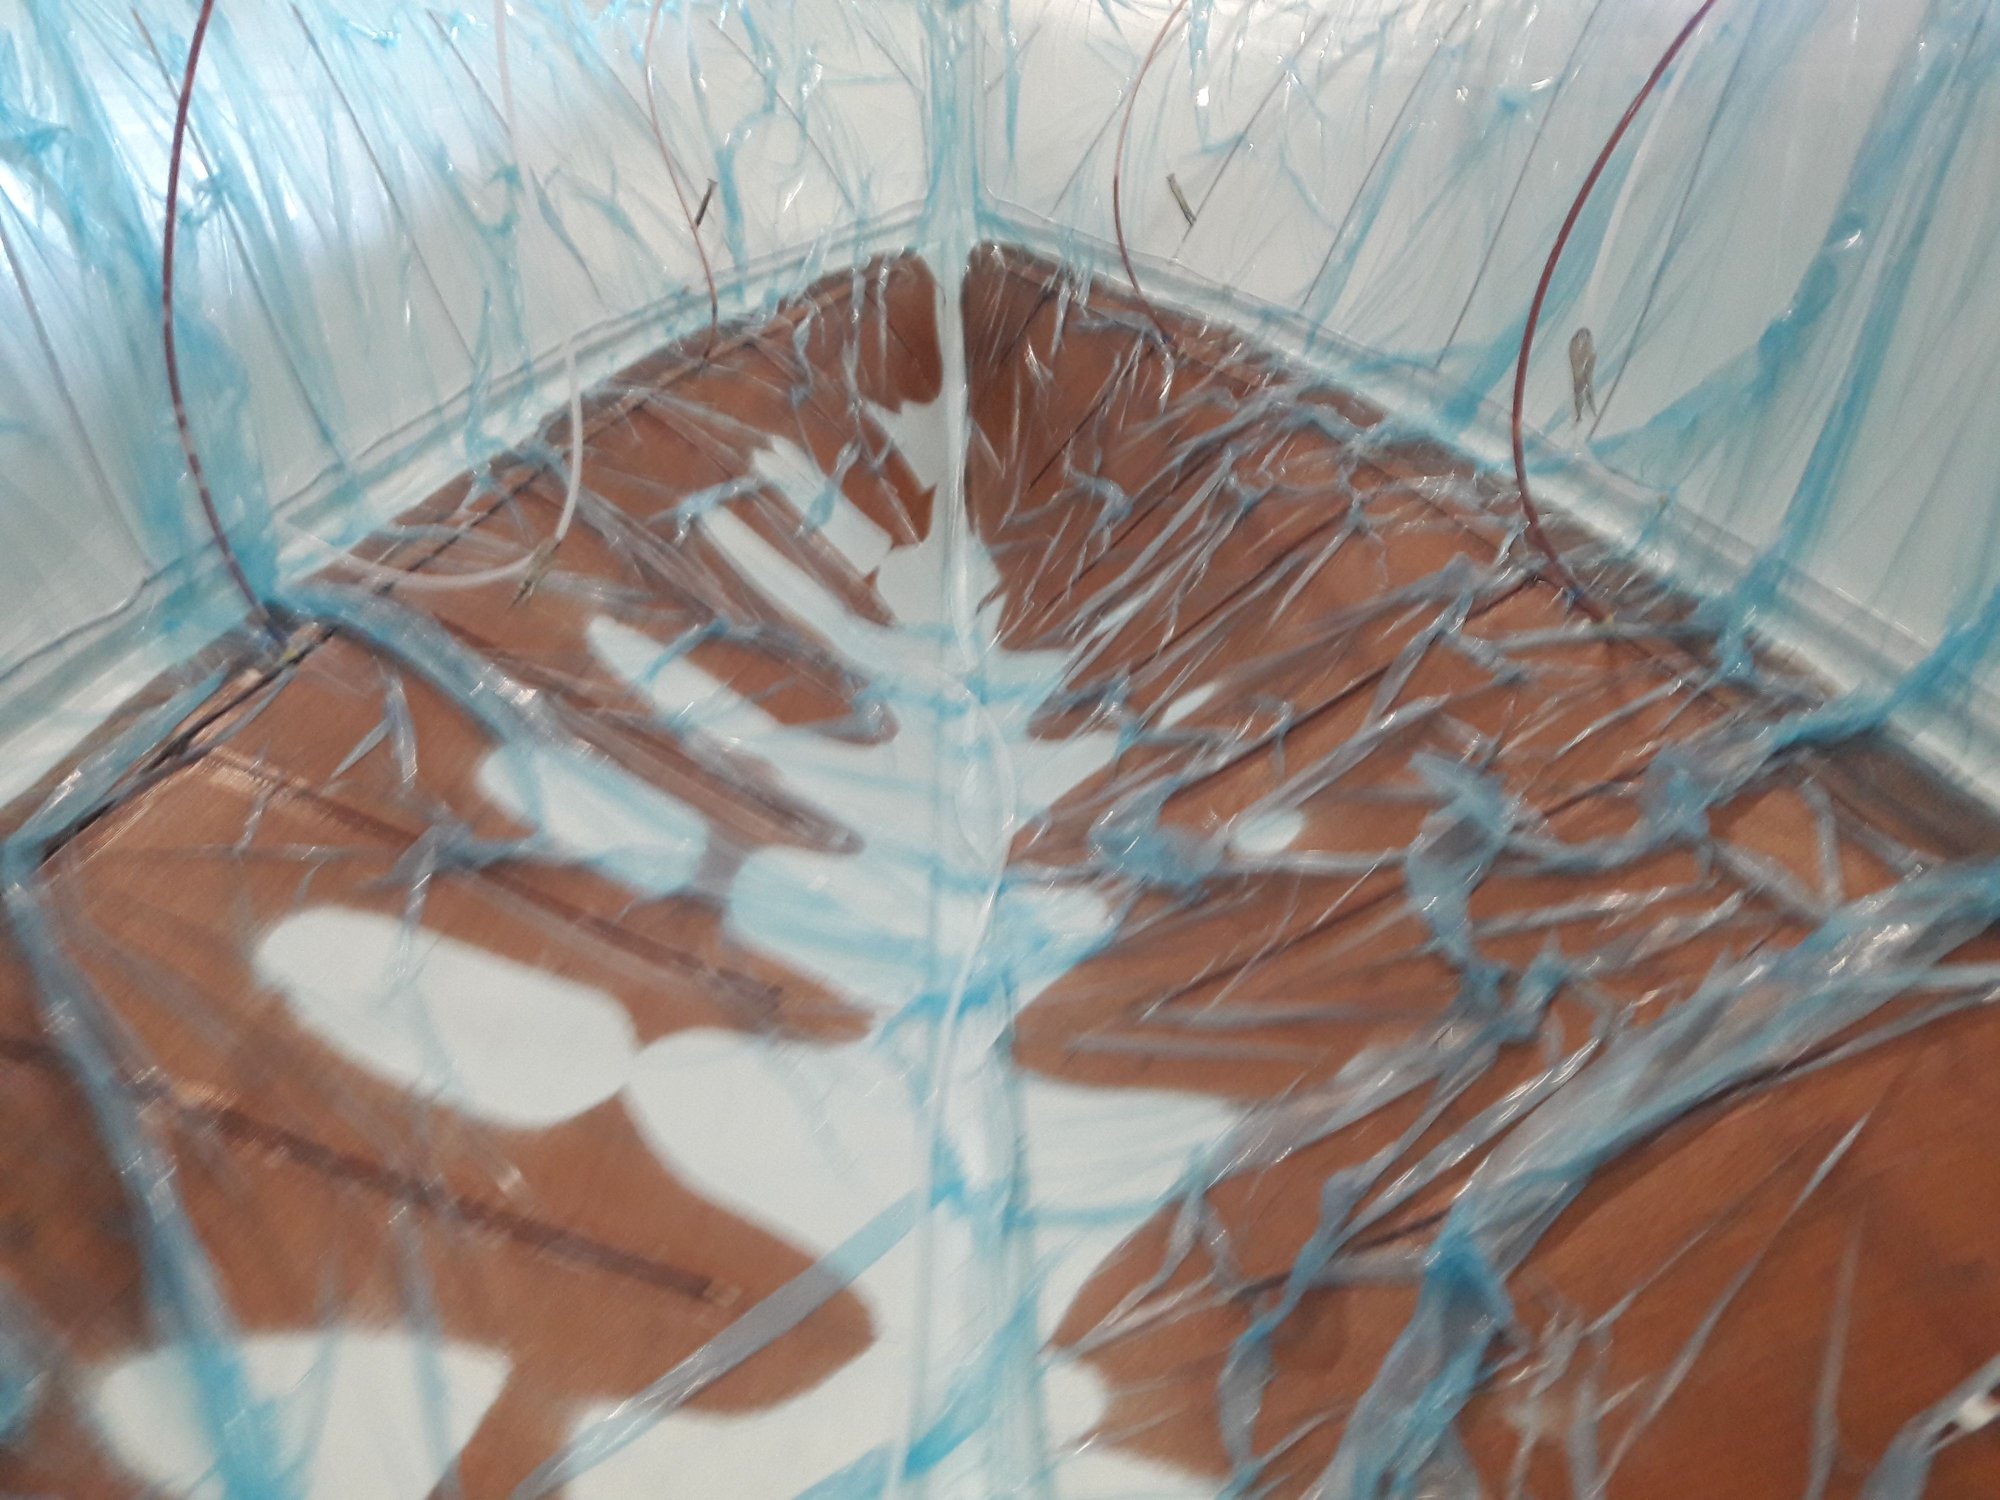
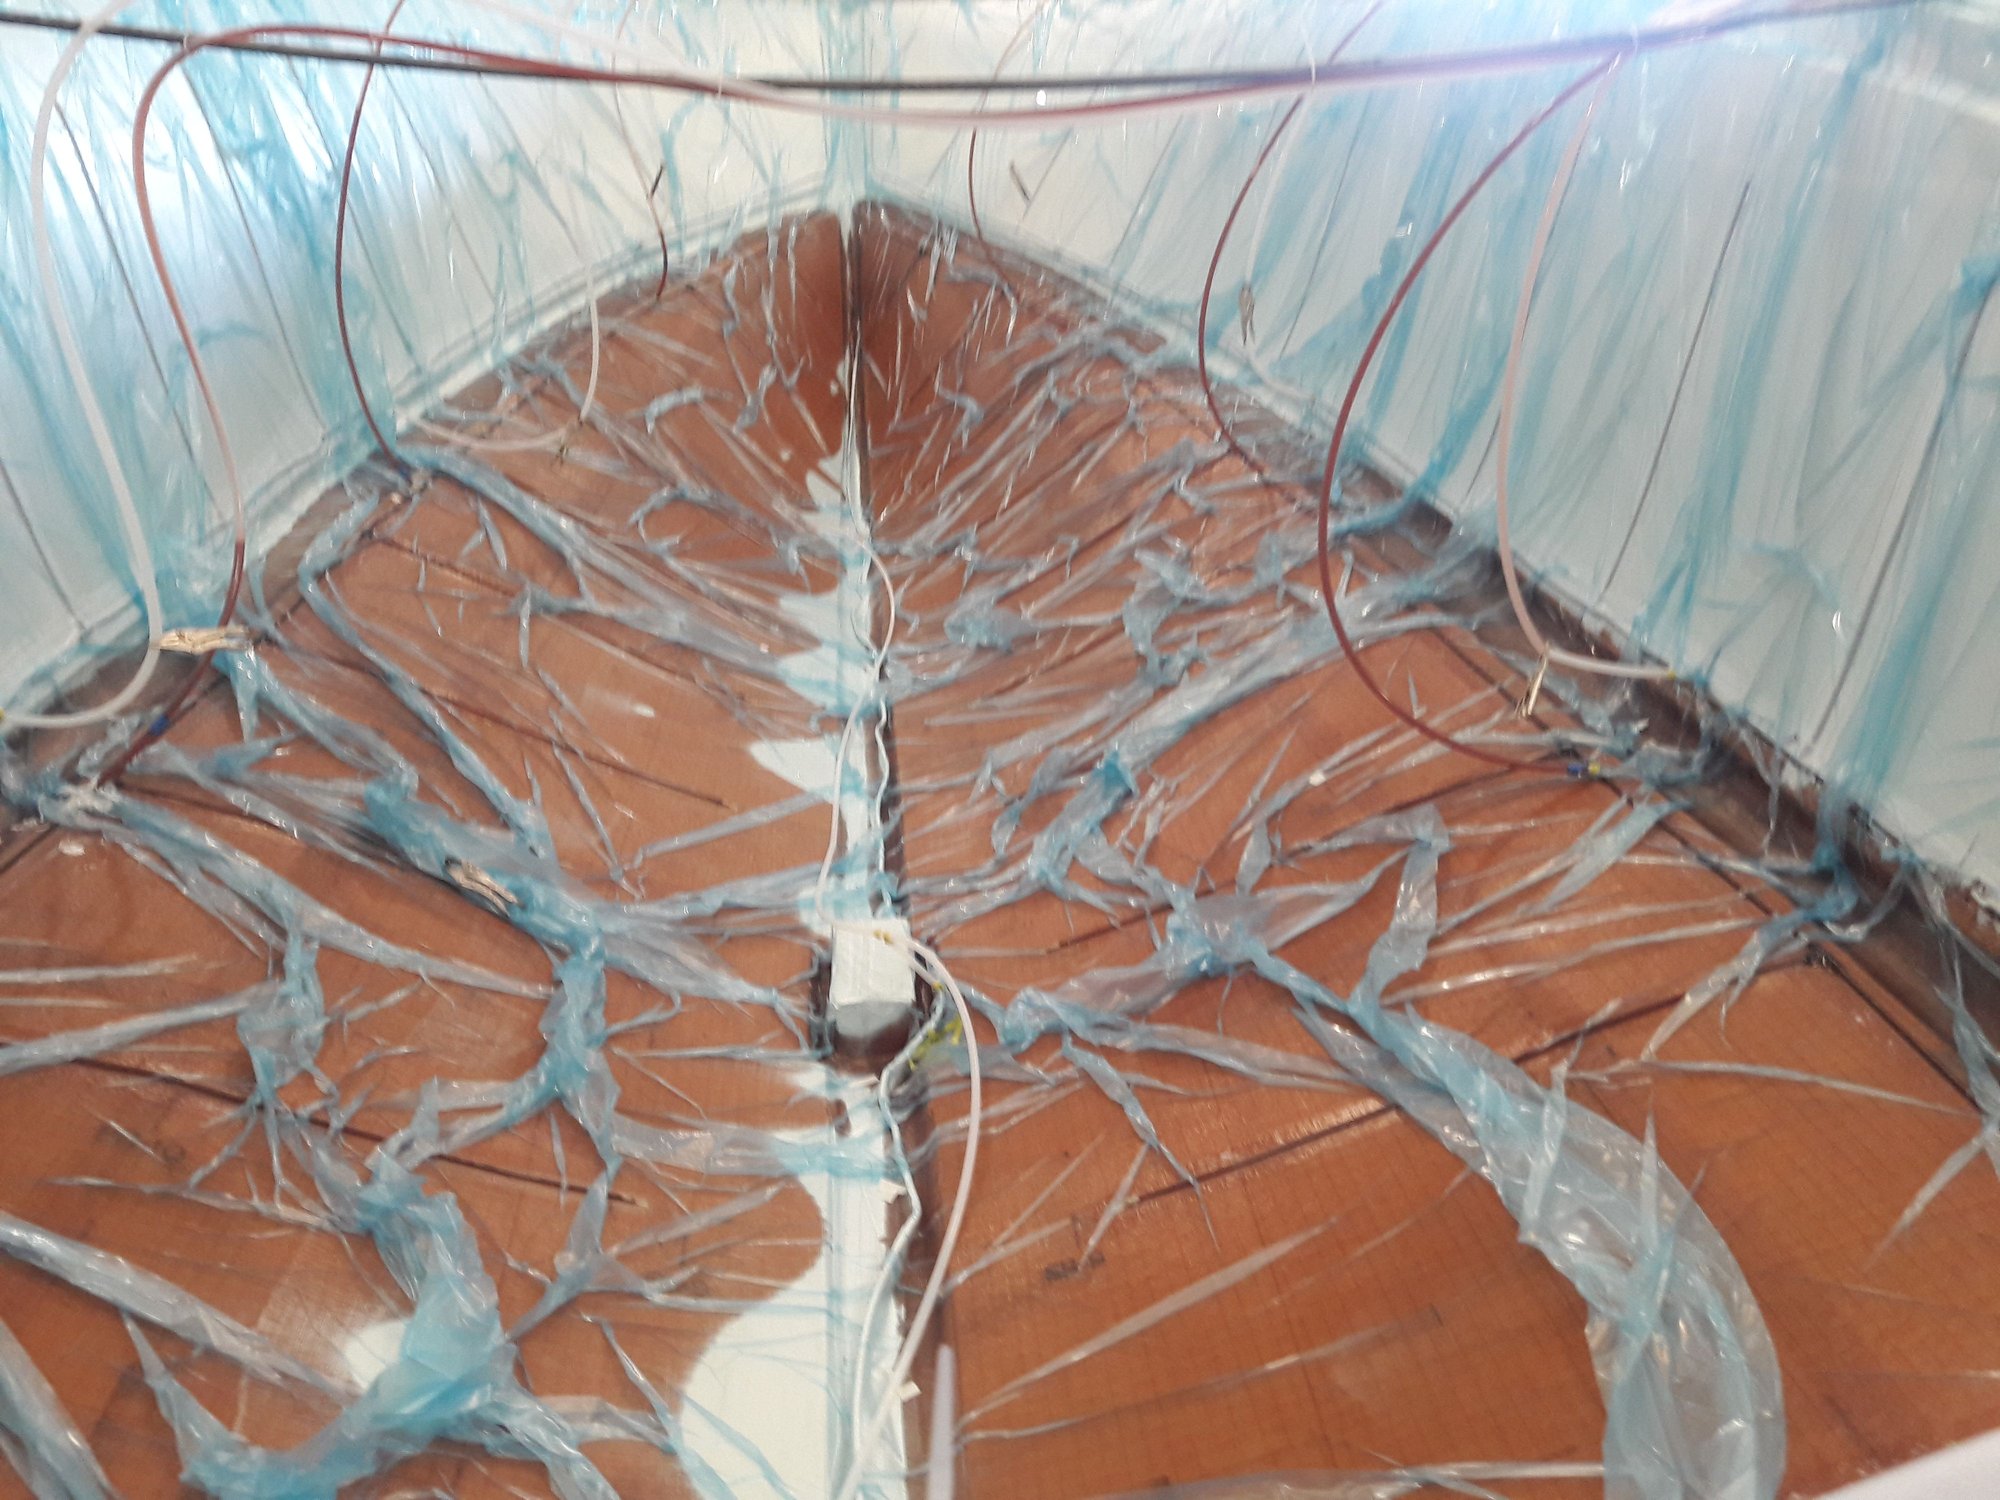
Loading the material is simple but complicated. The skin has already been ground and prepped. The first layers of glass can be a variety of different materials. On this hull the laminate schedule has been specified by a naval architect. He calculated the load and strength of the material required for the loads on the hull. In this case its a 3612 for infusion. Its 36 oz of glass running at a 60 degree angle. Most glass like an 1708 is a 45 degree angle. Rule of thumb, odd numbers are 45 degree, even numbers 1808 90 degrees. After the 36 is a 1208 Kevlar. The Kevlar is the yellow material in the photo. You also need special scissors to cut it. Next on the sides is the core. In this case its core cell. You can use devinycell or even balsa. Each has its own properties. The bottom is a 36, 24 (plus or minus 90), Kevlar and then core.
The core is all precut. You can cut the core by hand but it takes a while. I've done it. I use a special glue for installing the glass and core. Its made for infusion. its very important that the glass has no voids. It has to be tight against the skin and each other. You would think it would just fill with resin. That's not the case. It will actually suck the outer skin to the glass causing an indentation to the finished part. its then repaired after. The core to need to be tight together. if not the excess resin will show up in the finished part. As you can see in the photos, the core is installed with attention to detail.
After the core comes the inner skin. The inner skin is usually thicker than the outer skin. I use to know why, but I've forgotten. Its also required per the naval architect. In this case its a 24, 1 1\2 oz continuous, then a 36. this is on the sides and bottom. keep in mind that there are many more laminates to go on the bottom for the stringers.
What is continuous? Continuous mat is similar to chopped strand mat that everyone uses. With chopped strand the fiberglass is chopped into 2 inch pieces and held together with a binder. A continuous is what it sounds like. Continuous strands that go on and on with no binder holding it together. Its fluffy. How it stays together, I have no idea. Resin will flow through the continuous but not chop strand because of the binder. The continuous is second to last laminate. The resin soaks through the first laminate, hits the continuous and flows through the part. The core has holes in every square inch or so. The resin goes through the holes and wets out the outer glass. It does not have to wet out very far because they are so close. if you don't use continuous, you have to use some other type of flow material. There are different ways to do this that I have done. For this hull I do it this way. A different part I may do a different way.
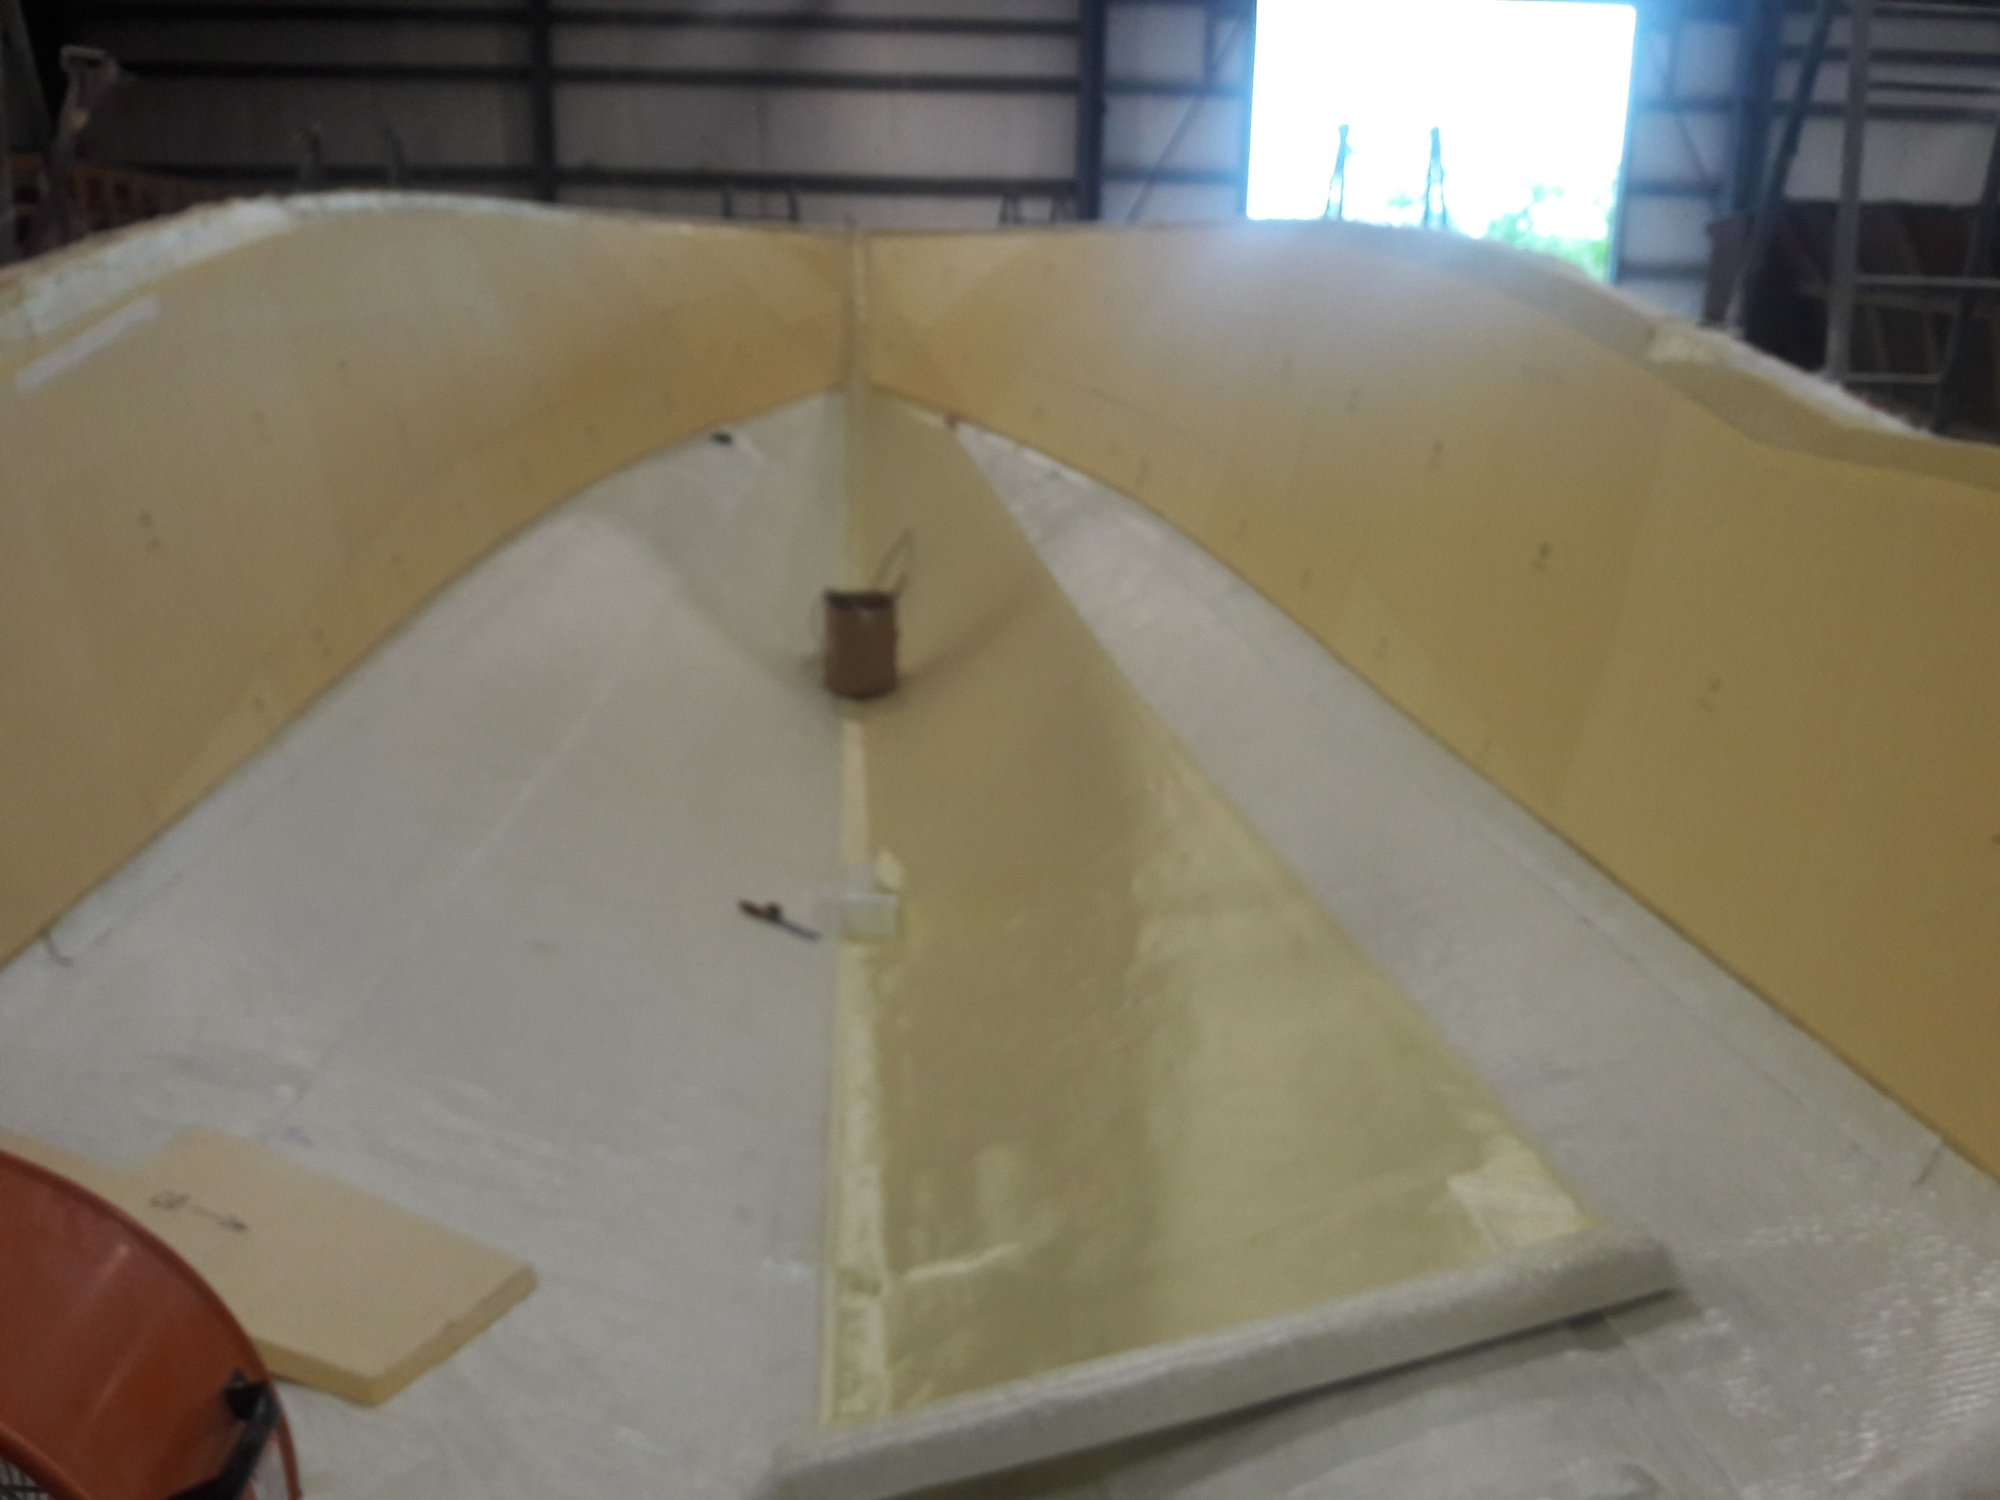
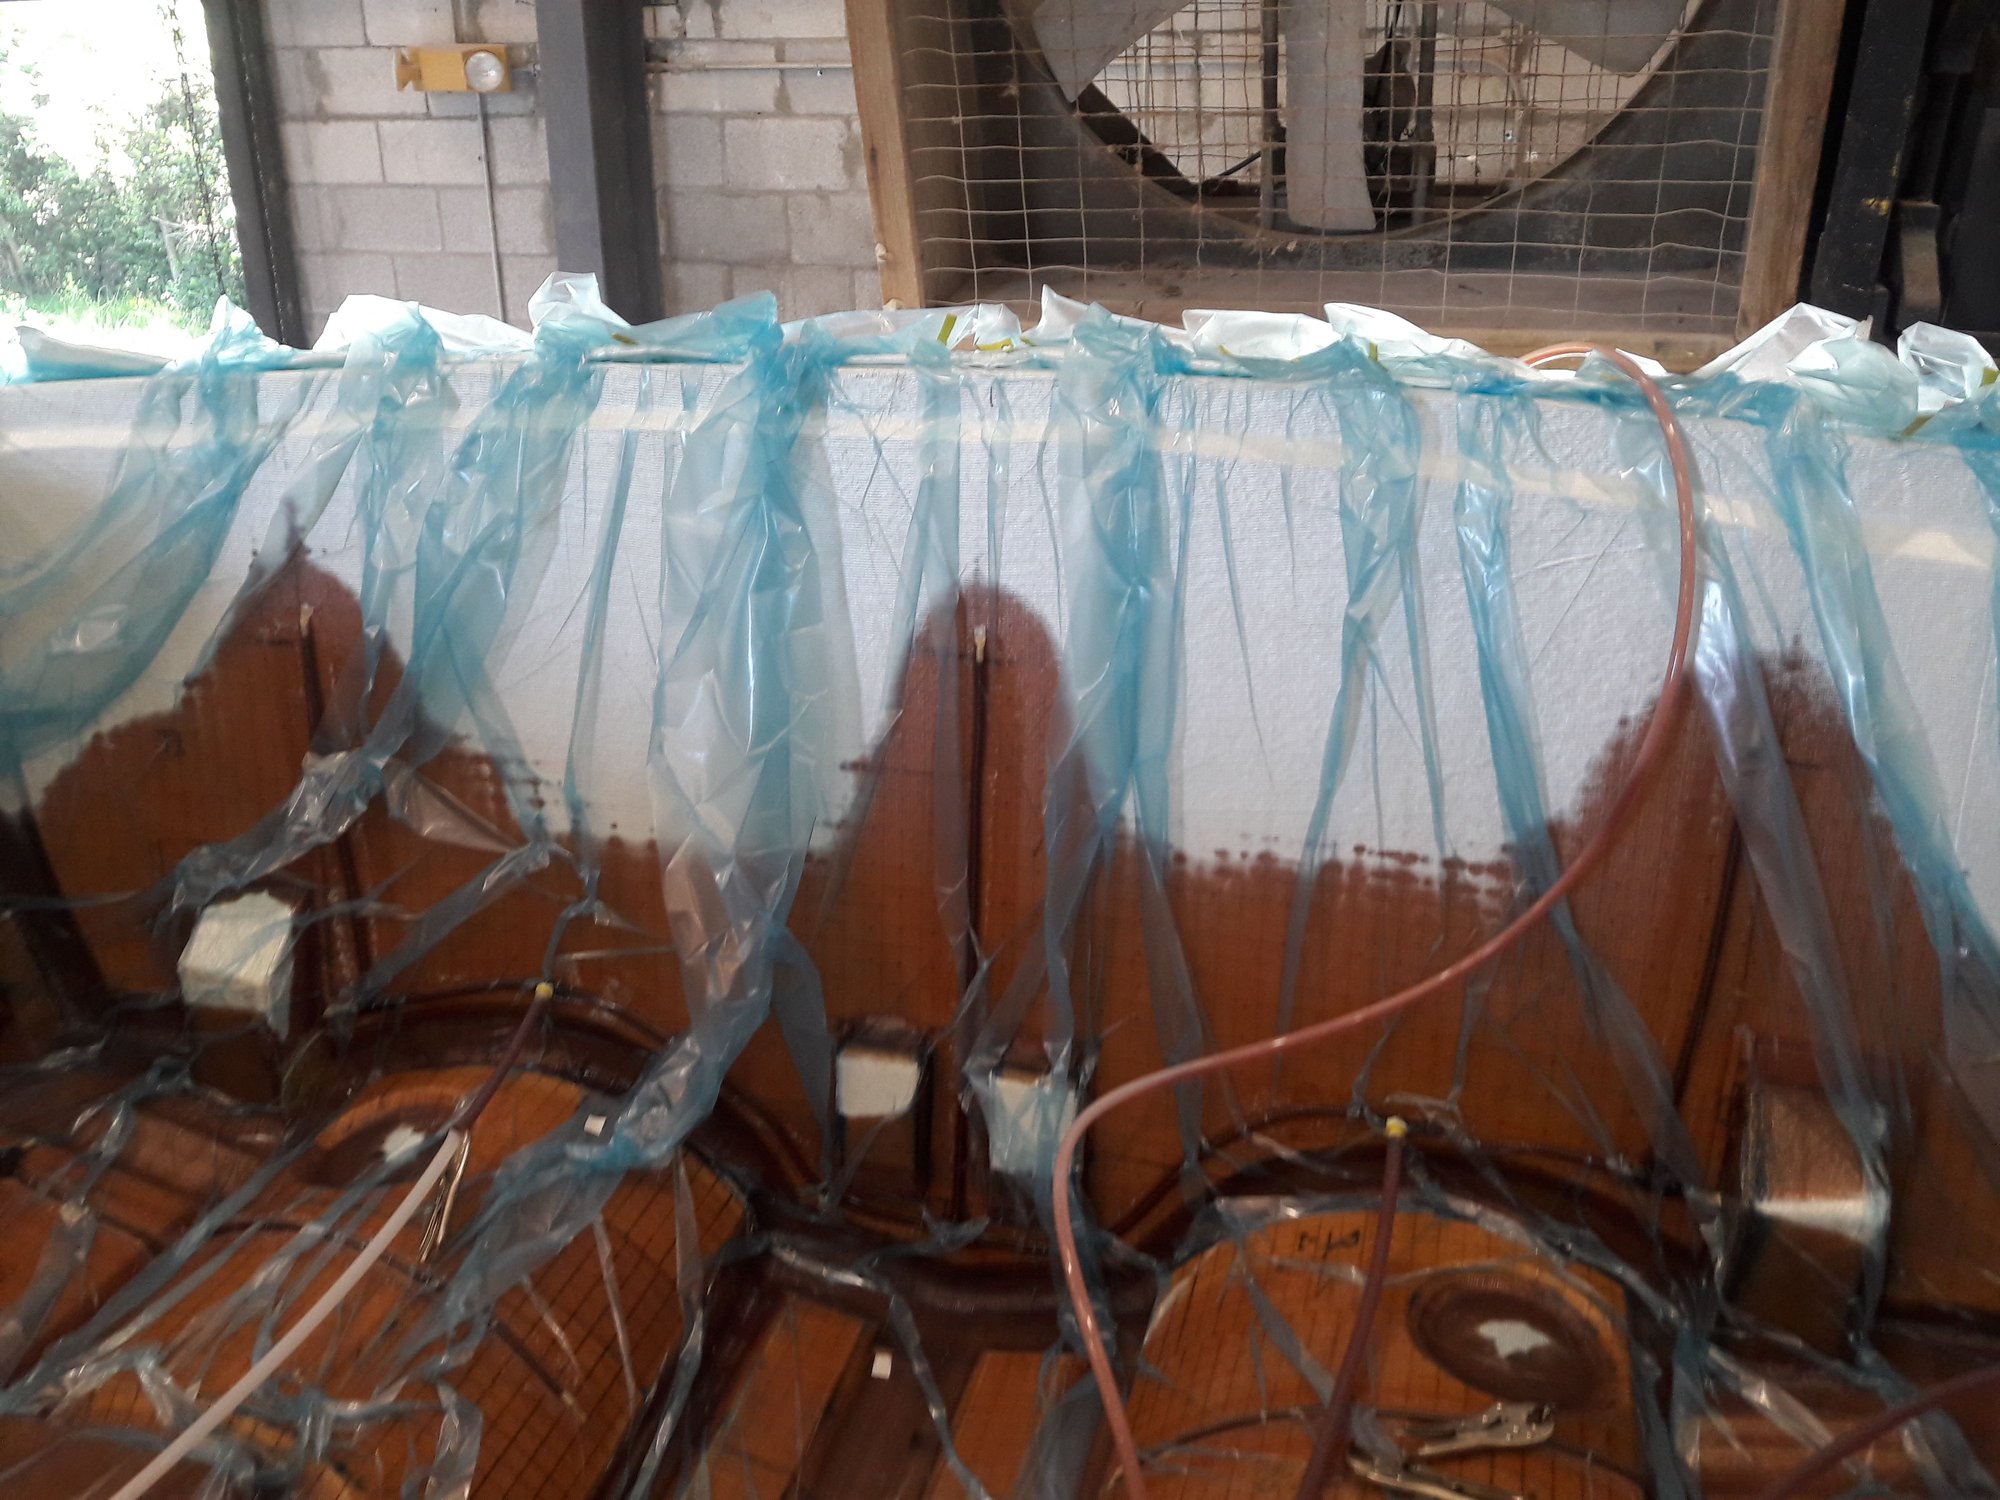
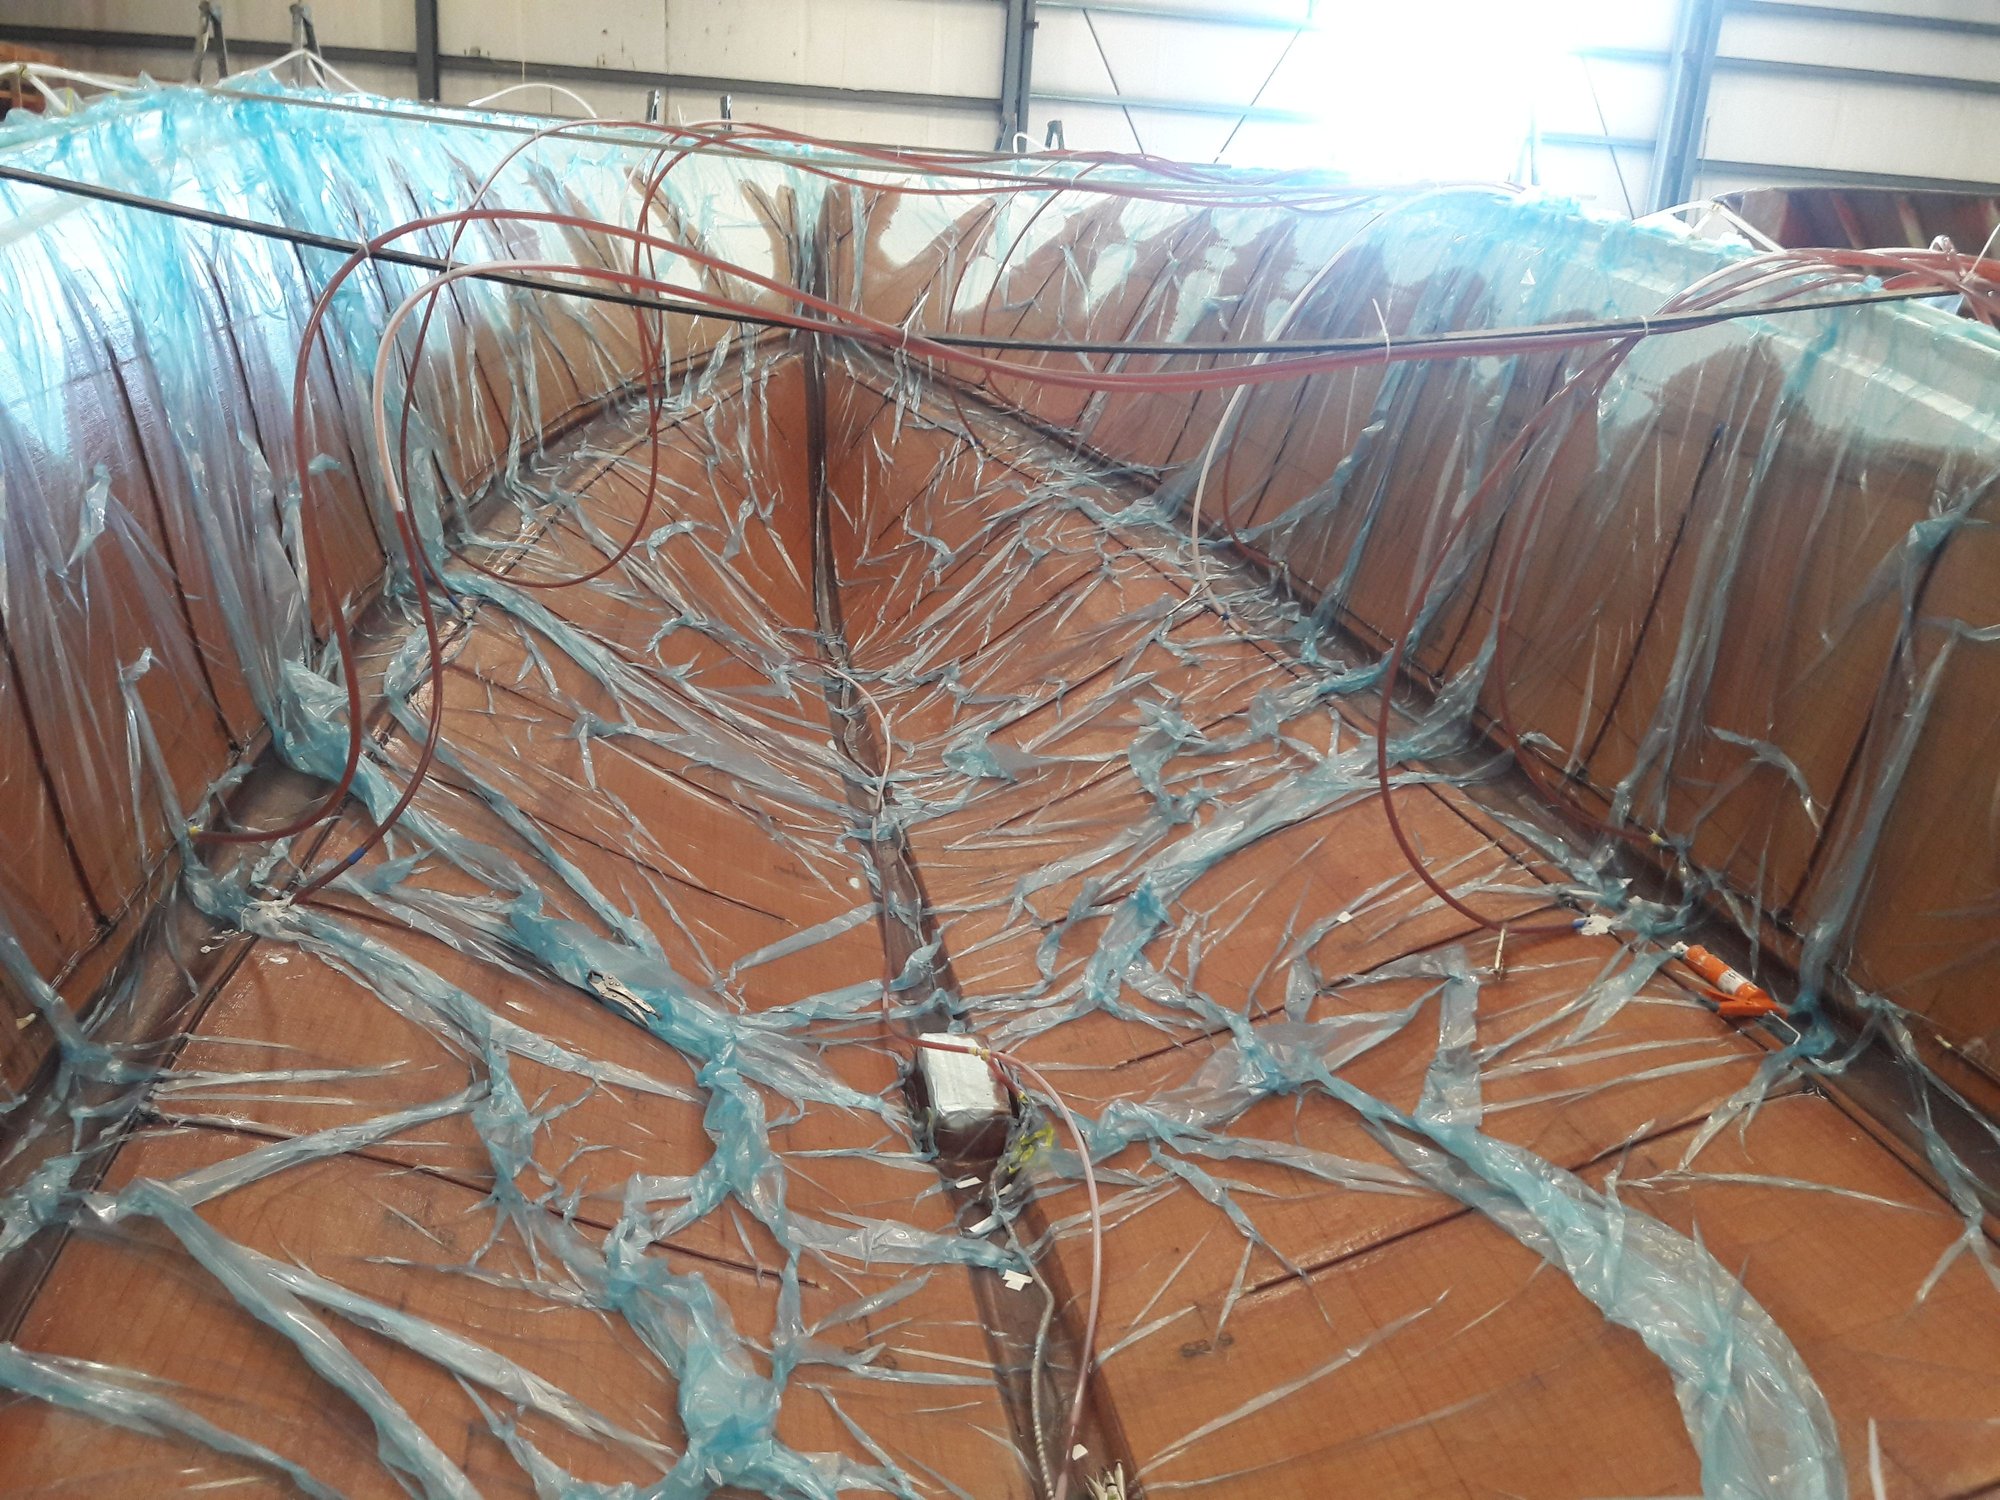
The material is loaded. Next comes the feed lines and vacuum lines. For this hull I'm doing it differently than what was previously discussed. The vacuum lines are in the keel and the flange. The reason is because the feed lines will start in the chine and flow to the keel and up the sides. If you look closely you can see the vacuum lines. the feed lines are 1\2 inch spiral. You put peel ply beneath and on top of the feed lines. The bottom has a feed line and the sides have a feed line along with the transom. The feed lines have branches coming off of them 36 inches apart. They end 18 inches from the vacuum lines. the purpose of this is to slow down the flow. Each feed line has 5 5/8 resin flow lines to it. If you don't have enough it will flow to slow. If you have to many, clamp one off. Simple right? Look closely and you can see the branch lines.
Here is how this is going to work. The rein lines run into a 55 gallon drum that I have cut the top off of. The bottom go to one drum, the sides to another. I pre-pour all the resin I need into 5 gallon buckets. All the catalyst is poured into pre-measured cups. I've calculated how much resin it will take because I did the test panels. It will take about 120 gallons. I'm going to start off with 30 gallons resin in the drum. It will only take about 5 minutes to go through the first 20 gallons maybe less. Once its gone down to 10 gallons or a little less, we'll catalyze another 5 and add it. The most important job is to make sure you don't have to much resin in the drum, because it will catalyze in the drum. You also cannot run out of resin because you'll put lots of air in the part. Its very very important to pay attention to what you are doing. There is no room for error.
Its ready to go. I'm going to infuse the bottom then the sides.
04-23-2018, 04:04 PM
#10
Registered
Thread Starter
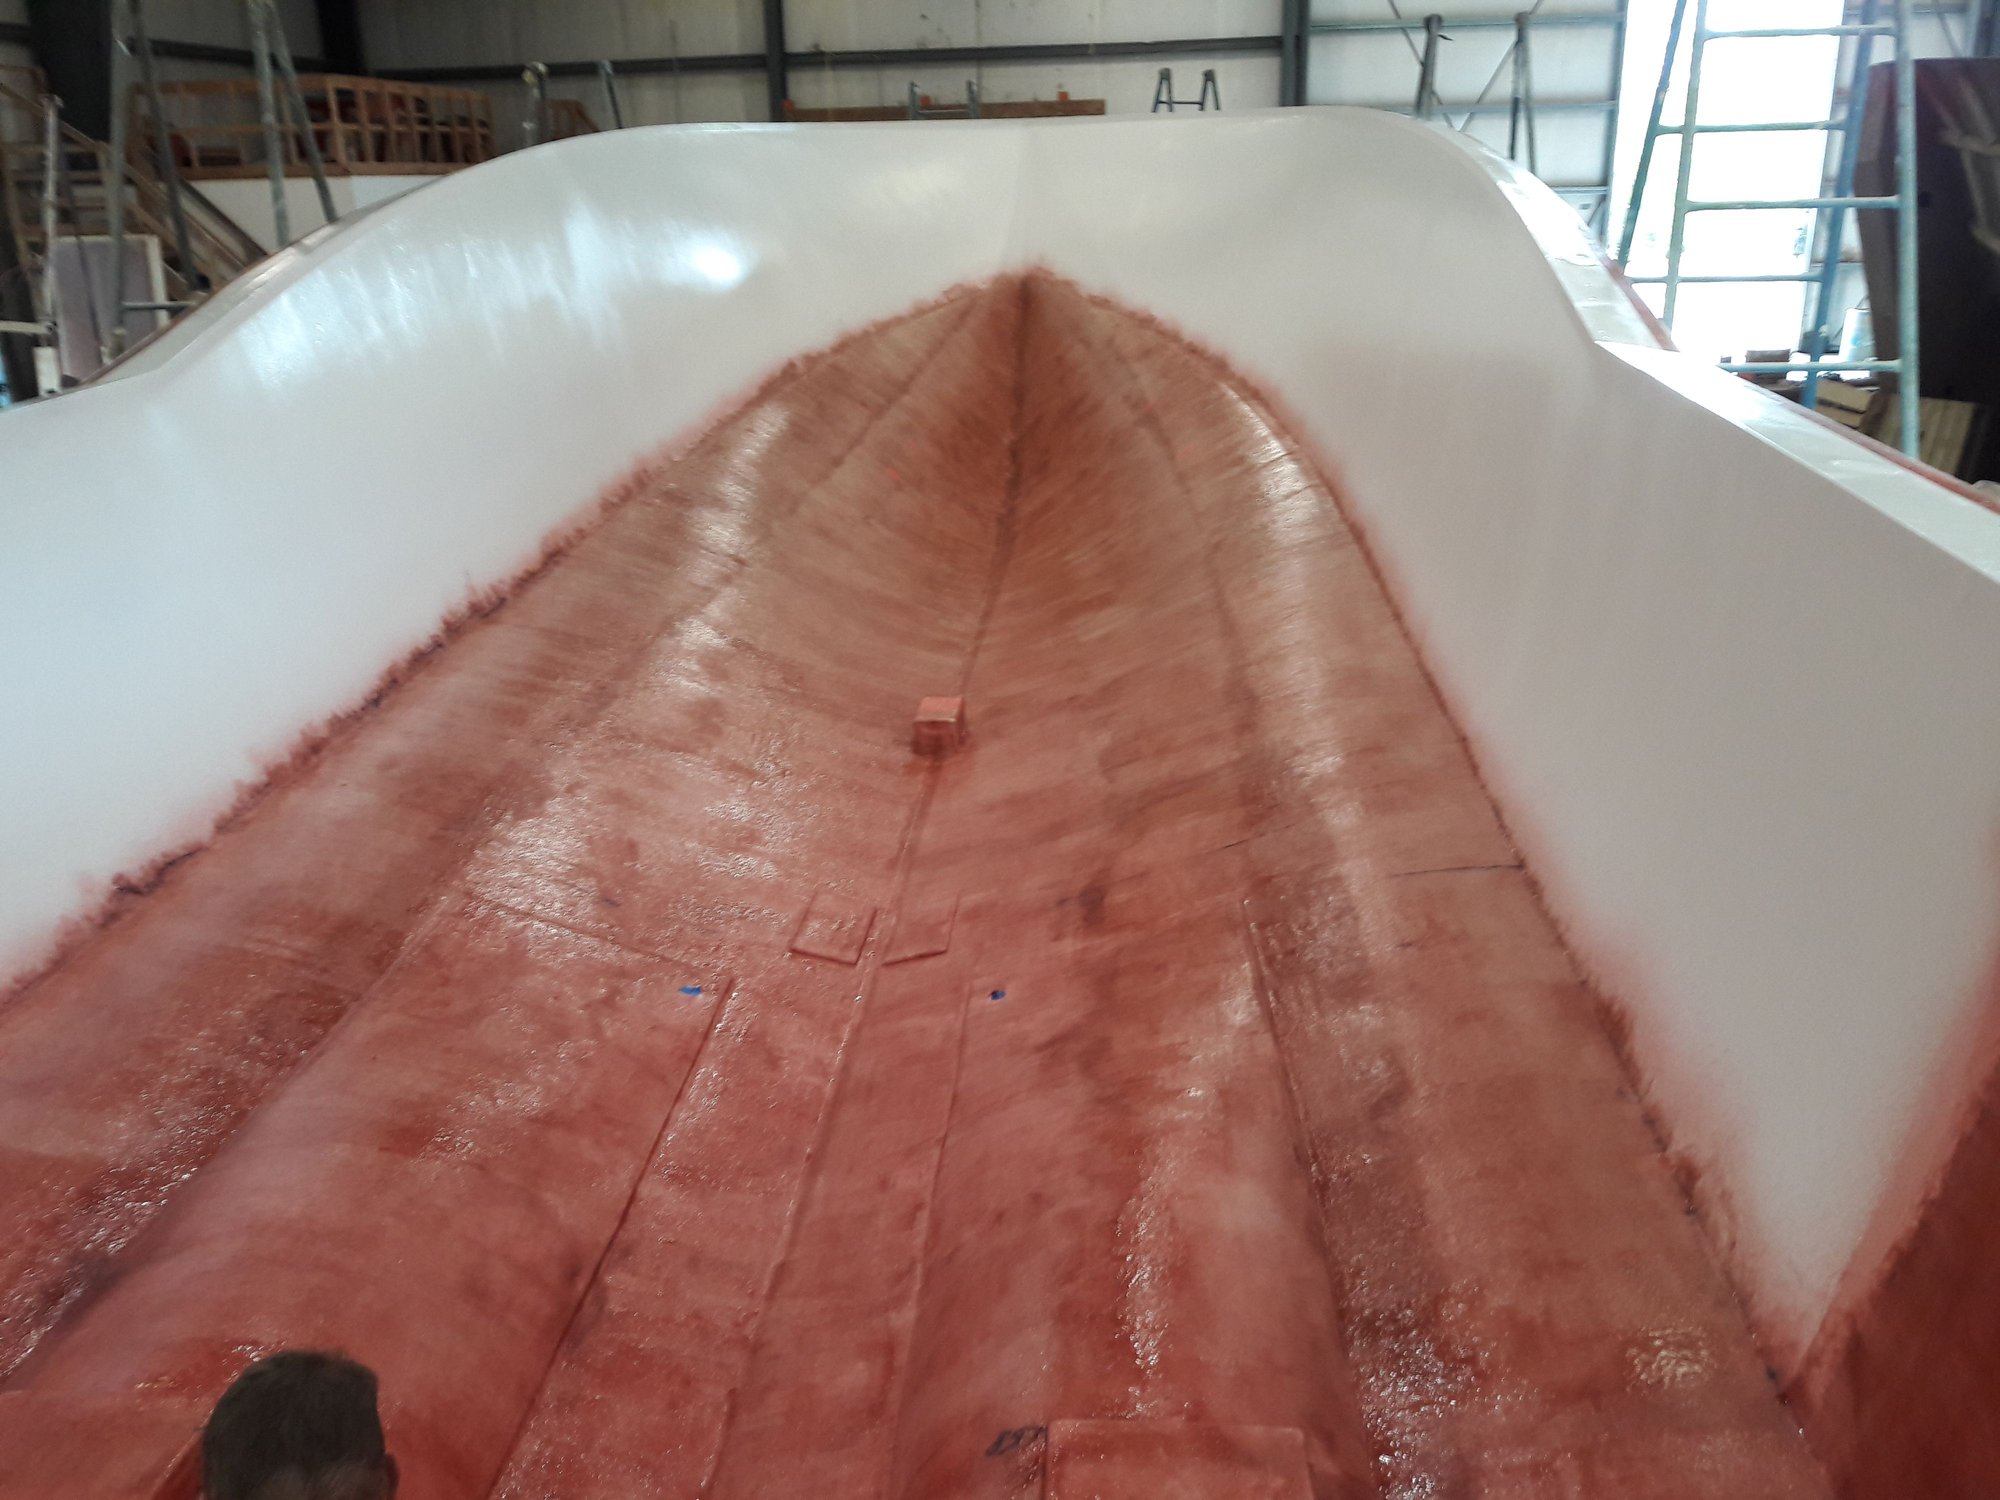
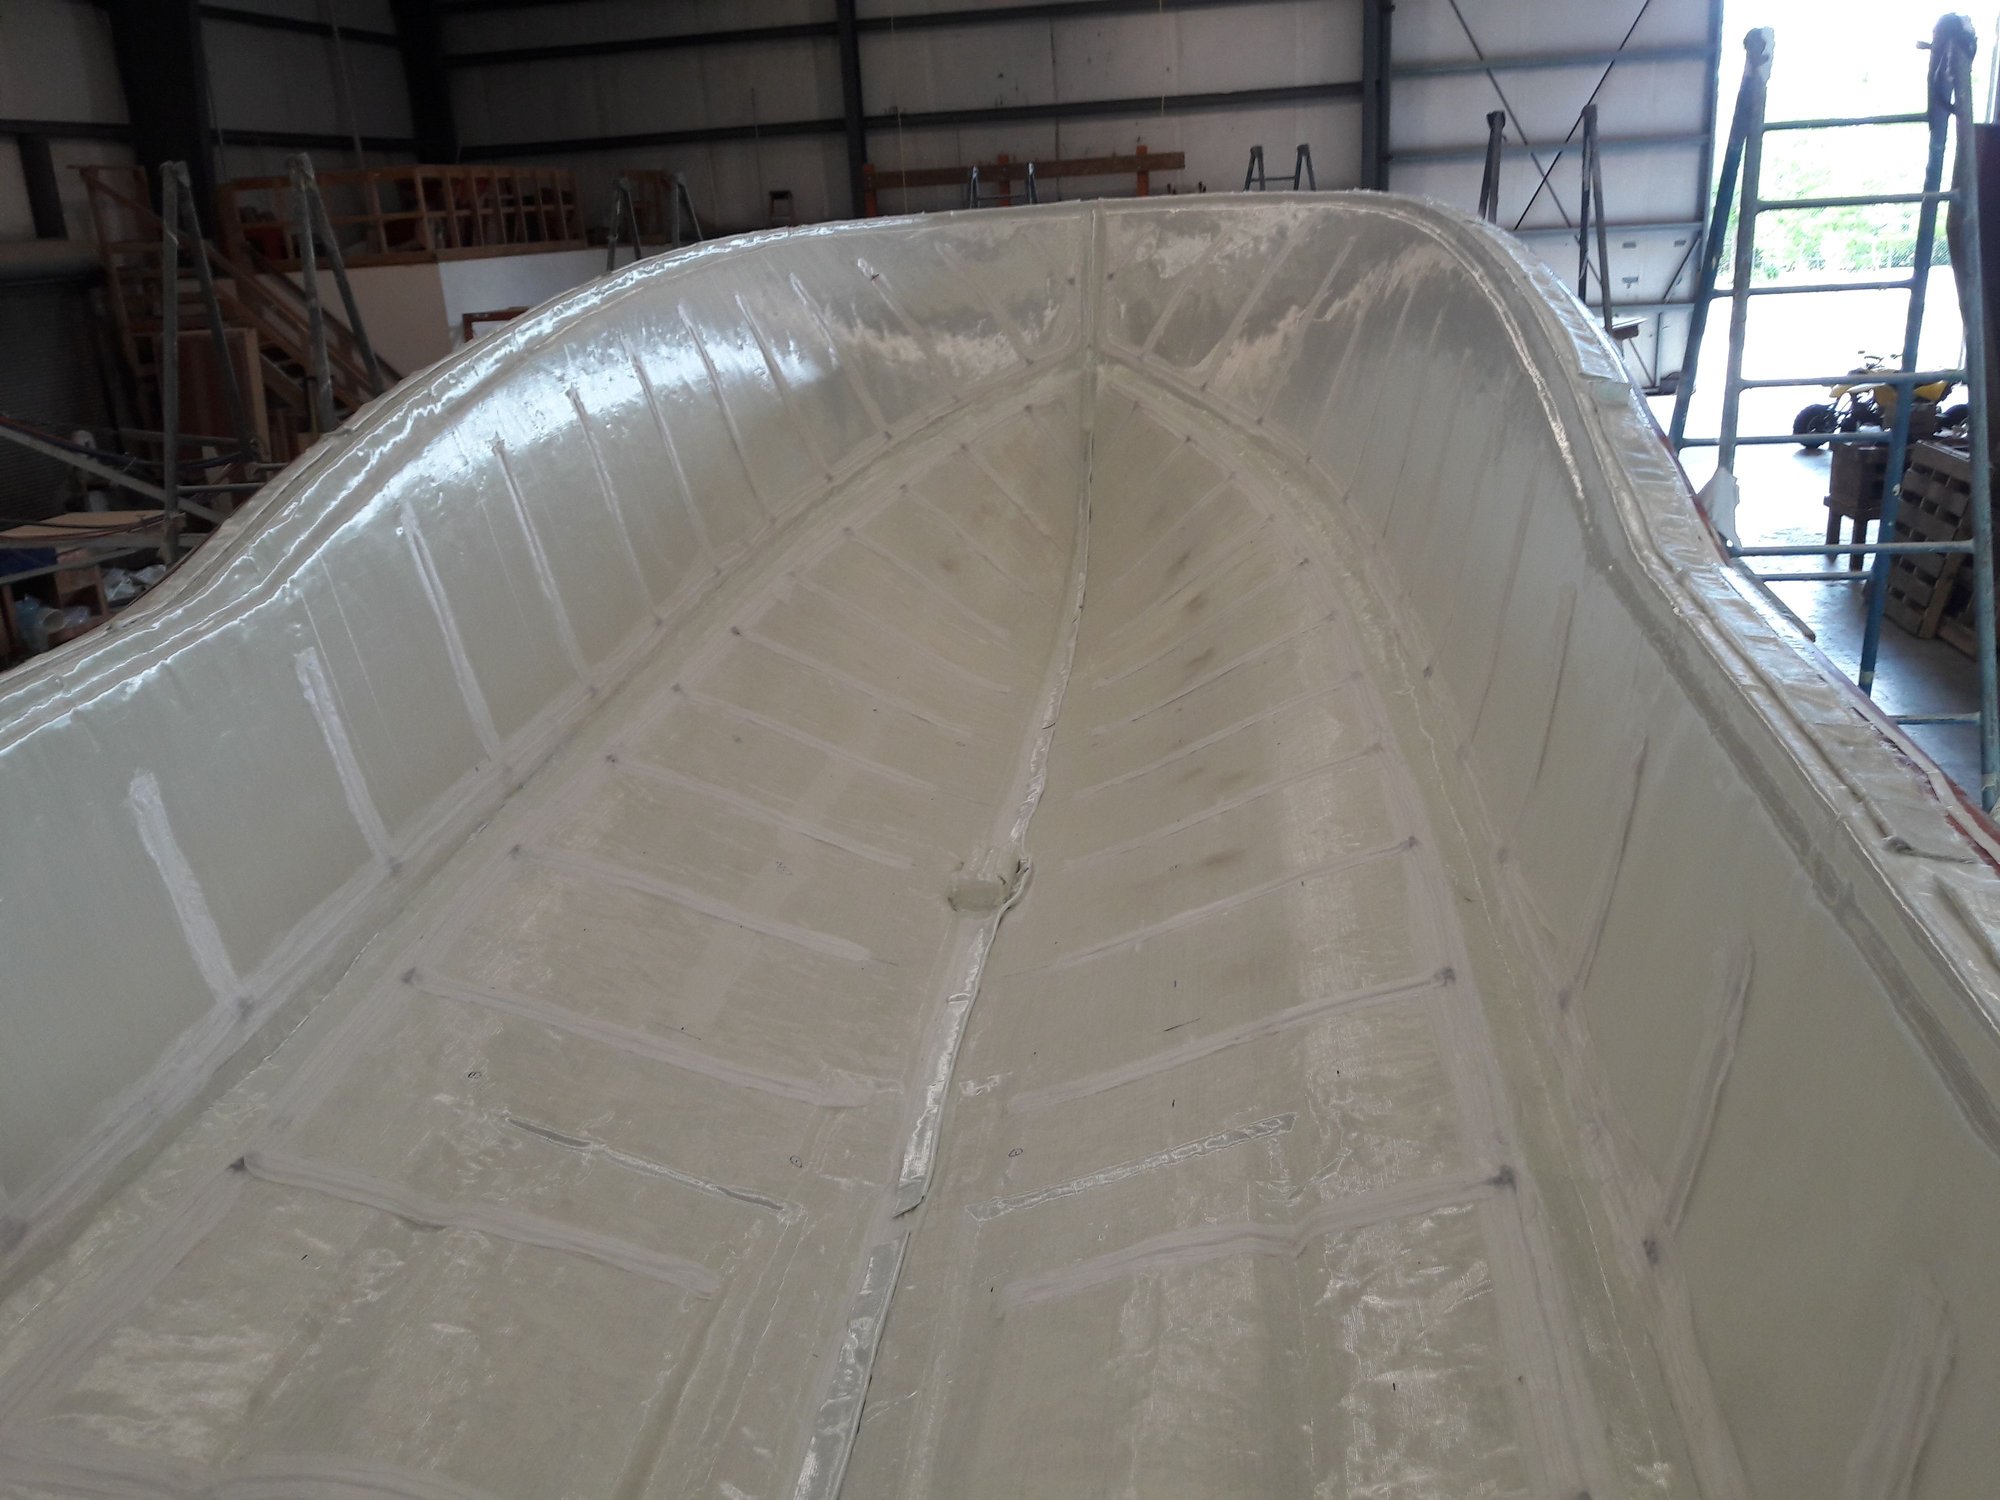
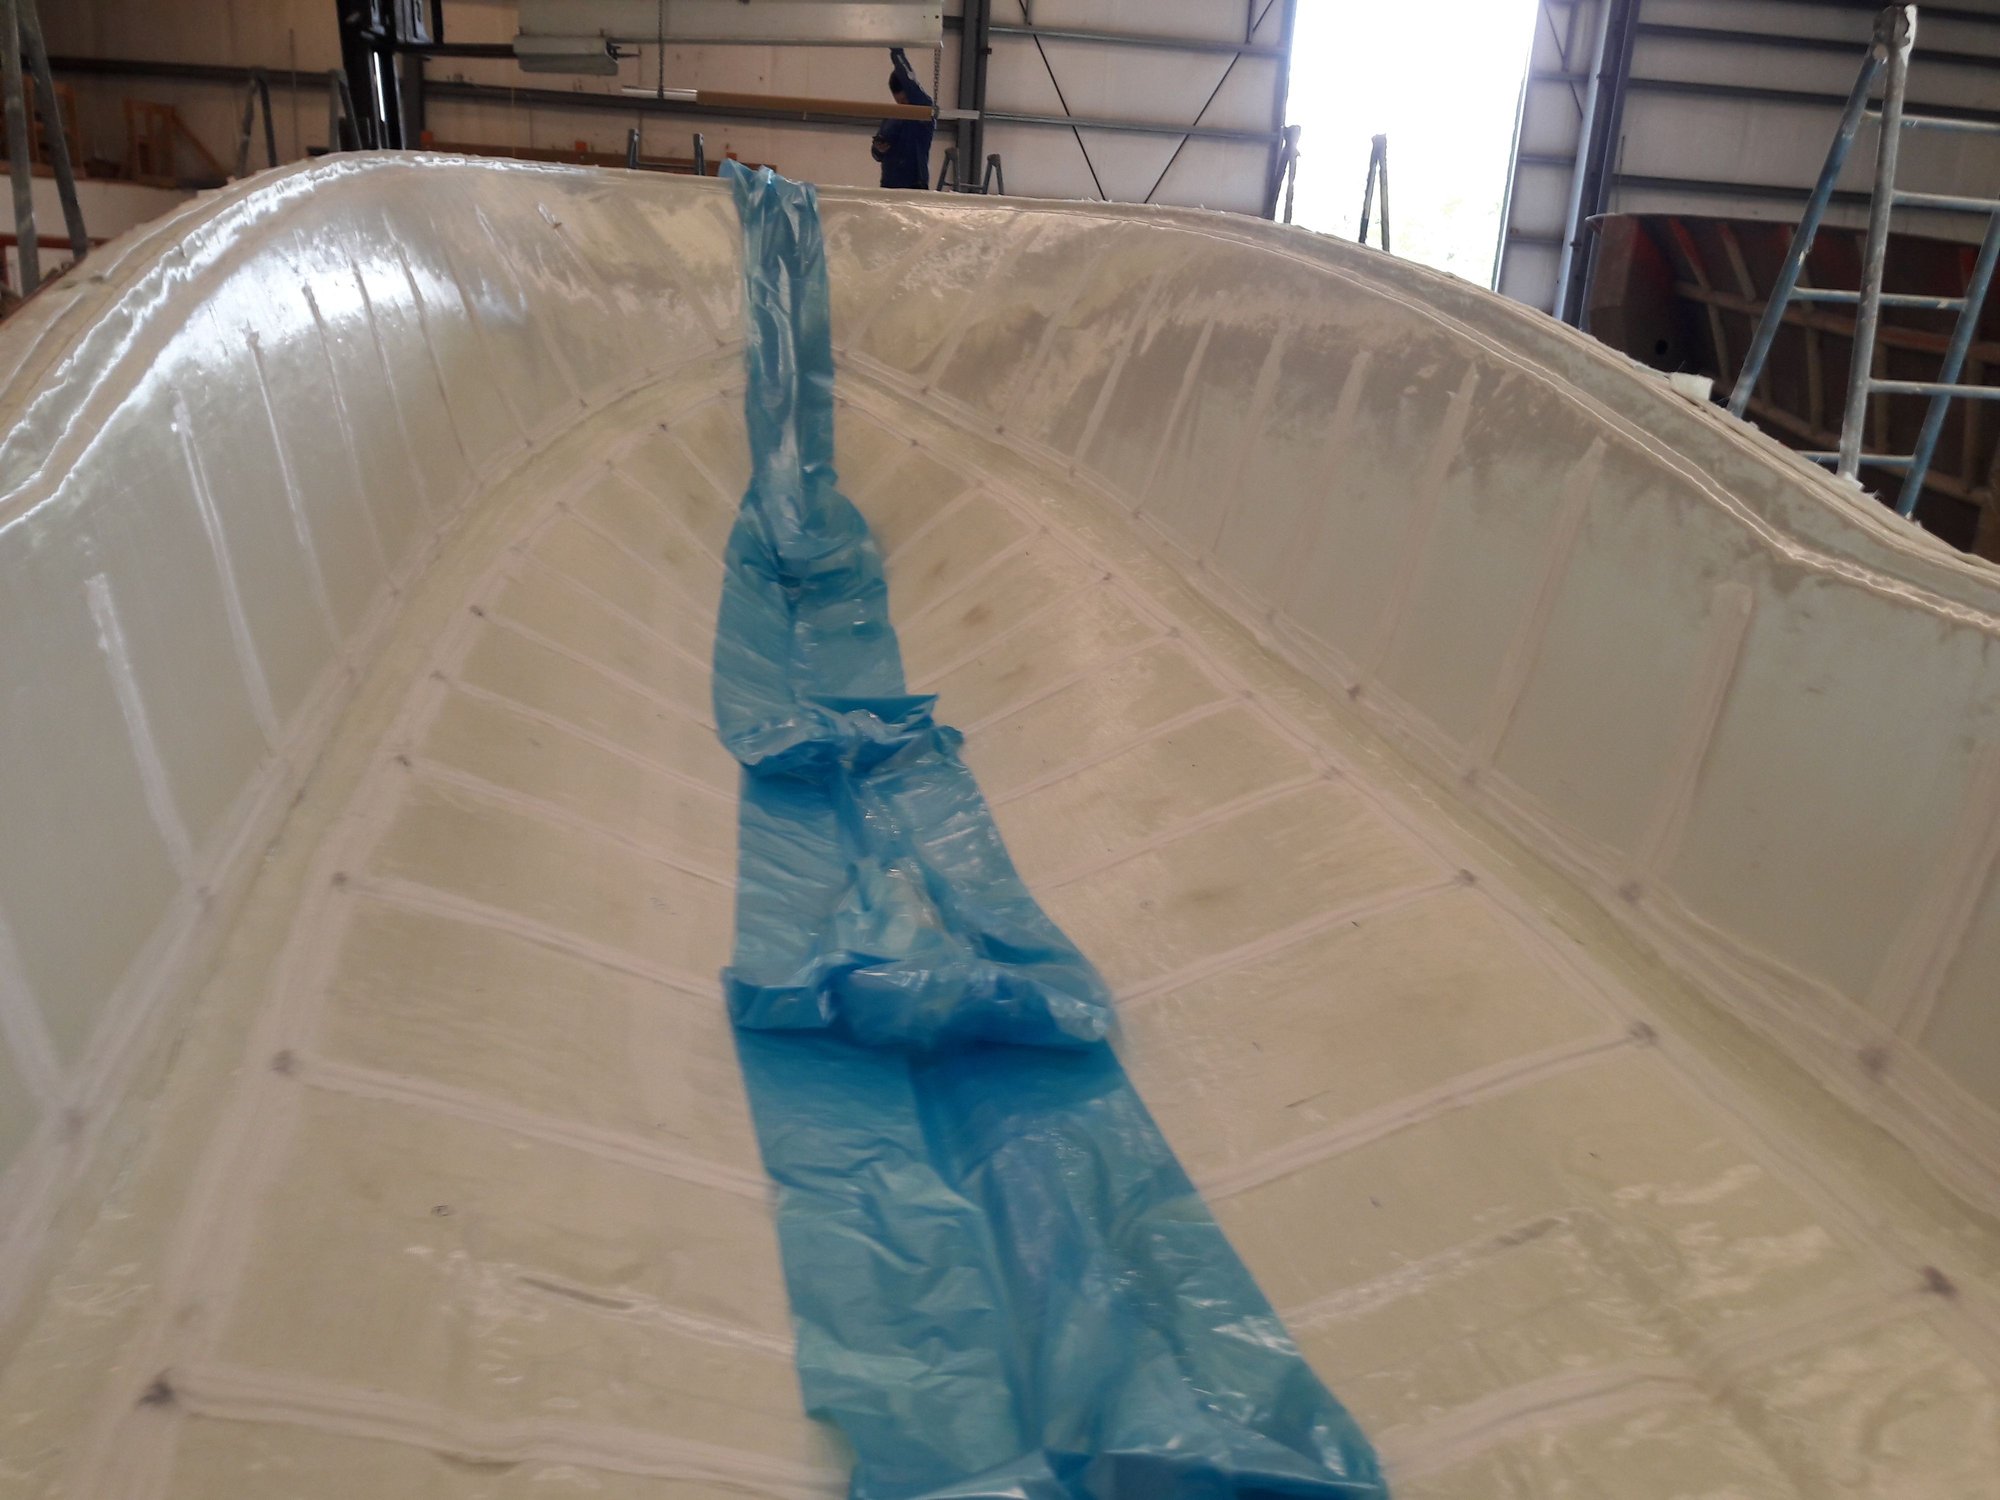
This is 6 minutes into the infusion. You can see the feed lines leading into the hull. Obviously, I opened the right side first.
This is 12 minutes
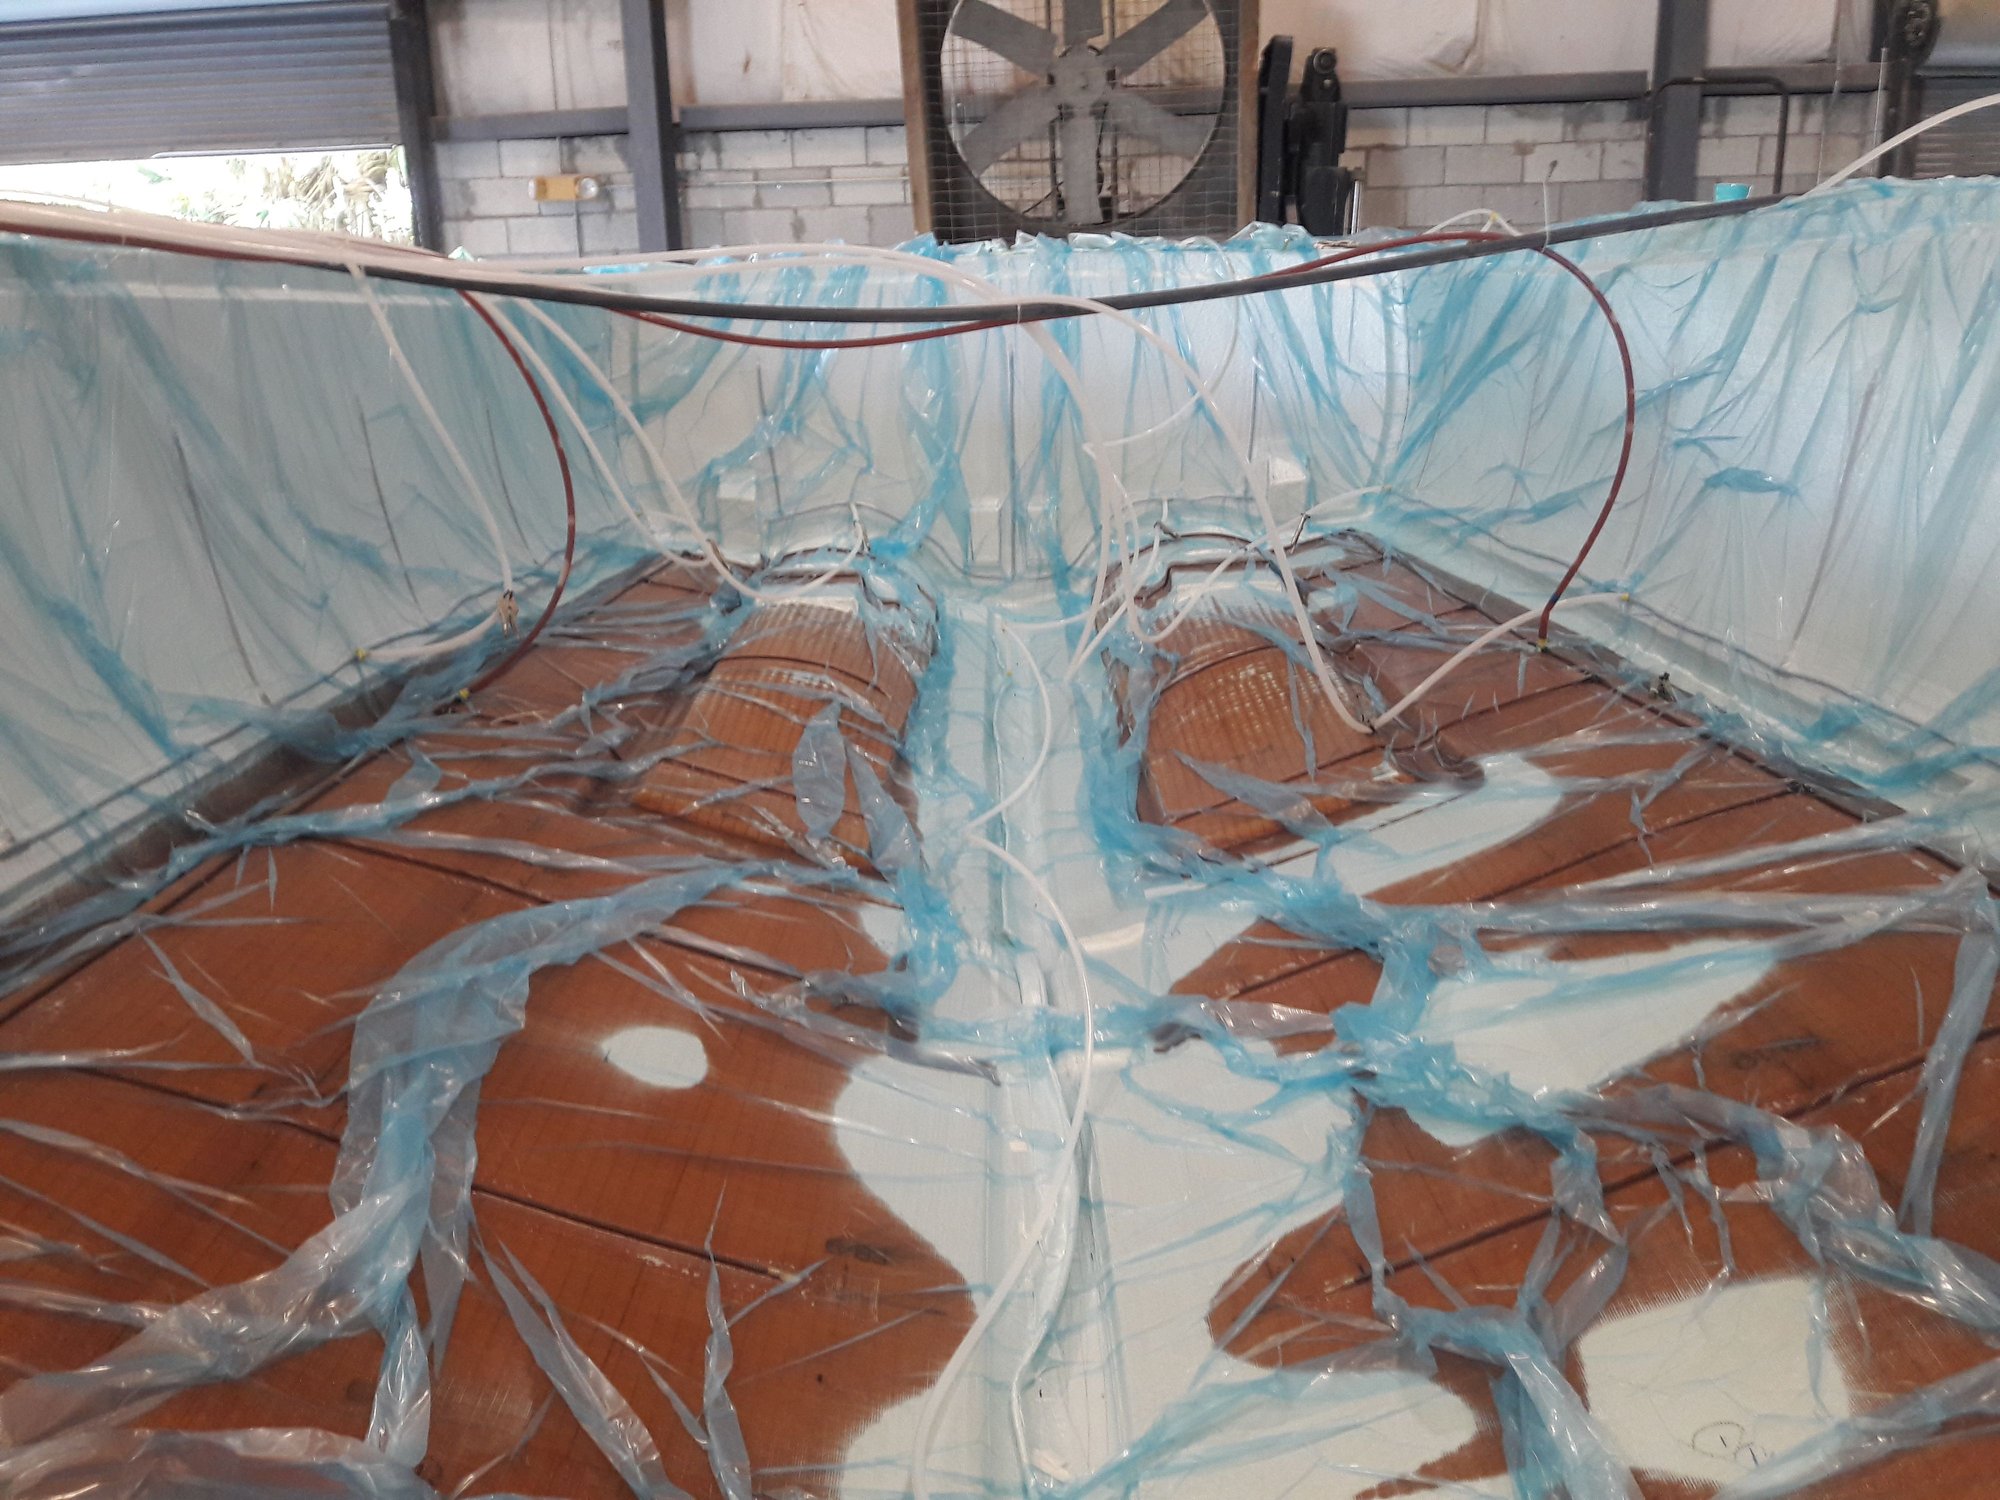
12 minutes looking aft.
20 minutes
35 minutes feeding the transom
50 minutes and the sides are about full
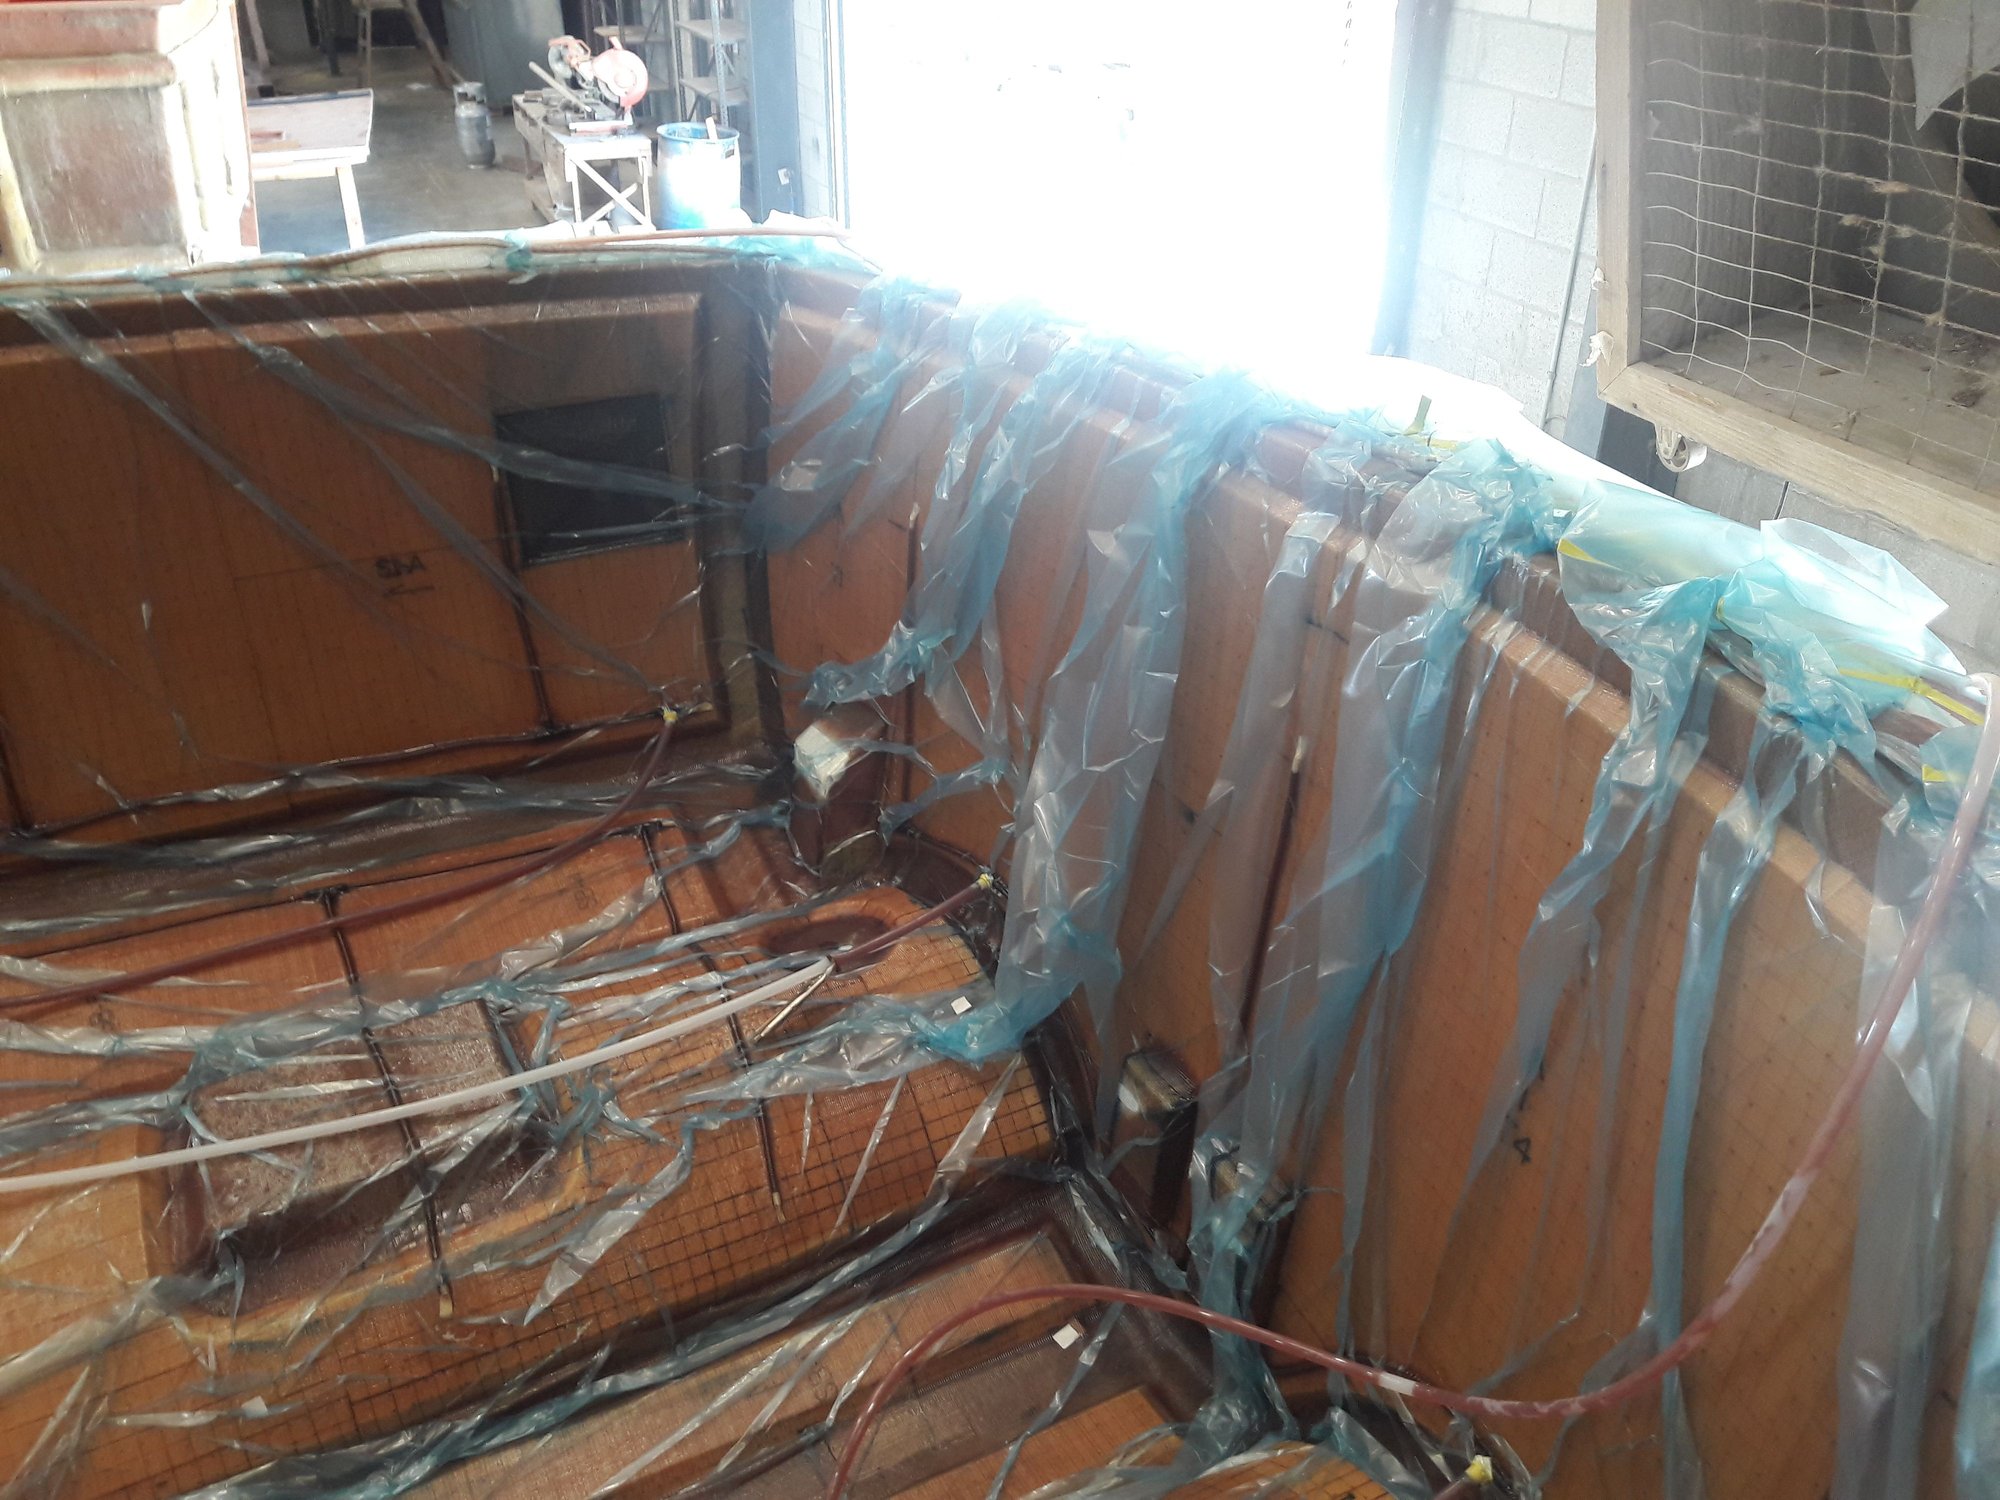
60 minutes parts filled
60 minutes, parts filled, except for the transducer block. I'll fix that later.
Here is how I'm going to do this. I have 5 resin feed lines leading to the feed line in the hull. All total there are 20 plus the transom. I'm going to feed the bottom first. When the resin fills the bottom I will clamp the vacuum lines in the keel. I'll also clamp 4 of the feed lines. I always keep 1 open to continue to feed a little resin until it gels. Once the bottom is infused I'll do the transom and the sides. In order not to have an issue with the resin gelling in the drum, I'll use a second drum for the sides. The resin for this hull has a 70 minute gel time. You can order different gel times depending upon the part you're building. Keep in mind that you have to control the resin flow and time. If you fill the part in 20 minutes with a 70 minute resin, you're going to spend 50 minutes adding more resin and pulling resin out of the part. That resin is going into a pot that if it overflows will then go into the vacuum pump. Not a good thing. Ideally, you want the part to fill about 10 minutes before it gels. This is the reason for test panels. You have to control the flow of the resin.
If you look at the photos closely you will be able to see the feed lines. This is how this works for this part. When the feed lines are open, the resin will flow down the line and down each branch line. The branch lines will fill in between each line. By stopping the branch lines 18 inches from the vacuum line, it slows the flow of resin and allows the branches to fill in. Ideally I want all the resin to reach the vacuum lines at the same time.

