


My new project - 86 - 272 LS
 11-19-2012, 07:08 PM
#201
Registered
You are extremely fortunate and blessed that you did not hydro-lock a motor. Focus on the positive...you recognized the warning signs and acted upon what you discovered.
Remember Occam's Razor?
Remember Occam's Razor?
 11-19-2012, 10:21 PM
#202
Registered
Join Date: Oct 2012
Location: Cleveland, Ohio
Posts: 99
Likes: 0
Received 0 Likes
on
0 Posts
Another quick thought since sprink58 brought up the hydro-lock issue. I doubt you hydro-locked that motor but just because it continued to run doesn't mean it didn't hydro-lock and bend a connecting rod...even a little. Since you have the pan off and are checking bearings take a close look at all eight rods. A slight bend is even possible if enough water entered the cylinder to stop the piston just before top dead center on the compression stroke. Again, I think you are probably fine but you're in there...
Good luck! That's a major PITA. I'm pullin' for ya.
Good luck! That's a major PITA. I'm pullin' for ya.
11-20-2012, 12:09 PM
#203
Registered
Join Date: Nov 2007
Posts: 401
Likes: 0
Received 0 Likes
on
0 Posts
I used the glm manifolds on my 350 when I had it in my boat I bought the aluminum kit from these guys
http://boatstoreonline.com/glmexhaust.html
I haven't had and issues with them, came with everything including bolts, the set only weights 52lbs compared to 126 on the cast iron!
http://boatstoreonline.com/glmexhaust.html
I haven't had and issues with them, came with everything including bolts, the set only weights 52lbs compared to 126 on the cast iron!
11-20-2012, 12:22 PM
#204
"I used the glm manifolds on my 350 when I had it in my boat I bought the aluminum kit from these guys
http://boatstoreonline.com/glmexhaust.html
I haven't had and issues with them, came with everything including bolts, the set only weights 52lbs compared to 126 on the cast iron! "
I bought a set of these GLM aluminums as well from this place. I thought they seemed well made (considering they are chinese) with bronze plugs where needed as well as anodes. The mating surface of mine were good but I did take a flat file to them to take off the powder coating as I didn't want the power coating to delaminate from the aluminum and leak that way.
I had a motor hydrolock on me, it was on a start up and it hitched then fired. There was a metalic rapping noise so I took the boat out and tried to blow it up. Well it didn't blow but was down on power so I tore it down. The connecting rod was bent into a perfect "s" shape and since it was so shortened it caused the piston skirt to hit the crank counterweight. Replaced rod and piston assembly, refreshed bearings and rings and put back together, ran nice.
11-20-2012, 06:21 PM
#205
Registered
Dennis Moore's prices are tough to beat on this stuff.
http://www.mooreperformance.info/Mer...nifoldkit.html
http://www.mooreperformance.info/Mer...nifoldkit.html
11-21-2012, 10:40 AM
#206
Registered
Thread Starter
Thanks all. The risers and manifolds look really good, but two things are suspect. Looks like I had a leak on one side due to the gasket between the riser and manifold. The other item is I have different risers on the two motors. The port motor with no water problems, has the 3" risers with the tube inside the outlet. The starboard motor has GLM risers which do not have a seperating tube where the water dumps in, it just dumps directly into the exhaust stream. So maybe a problem with reversion at idle? Who knows, but I will definately look at new risers and just go with the 4" outlet ones.
Oh, also getting new bearings for the crank and rods. rods all look fine, nothing looks out of place. Time to go spend some money....
Brian
Oh, also getting new bearings for the crank and rods. rods all look fine, nothing looks out of place. Time to go spend some money....
Brian
01-09-2013, 11:11 AM
#207
Registered
Thread Starter
Well, been a month and a half and not much done, kinda depressing.
Motor: Got a new crank and bearings for the SB motor, should be going together this week. Also got new bearings for the original crank, as this will be going in my backup motor. Why? Not sure really why I am swapping them around other than the original was turned .020 and the new on is only .010. Either way, motor is going back together.
Spare Motor: Picked up another motor and stripped it down, looks good. Going to hone the cylinders since they speced out good, no taper or out of round. Actually seems a little tight for a marine motor, right at 4.0005 to 3.9995 on the bores. Still need a cam, rings, oil pump and gaskets for the backup motor, but have the block, crank, bearings, vortec heads, etc for building a copy long block. This will be backup work for mechanic as he has time.
Bilge. Started cleaning the bilge out again, amazing how dirty it can get in 2 hours of use when you get water in your oil and it steams out. Yuck! At least this time it cleans easily with some spray cleaner and rags.
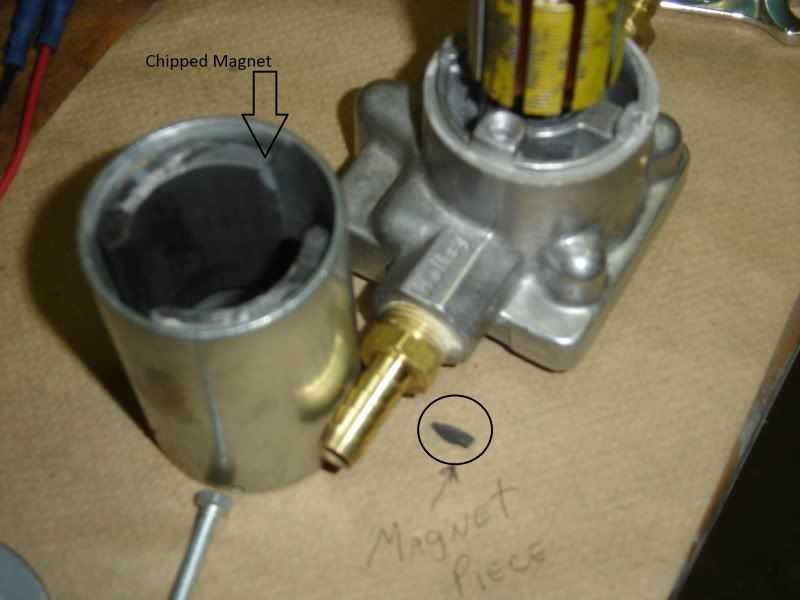
Fuel system. This I feel better about now. Pulled everything out and opened up the holley fuel pump. Bottom end looked fine, screen was clean, parts moved freely. Took the motor side apart and what do you know, found a piece of magnet loose on the inside. Pretty small piece, (see below) but doesn't take much inside a electric motor to cause all kinds of problems with jamming and stoppage. Cleaned it all out and put it back together to try again. Going with two pumps with two seperators this time. Got everything in including the new filters and a second fuel pressure switch, so time to put that back in so it will be ready when the motor is set to be dropped in.
Also removed the old fuel pump switch as it would shut off randomly. Brand new, but giving me problems so out it goes.
Today I should finish cleaning the bilge, start assembling the fuel system and adding some wood behind the bottom of the bench seat to reinforce that area further and mount the pumps/filters on. Next will be a bit larger endeavor. I am adding some reinforcement along the bottom of the seat as I plan to make the back of the bench seat removable for service. It will still be bolted in securely, but if I need to work on something, remove a few bolts and pull it out. That way I can lay on the bench and then down into the engine compartment. Structurally it should be better when I am done, but still a bit nervous about cutting up a fiberglass shell. At least I have the glass experience that I can always return it to stock if I want to.
Oh, also bought 4" risers, gaskets for them and outdrive water pump kits. Michigan Motorz does a good job on small parts and gaskets.
Brian
Motor: Got a new crank and bearings for the SB motor, should be going together this week. Also got new bearings for the original crank, as this will be going in my backup motor. Why? Not sure really why I am swapping them around other than the original was turned .020 and the new on is only .010. Either way, motor is going back together.
Spare Motor: Picked up another motor and stripped it down, looks good. Going to hone the cylinders since they speced out good, no taper or out of round. Actually seems a little tight for a marine motor, right at 4.0005 to 3.9995 on the bores. Still need a cam, rings, oil pump and gaskets for the backup motor, but have the block, crank, bearings, vortec heads, etc for building a copy long block. This will be backup work for mechanic as he has time.
Bilge. Started cleaning the bilge out again, amazing how dirty it can get in 2 hours of use when you get water in your oil and it steams out. Yuck! At least this time it cleans easily with some spray cleaner and rags.
Fuel system. This I feel better about now. Pulled everything out and opened up the holley fuel pump. Bottom end looked fine, screen was clean, parts moved freely. Took the motor side apart and what do you know, found a piece of magnet loose on the inside. Pretty small piece, (see below) but doesn't take much inside a electric motor to cause all kinds of problems with jamming and stoppage. Cleaned it all out and put it back together to try again. Going with two pumps with two seperators this time. Got everything in including the new filters and a second fuel pressure switch, so time to put that back in so it will be ready when the motor is set to be dropped in.
Also removed the old fuel pump switch as it would shut off randomly. Brand new, but giving me problems so out it goes.
Today I should finish cleaning the bilge, start assembling the fuel system and adding some wood behind the bottom of the bench seat to reinforce that area further and mount the pumps/filters on. Next will be a bit larger endeavor. I am adding some reinforcement along the bottom of the seat as I plan to make the back of the bench seat removable for service. It will still be bolted in securely, but if I need to work on something, remove a few bolts and pull it out. That way I can lay on the bench and then down into the engine compartment. Structurally it should be better when I am done, but still a bit nervous about cutting up a fiberglass shell. At least I have the glass experience that I can always return it to stock if I want to.
Oh, also bought 4" risers, gaskets for them and outdrive water pump kits. Michigan Motorz does a good job on small parts and gaskets.
Brian
01-09-2013, 04:20 PM
#209
Registered
Thread Starter
Well, the bilge is scrubbed out pretty well now. When people said they were intimate with thier boats, I figured it was just a saying about how well they new it. After wiggling around in the bilge with only one motor out and all the harware still in there to include motor mounts, I have a new understanding of what that means.
Below is a picture of what the back looks like now. In black is where I plan to cut to make it removeable. All the screw holes for the cushions are inside these cuts, so the seat will come out as one piece, no need to remove cushions first. The area in red will be reinforced with 1.5" plywood resined onto the center section above the fuel tank and glued/screwed to the underside of the back seat lip at the top. Should be very strong and give a lot of shear support. Will also provide a good place to mount both fuel filters and gauges.
Once removed, the fiberglass seat back should be about an inch below the top of the seat cushions. That way I can lay chest down on the cushion with my head and arms in the engine bay to work on the bilge pump, electrical or fuel system. You could sit on the seat with your legs in front of the engines to work on the motors also.
The top part that is cut out will remount in two places. The upside down U at the top will be keyed to the hull sides and secure with a bolt. The bottom will have a flange added on the backside which will allow it to be secured to the new plywood that was added underneath. I am figuring on 7 bolts total to secure it, so not a quick disconnect, but maybe a 5 - 10 minute job.
Once reassembled, the whole thing should be more rigid than when I started, but I am unsure how important that is. The seat back which is part of the inner liner does not secure into the sides of the hull and there is nothing on either side of the upside down U piece other than the deck, so if there is much shear in that piece, I really think you would see more flexing in the deck area right there.
I have thought this out and feel really good about it. Then again, I better feel good about it, it is my family. but with how much work I did beefing up the rear fuel tank bulk head and center stringer, it will be solid.
If it doesn't work I will either return it to normal or look for a new hull!
Brian
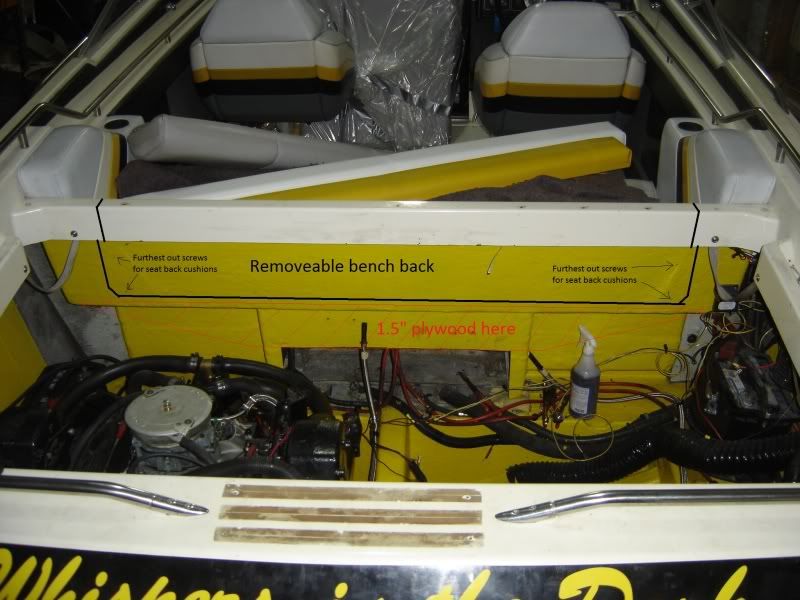
01-09-2013, 11:15 PM
#210
Registered
Nice design. Growing up we had a 23 wellcraft nova. Very solid and sturdy boat. The whole back seat basically 3 pieces. That was bolted/screwed in. 30 minutes could have moor fully exposed. I don't think you will have rigidity problems.

