


My new project - 86 - 272 LS
 12-22-2011, 10:18 AM
#21
Registered
Thread Starter
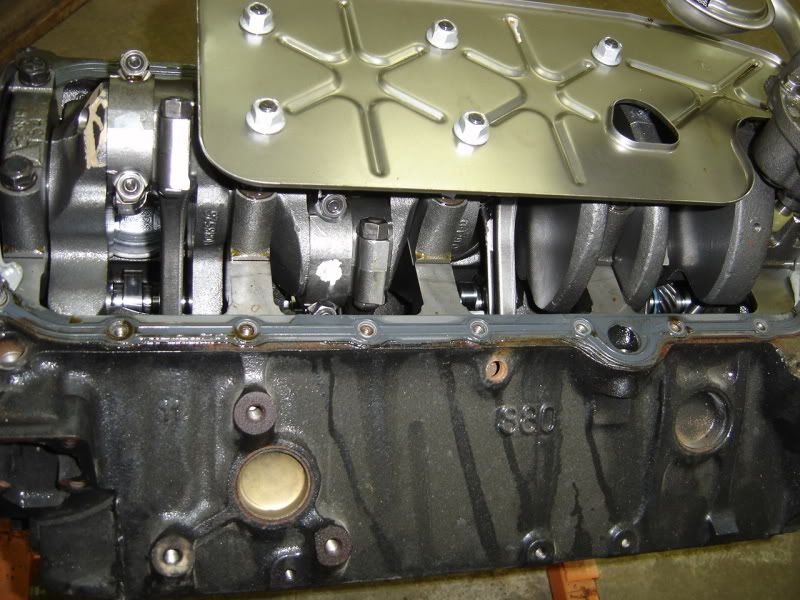
Well we finally started digging into the motor to determine the damage. It started off scary as the water distribution block above the thermostat is badly corroded. It will need to be replaced as part of the hose boss is gone. The intake had quite a bit of rust flake piled up on it also that had to be vacuumed away before the bolts could even be removed. Not feeling good at this point. But, all the bolts are coming out pretty easy. Exhaust manifold came off without issue and looked OK, but the risers were listed as being replaced. Then pulled the intake manifold. Came off fine, but orange permatex for gaskets on the front and back that had been painted black on the exterior. So, the motors have definitely been apart before and upon closer inspection, both motors look the same. The intake was put on with orange permatex and then it was painted. Makes sense as the valve covers also had black overspray on them that I had noticed before. Inside under the manifold is surface rust on the cast iron. The exposed parts of the lifters look clean and shiny, the pushrods look good, just surface rust. Look in the cooling ports on the heads and they look really good. I mean like on a car, really good. No rust in the passages so now I am a bit more hopeful.
Pull the valve cover and there is a lot of rust on the heads. I mean a lot! When you put the socket down on the head bolt, if it is in a low area it oozes out like mud. Then we notice the valve covers, you can see through them they have rusted out so bad. So now we know how the moisture got under the valve covers. The heads come off fine and looks like good news. Cylinder walls look beautiful, really good. Even the heads look pretty good underneath, just surface rust up top. Rocker arms look good, springs look good, just the head surface. Looks like some carbon buildup between the cyclinders on the head gasket, so wonder if the head gasket was also leaking? The compression check really didn�t show cylinder pairs leaking into each other, so not sure on that one. Maybe they overheated the motors before, not sure.
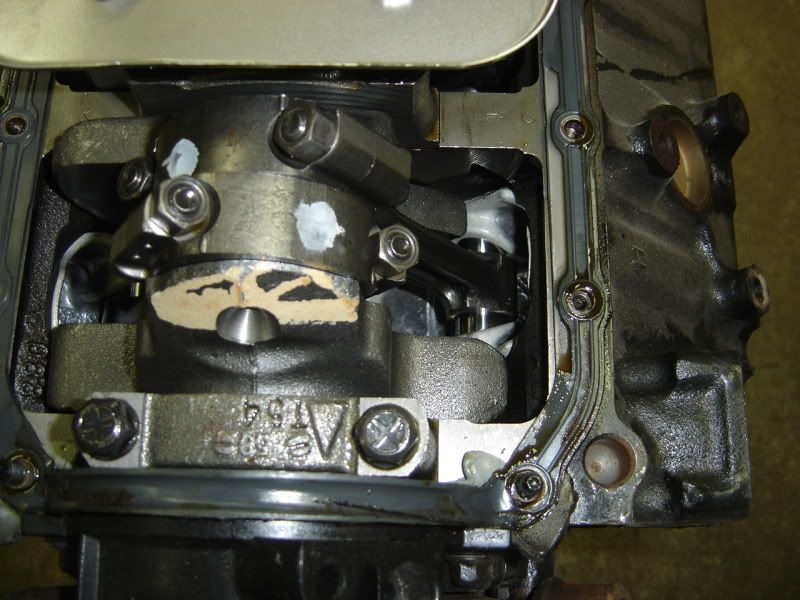
So the mechanic pulls the numbers off the block and runs them. Says it is a 4 bolt main! They mic right at 4.000� on bore and 3.500� on stroke, so it looks like new motors were put into this thing as the hour meter shows 692 hours. Would expect more wear for that kind of hours I would think. I know mercruiser did not put 4 bolt mains in the alpha drive boats in 1986, so I am guessing these must be new blocks?
Now the rust. I bought this from a guy in NJ that bought it off long island through Ebay. Last registration sticker showed 2009, so since 2009 it has probably only run about 15 minutes. I had it running about 3-5 minutes on the hose, and the NJ guy had it running in the water to switch trailers, said he ran it 100 to 200 yards on the river just to check it out? Who knows, but it has not run much at all and was empty of gas when I looked at it. I am wondering if the compression issue is due to rust on the valve seats? If the internal surface looks that bad, could the valves that were sitting open let the seats rust and lose their seal? We are going to pull the heads apart and take a look, but I am feeling better about it now.
Motor Plans: Now what to do. First, we are going to pull the front and replace the timing chain as you can see the surface rust on it. I also do not know what cam is in this, so we will have to try to measure it for lift and duration. Most likely replace the cam and intake with an Edelbrock performer package, but I need to read up on options there and decide what to do. Could go with Vortec heads and intake, but you are talking about $700 per engine there plus a cam then. If going that far, should go with something like the LT4 roller cam which adds another $400 to the package and would need better carbs, so all of a sudden you are talking about $3,000 in motor upgrades on a $5,000 boat with old Alpha drives. Hmm, thinking performer cam and intake, rebuild or tune up the stock carb and run the damn thing for a few years and buy something bigger that I really want!
Pull the valve cover and there is a lot of rust on the heads. I mean a lot! When you put the socket down on the head bolt, if it is in a low area it oozes out like mud. Then we notice the valve covers, you can see through them they have rusted out so bad. So now we know how the moisture got under the valve covers. The heads come off fine and looks like good news. Cylinder walls look beautiful, really good. Even the heads look pretty good underneath, just surface rust up top. Rocker arms look good, springs look good, just the head surface. Looks like some carbon buildup between the cyclinders on the head gasket, so wonder if the head gasket was also leaking? The compression check really didn�t show cylinder pairs leaking into each other, so not sure on that one. Maybe they overheated the motors before, not sure.
So the mechanic pulls the numbers off the block and runs them. Says it is a 4 bolt main! They mic right at 4.000� on bore and 3.500� on stroke, so it looks like new motors were put into this thing as the hour meter shows 692 hours. Would expect more wear for that kind of hours I would think. I know mercruiser did not put 4 bolt mains in the alpha drive boats in 1986, so I am guessing these must be new blocks?
Now the rust. I bought this from a guy in NJ that bought it off long island through Ebay. Last registration sticker showed 2009, so since 2009 it has probably only run about 15 minutes. I had it running about 3-5 minutes on the hose, and the NJ guy had it running in the water to switch trailers, said he ran it 100 to 200 yards on the river just to check it out? Who knows, but it has not run much at all and was empty of gas when I looked at it. I am wondering if the compression issue is due to rust on the valve seats? If the internal surface looks that bad, could the valves that were sitting open let the seats rust and lose their seal? We are going to pull the heads apart and take a look, but I am feeling better about it now.
Motor Plans: Now what to do. First, we are going to pull the front and replace the timing chain as you can see the surface rust on it. I also do not know what cam is in this, so we will have to try to measure it for lift and duration. Most likely replace the cam and intake with an Edelbrock performer package, but I need to read up on options there and decide what to do. Could go with Vortec heads and intake, but you are talking about $700 per engine there plus a cam then. If going that far, should go with something like the LT4 roller cam which adds another $400 to the package and would need better carbs, so all of a sudden you are talking about $3,000 in motor upgrades on a $5,000 boat with old Alpha drives. Hmm, thinking performer cam and intake, rebuild or tune up the stock carb and run the damn thing for a few years and buy something bigger that I really want!
 12-25-2011, 12:10 PM
#22
Registered
Well we finally started digging into the motor to determine the damage. It started off scary as the water distribution block above the thermostat is badly corroded. It will need to be replaced as part of the hose boss is gone. The intake had quite a bit of rust flake piled up on it also that had to be vacuumed away before the bolts could even be removed. Not feeling good at this point. But, all the bolts are coming out pretty easy. Exhaust manifold came off without issue and looked OK, but the risers were listed as being replaced. Then pulled the intake manifold. Came off fine, but orange permatex for gaskets on the front and back that had been painted black on the exterior. So, the motors have definitely been apart before and upon closer inspection, both motors look the same. The intake was put on with orange permatex and then it was painted. Makes sense as the valve covers also had black overspray on them that I had noticed before. Inside under the manifold is surface rust on the cast iron. The exposed parts of the lifters look clean and shiny, the pushrods look good, just surface rust. Look in the cooling ports on the heads and they look really good. I mean like on a car, really good. No rust in the passages so now I am a bit more hopeful.
Pull the valve cover and there is a lot of rust on the heads. I mean a lot! When you put the socket down on the head bolt, if it is in a low area it oozes out like mud. Then we notice the valve covers, you can see through them they have rusted out so bad. So now we know how the moisture got under the valve covers. The heads come off fine and looks like good news. Cylinder walls look beautiful, really good. Even the heads look pretty good underneath, just surface rust up top. Rocker arms look good, springs look good, just the head surface. Looks like some carbon buildup between the cyclinders on the head gasket, so wonder if the head gasket was also leaking? The compression check really didn�t show cylinder pairs leaking into each other, so not sure on that one. Maybe they overheated the motors before, not sure.
So the mechanic pulls the numbers off the block and runs them. Says it is a 4 bolt main! They mic right at 4.000� on bore and 3.500� on stroke, so it looks like new motors were put into this thing as the hour meter shows 692 hours. Would expect more wear for that kind of hours I would think. I know mercruiser did not put 4 bolt mains in the alpha drive boats in 1986, so I am guessing these must be new blocks?
Now the rust. I bought this from a guy in NJ that bought it off long island through Ebay. Last registration sticker showed 2009, so since 2009 it has probably only run about 15 minutes. I had it running about 3-5 minutes on the hose, and the NJ guy had it running in the water to switch trailers, said he ran it 100 to 200 yards on the river just to check it out? Who knows, but it has not run much at all and was empty of gas when I looked at it. I am wondering if the compression issue is due to rust on the valve seats? If the internal surface looks that bad, could the valves that were sitting open let the seats rust and lose their seal? We are going to pull the heads apart and take a look, but I am feeling better about it now.
Motor Plans: Now what to do. First, we are going to pull the front and replace the timing chain as you can see the surface rust on it. I also do not know what cam is in this, so we will have to try to measure it for lift and duration. Most likely replace the cam and intake with an Edelbrock performer package, but I need to read up on options there and decide what to do. Could go with Vortec heads and intake, but you are talking about $700 per engine there plus a cam then. If going that far, should go with something like the LT4 roller cam which adds another $400 to the package and would need better carbs, so all of a sudden you are talking about $3,000 in motor upgrades on a $5,000 boat with old Alpha drives. Hmm, thinking performer cam and intake, rebuild or tune up the stock carb and run the damn thing for a few years and buy something bigger that I really want!
As a suggestion...consider keeping your mods reasonable and cost effective. Consider re-working your heads with a valve job and new valve springs and retainers. This will insure that the top end of the motors are tight. If you shop this you might get by on 4: heads with $400~$500. Find a local machine shop you can deal with that understands your budget. If your intakes are serviceable consider cleaning them up and re-using them....With a stock set up you will not see any gains that are noticeable unless you change the cam. You discovered that the engines are 4: bolt main bearing cap versions which means at some point someone put truck or marine short or long blocks in the boat which gets you the torque cam...a good thing. Double check that you have brass freeze plugs by putting a magnet on the ones you can get to. If the magnet sticks you have steel freeze plugs...not good. This would also mean that you have automotive heads gaskets that are probably rusted and leaking. If you have brass you are good to go with running these motors for a few seasons until you make another decision. If they are steel you are looking at remove and replace engine to get to all of the plugs as well as replacing the head gaskets to marine stainless.
The engines in my 255 turned out to be truck 4:bolts with steel freeze plugs...the one above the starter on the port engine rusted through and now I am pulling engines. While I was doing this I lucked up and found a pair of re-built Vortec Marine Engines that have all forged pistons, rods and cranks and new Vortec heads. I bought the pair for $4500. I plan to re plug and put new marine head gaskets on the 5.7's I pull out. I have already made deals to swap them out for about $3000 worth of goods and services so my net is $1500...not bad.
In any case...don't sink a lot of money in the old 5.7's. Make the boat reliable and comfortable. Once freshened up those twin 260's will push that 272 to 60+ MPH and be reliable all day at 40~45.
Put a plan and budget together and stick to it...and don't get caught up in the "I got to have this or that" trap just because you see a great deal on it.
In overview think about the fact that you can spend $100,000 very quickly to buy a 2~3 year old boat that will not perform better than your 272 that you end up with $10K~$12K in.
Hope this helps your thought process some.
02-09-2012, 12:59 PM
#23
Registered
Thread Starter
Cockpit rework on a 1986 Formula 272
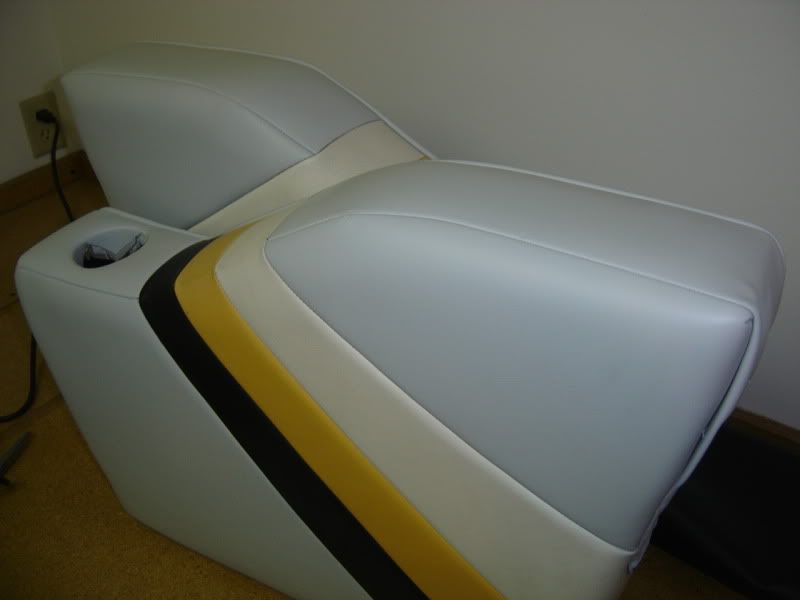
Bought this boat knowing it was going to be a project, but it always gets bigger than expected it seems. The rear seat was in rough shape appearance wise, but I had no idea just how bad. The front seats also looked rough but were also showing signs of structural issues as well. The side trim looked good, but felt weak.
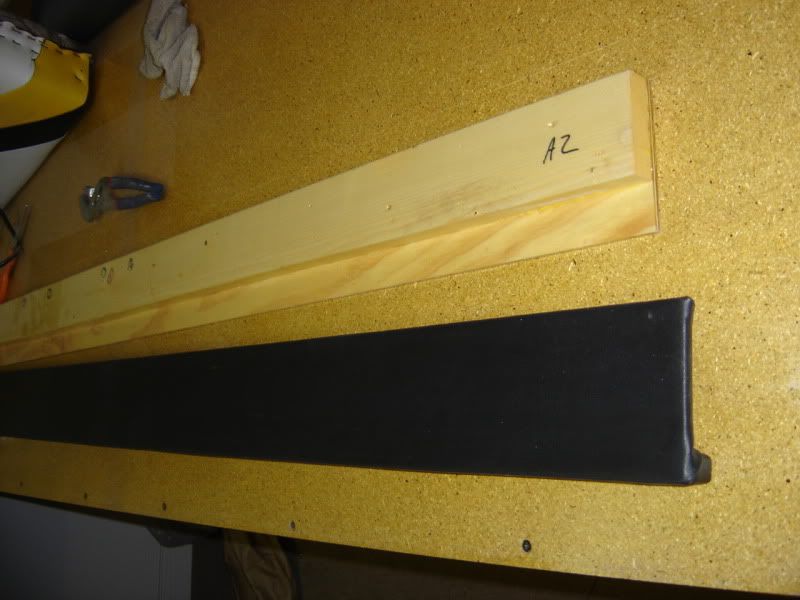
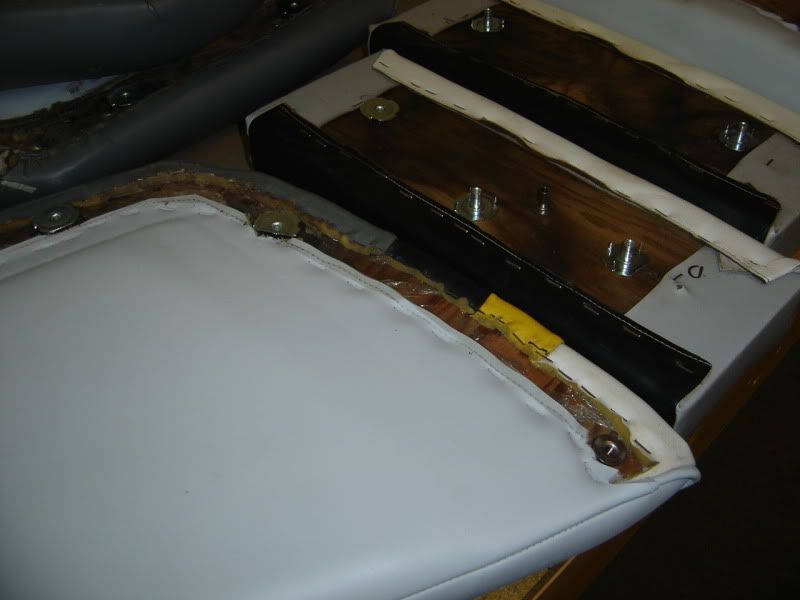
Side Trim
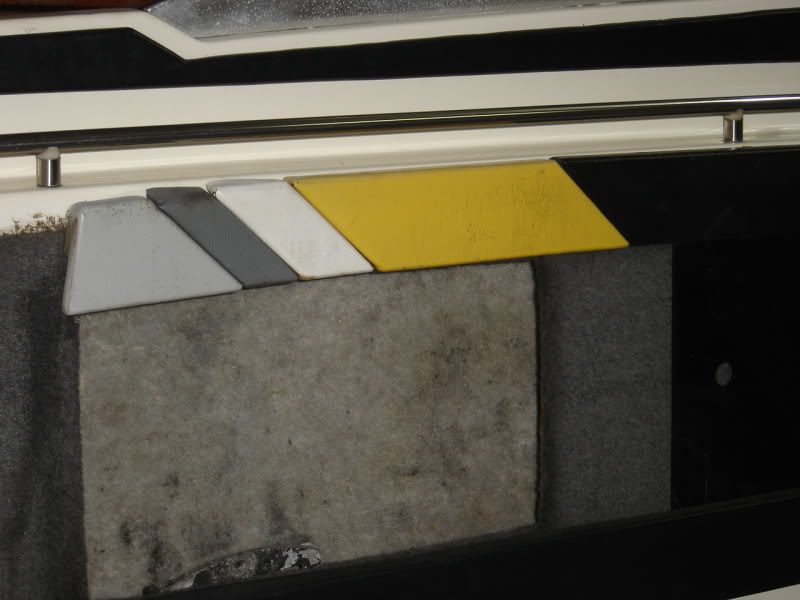
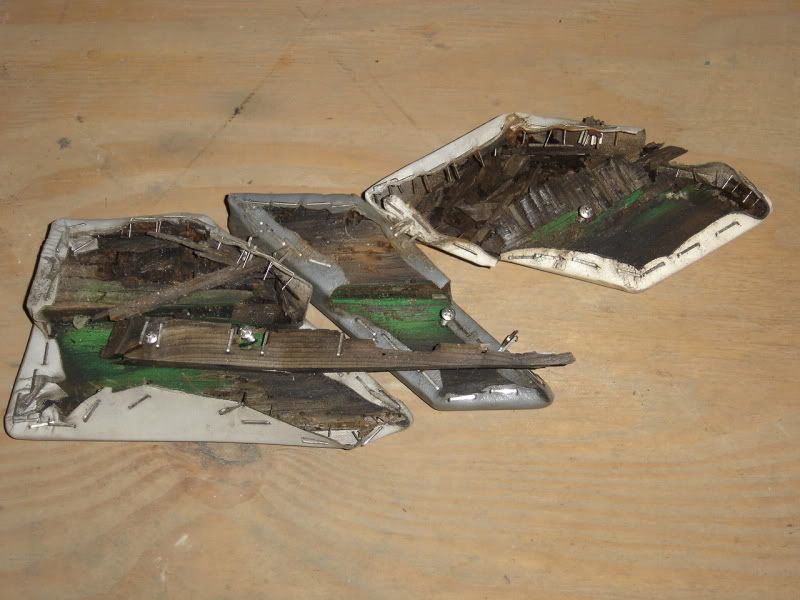
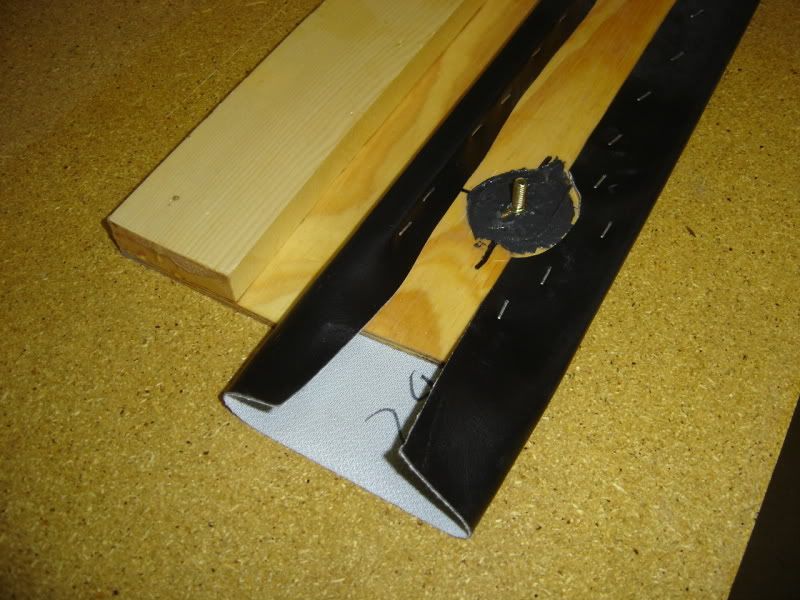
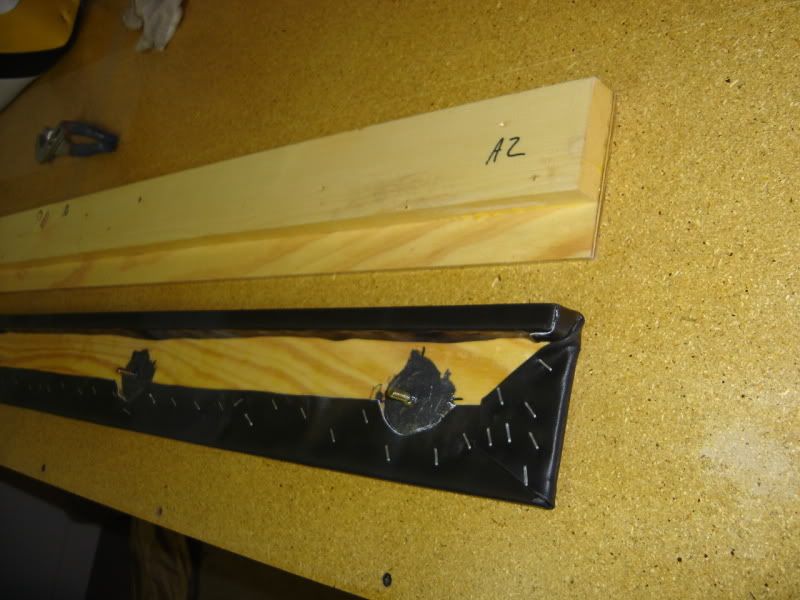
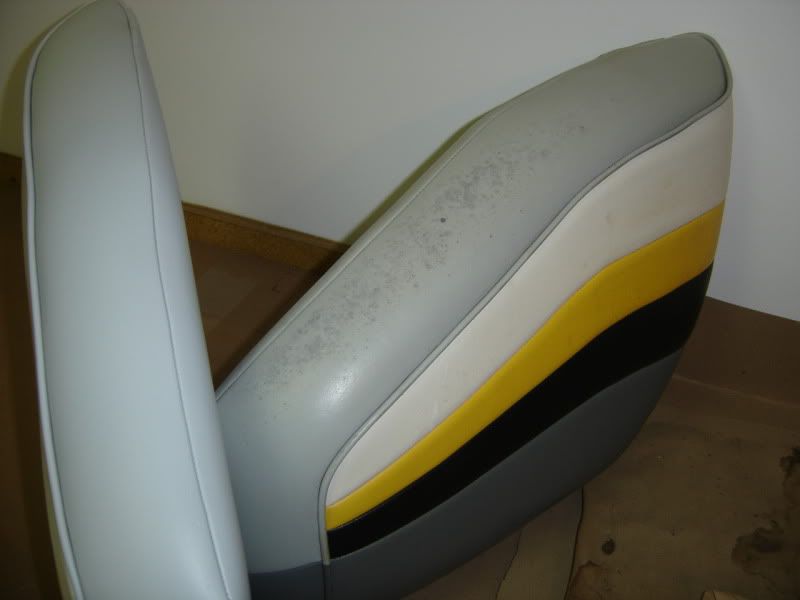
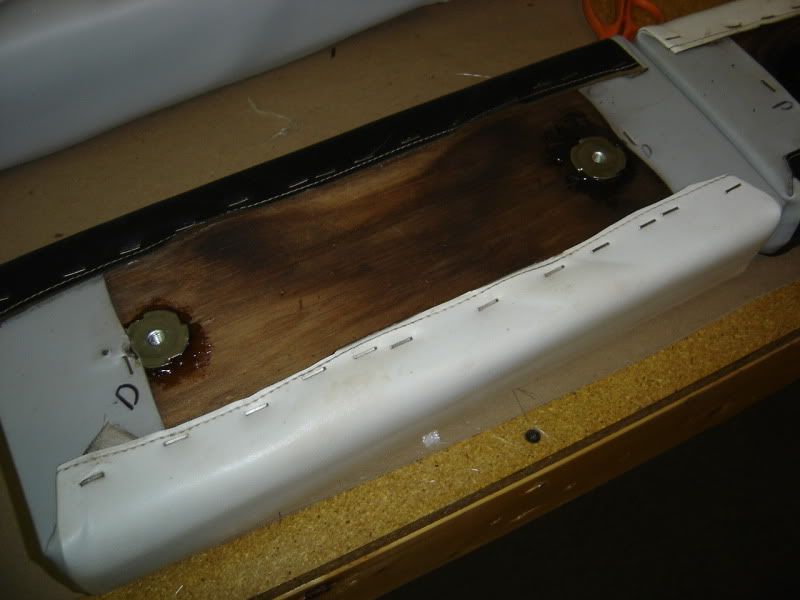
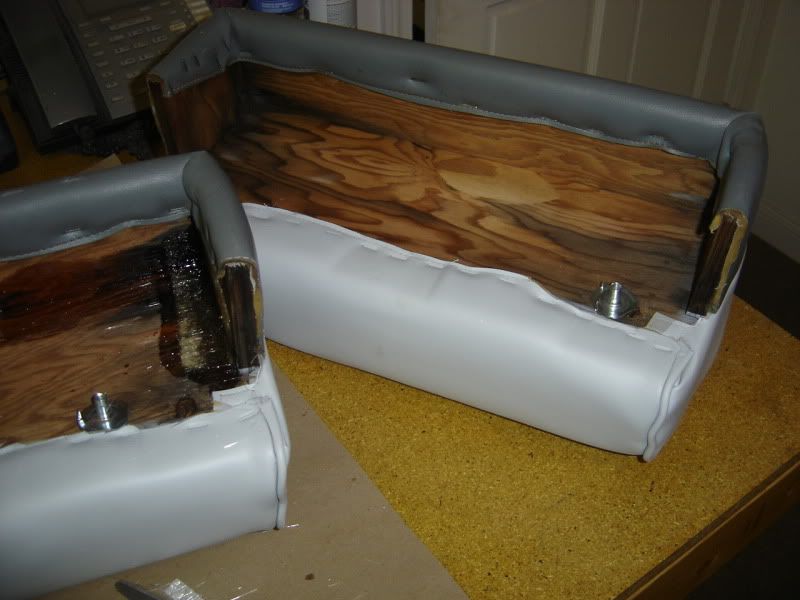
Upon inspection of the side trim, the back colored pieces were in really sad shape as can be seen in how they came off. Looks nice with all those colors, but I am not that interested on looks for this old boat. I decided to make new pieces and to keep the work down, I made them one solid piece and black. I used pine and standard plywood and made them as a solid piece. Glued them with exterior glue and then coated them well with urethane so they would not soak up the water. Holes were marked for the securing bolts and studs were glued to the new pieces. After that they were wrapped with new black marine vinyl. They line up nice, match the old pieces that were solid black at the front of the cockpit and should work out nicely. The old ones lasted 25 years, these should last pretty good with the better sealing. No idea how long, but this boat will not be sitting around outside much so they will stay dry. Also inside storage over the winter so everything should dry out nicely if it does get wet. I was amazed at how much water was being retained in the seat cushions and their wood pieces.
Bought this boat knowing it was going to be a project, but it always gets bigger than expected it seems. The rear seat was in rough shape appearance wise, but I had no idea just how bad. The front seats also looked rough but were also showing signs of structural issues as well. The side trim looked good, but felt weak.
Side Trim
Upon inspection of the side trim, the back colored pieces were in really sad shape as can be seen in how they came off. Looks nice with all those colors, but I am not that interested on looks for this old boat. I decided to make new pieces and to keep the work down, I made them one solid piece and black. I used pine and standard plywood and made them as a solid piece. Glued them with exterior glue and then coated them well with urethane so they would not soak up the water. Holes were marked for the securing bolts and studs were glued to the new pieces. After that they were wrapped with new black marine vinyl. They line up nice, match the old pieces that were solid black at the front of the cockpit and should work out nicely. The old ones lasted 25 years, these should last pretty good with the better sealing. No idea how long, but this boat will not be sitting around outside much so they will stay dry. Also inside storage over the winter so everything should dry out nicely if it does get wet. I was amazed at how much water was being retained in the seat cushions and their wood pieces.
02-09-2012, 01:02 PM
#24
Registered
Thread Starter
Rear seat
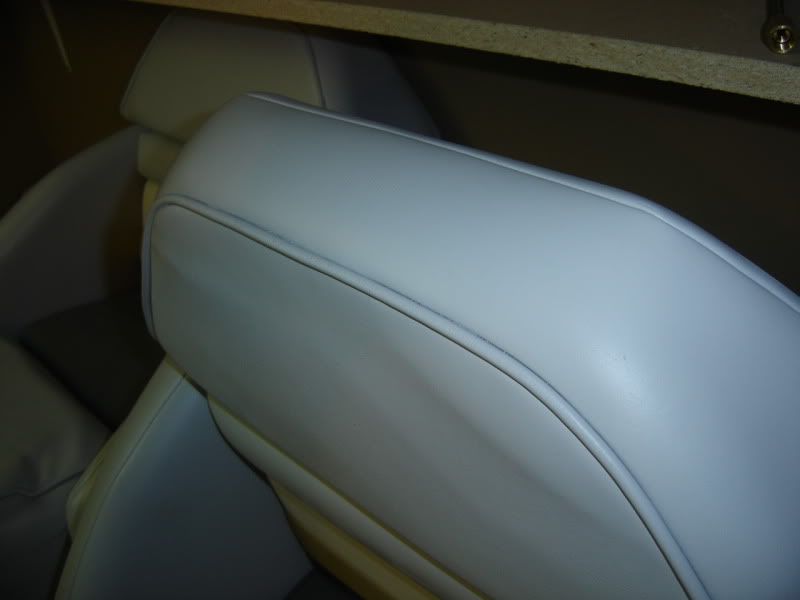
The rear seat needed work also. The old plywood was rotted at the bottom and the carpet looked tattered. I used � exterior plywood for new pieces, again coated them with urethane and attached new carpet. Stronger than the old and looks nice. The cushions look like they will make it a bit longer, except for the yellow and white which has got brittle and started cracking. I got some new vinyl for that and will be remaking those pieces. The grey and black pieces survived and are still soft. They also cleaned up rather well.
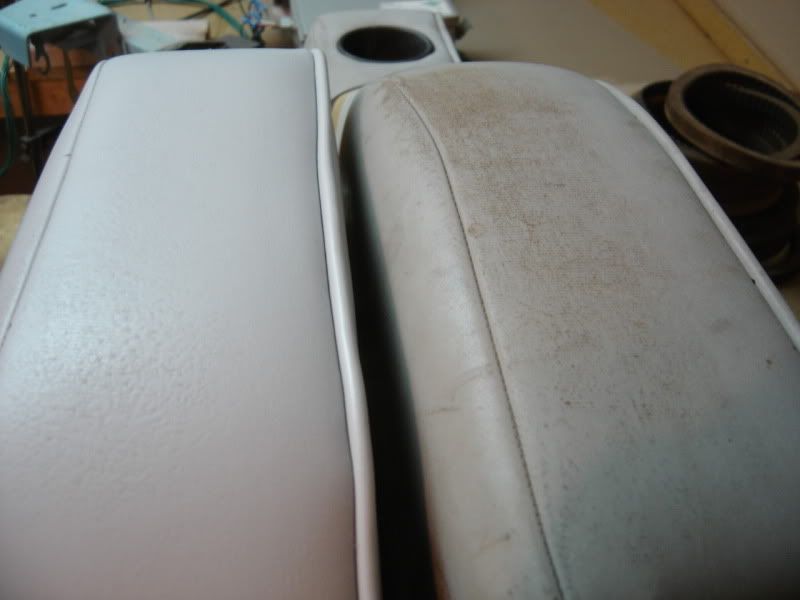
The rear seat armrest looked really rough. They were loose from where the anchors had mostly rusted away and the tops of the light grey vinyl had worn down to where you could see the stitching. I really thought it was a lost cause, but decided to try the SEM marine vinyl spray. Well, I am very happy with how it turned out and am anxious to see how it holds up over the summer. Have read some different experiences with it on OSO here with regards to sunlight and heat, so we will see. I was really surprised that it ended up filling in the exposed fabric. Took a lot of spraying, but it filled it in. The grain texture on the vinyl is gone of course where it was built up that much, but it looks pretty good. The only thing I sprayed was the light grey as everything else looked good. Well, with the grey redone now and looking good, the others are really showing their age also. Turns out they looked good by comparison. So if the other stuff holds up over the summer, I will respray the yellow, white and black also next winter.
The rear seat needed work also. The old plywood was rotted at the bottom and the carpet looked tattered. I used � exterior plywood for new pieces, again coated them with urethane and attached new carpet. Stronger than the old and looks nice. The cushions look like they will make it a bit longer, except for the yellow and white which has got brittle and started cracking. I got some new vinyl for that and will be remaking those pieces. The grey and black pieces survived and are still soft. They also cleaned up rather well.
The rear seat armrest looked really rough. They were loose from where the anchors had mostly rusted away and the tops of the light grey vinyl had worn down to where you could see the stitching. I really thought it was a lost cause, but decided to try the SEM marine vinyl spray. Well, I am very happy with how it turned out and am anxious to see how it holds up over the summer. Have read some different experiences with it on OSO here with regards to sunlight and heat, so we will see. I was really surprised that it ended up filling in the exposed fabric. Took a lot of spraying, but it filled it in. The grain texture on the vinyl is gone of course where it was built up that much, but it looks pretty good. The only thing I sprayed was the light grey as everything else looked good. Well, with the grey redone now and looking good, the others are really showing their age also. Turns out they looked good by comparison. So if the other stuff holds up over the summer, I will respray the yellow, white and black also next winter.
02-09-2012, 01:06 PM
#25
Registered
Thread Starter
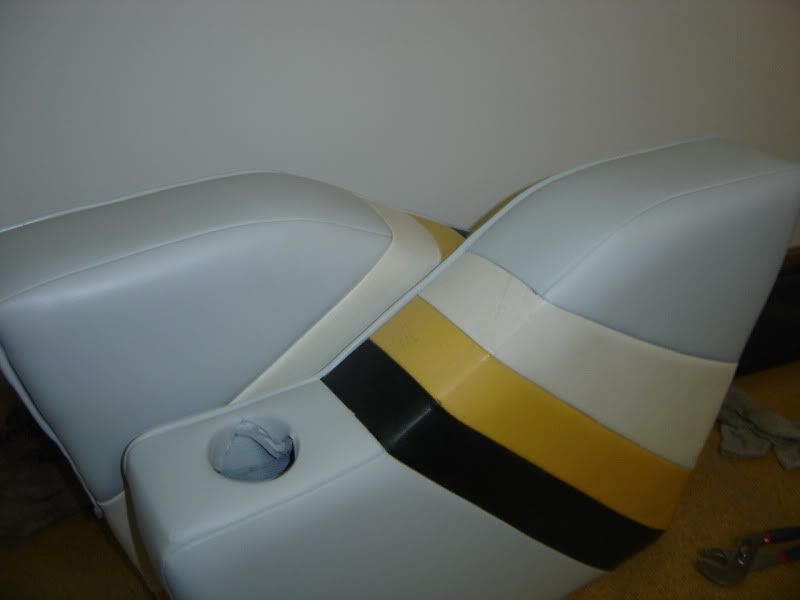
Boat came with the bucket seats. Again, the tops of the seats were really bad with the light grey being worn all the way into the fabric. They were also mechanically coming apart. When I looked at the boat, I wondered if the front seat cushion parts pivoted up to forma sort of bolster/leaning pad like I have seen on some new seats. So I lightly pulled up on the front cushion and it popped off right in my hands � opps! Later, I tried sitting in the passenger seat and when I did, the side popped off the chair due to the t nuts having rusted away. So I took everything apart and cleaned it up. The wood was still good, the T nuts had just rusted away after 25 years of exposure so the bolts pulled right out of the wood. After cleaning everything up I glassed in new t nuts and used new stainless bolts. The seats are now back together and ready to be set on the seat pedestals. Maybe I will go to bolsters in the future, but they are rather pricey. I think if I enjoy the offshore boating scene I may decide to go with a larger boat with bolsters, time will tell.
The swim pad has also been dismantled and will be reworked soon. All new vinyl and wood, only reusing the old foam which is in really good shape which surprised me

The swim pad has also been dismantled and will be reworked soon. All new vinyl and wood, only reusing the old foam which is in really good shape which surprised me
02-09-2012, 01:13 PM
#26
Registered
Thread Starter
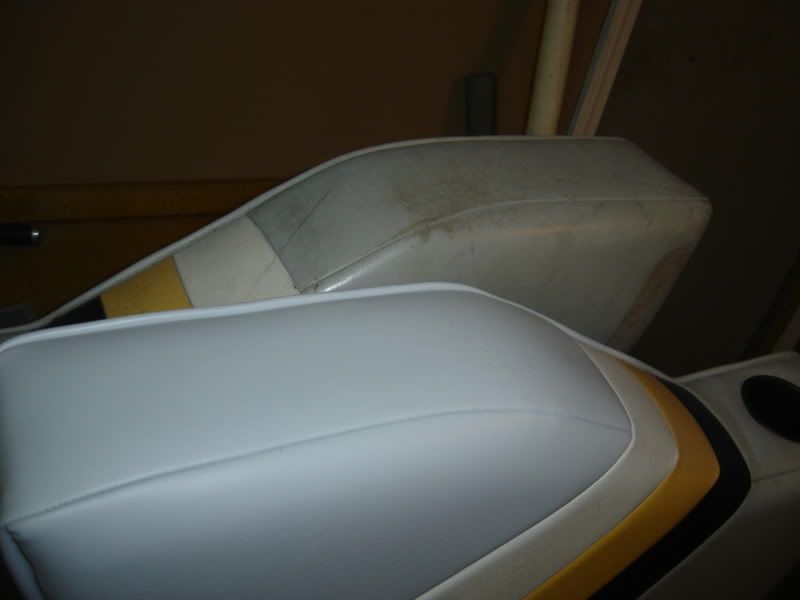
This first one is midway throught he vinyl repair. Color is good, but you can still see the texture of the fabric. Many many coats later it would fill in. To do the front seats and the rear arm rest took me four spray bottles.

The seat back tops were really bad like the rear armrest. Took lots and lots to fill it in. Still, the four bottles with a can of cleaner/prep cost about $50 + sh.
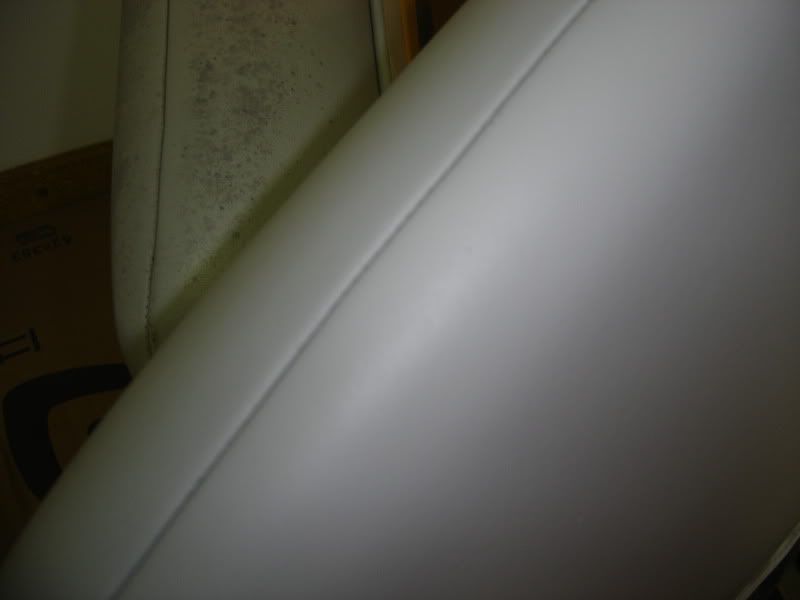
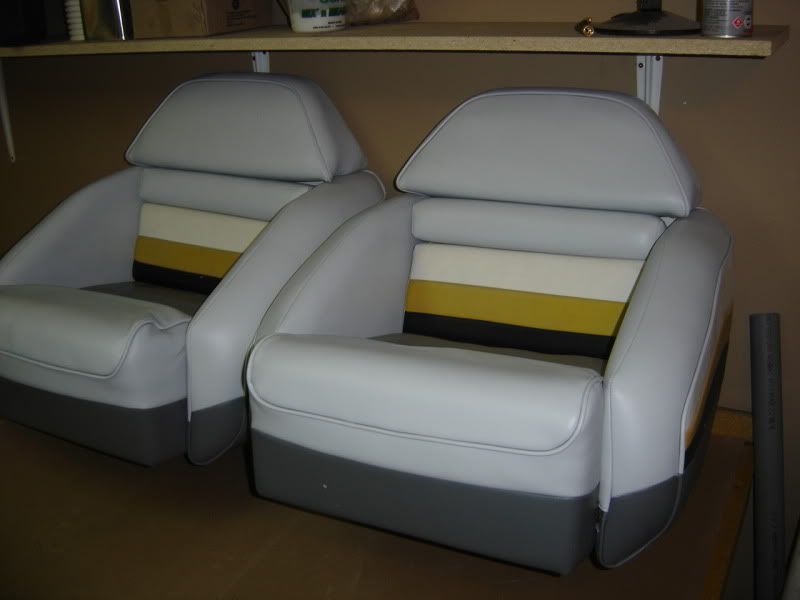
Here are the seat sides before and after. The color was destroyed, but the vinyl was still smooth and covered fairly easy.
The seat back tops were really bad like the rear armrest. Took lots and lots to fill it in. Still, the four bottles with a can of cleaner/prep cost about $50 + sh.
Here are the seat sides before and after. The color was destroyed, but the vinyl was still smooth and covered fairly easy.
02-09-2012, 01:57 PM
#27
Registered
Thread Starter
Well, I spent $649 and bought 3 used engines, two with vortec heads and one with marine center bolt heads but pre vortec, and two mercruiser 14" flywheels. The marine block is shown below, looks very good. This was the one with the old style heads, but the internals look new, all original and not rebuilt. Run, but not very much.
The other engine is taken apart and having some work done to the block and crank to fix a spun bearing. Rehone the cylinder walls so we can put in new rings, new cam bearings and magnaflux everything.
Marine engine came with the mercruiser roller cam, so now I need another mercruiser roller cam or chevy �ramjet� cam, two aluminum intake manifolds, anothe marine oil pan and the rebuild kits. Getting interesting now�.
02-09-2012, 08:01 PM
#28
Registered
OK...you are now officially in the soup. The seats and interior panels are looking good...great job.
Great buy on the engines. Check some of my later posts from the past few days for links to what Vortec heads are the good ones and which blocks work with what. you can roller cam pre Vortec but you have to use after market cams and lifters which is not a big deal.
Stay after it..you're moving in the right direction.
02-09-2012, 08:11 PM
#29
Registered
Thread Starter
OK...you are now officially in the soup. The seats and interior panels are looking good...great job.
Great buy on the engines. Check some of my later posts from the past few days for links to what Vortec heads are the good ones and which blocks work with what. you can roller cam pre Vortec but you have to use after market cams and lifters which is not a big deal.
Stay after it..you're moving in the right direction.
Great buy on the engines. Check some of my later posts from the past few days for links to what Vortec heads are the good ones and which blocks work with what. you can roller cam pre Vortec but you have to use after market cams and lifters which is not a big deal.
Stay after it..you're moving in the right direction.
I am pretty geeked about the interior and want to get it put back together, but knowing the motors are out I am not in a hurry to put the rear bench back in for fear of it getting dirty. That should go fairly quick once the motors are in.
Tonight I started working on the center stringer. I can't believe how the made that and then left it open at the bottom. Basically been open to any water in the bilge for 25 years. Looks like it will not be a bad repair either way, I have seen boat with way worse damage and they were still being used!
Brian
02-25-2012, 12:25 PM
#30
Registered
You will regret spray painting the vinyl and seats! I tried that approach last year with vinyl paint and it was a disaster!!!! Once you start using the boat the paint will crack and peel off leaving the vinyl looking like crap! You will then go into maintenance mode of continually painting it and eventually you will give up and accept the fact that they need to be recovered. It will be embarrasing when you bring people on board too because you will see paint flakes on the floor (get ready to do LOTS of vacuuming).
My advice is to recover them now (especially the seats which will get alot of use and wear). If you decide to wait due to budget I understand but just remember this post once the vinyl paint starts to crack and peel.
My advice is to recover them now (especially the seats which will get alot of use and wear). If you decide to wait due to budget I understand but just remember this post once the vinyl paint starts to crack and peel.

