


My new project - 86 - 272 LS
 05-29-2012, 09:06 PM
#81
Registered
Thread Starter
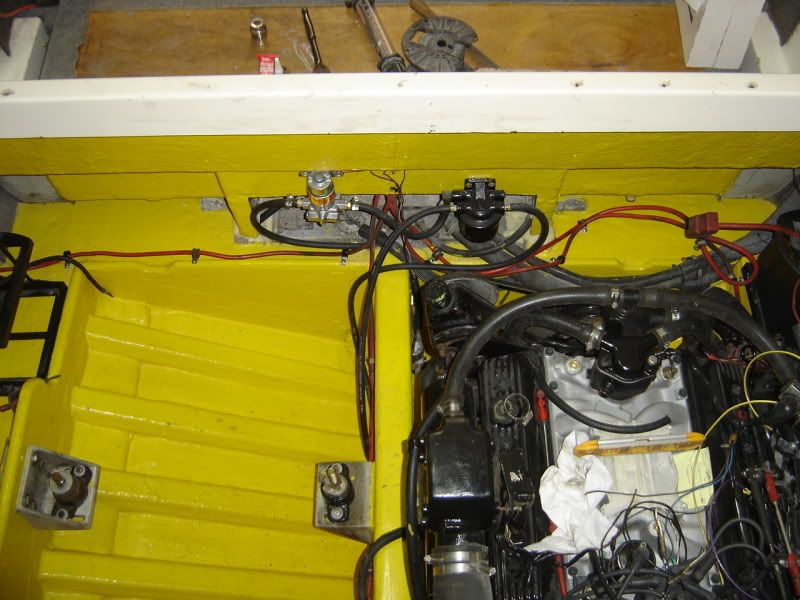
Well, I haven't forgot about this thing, but a bunch of small stuff done. Had to tie up a few loose ends like bilge blower hoses, secure wires with the holders, get power steering pump positioned, find springs and washers for transom assembly and a final wipe down of the starboard bilge.
Then we dropped a motor in it! yep, one is back in. Haven't done much back there since. My exhaust manifold gaskets and thermostat housing gaskets just showed up, so I can finish bolting that stuff on tomorrow now.
Spent most of today messing around trying to get the motor aligned. Got the tool from whoya and for the life of me couldn't get it aligned. Then I got some help with them trying to get it in and me crammed in the bilge, tried again. still no go. Raising motor, leveling motor, pushing pulling etc. Nothing.
OK, take the tool over to the other engine sitting on a crate and what do you know, it will not go into the coupler! It is 1.010" on the spline end and the splines are 1.000" on the inside. So, go to the lathe and make a small sample and what do you know, it is pretty close. About another hour and it looks perfect!
So, one motor in and ready to button up, hopefully tomorrow. Tomorrow i also hope to get the other transom assembly on and set the port motor mounts, finish securing starter wires and such so we can drop in #2 on Thursday.
swim platform has been designed, cut, glued, routed and sanded: now ready for urethane.
Got the other trim tab back on today so that is done.
Trailer parts came in so started working on trailer also. Made new bushings for the leaf springs and putting in new bolts. Hopefully tomorrow or next day the electric brakes and fresh hubs will go back on.
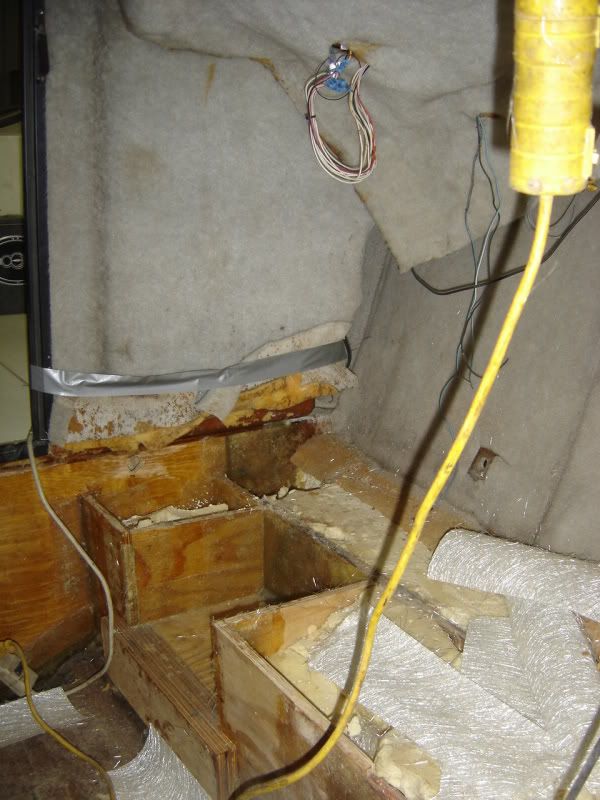
Over the weekend I worked a lot in the cabin area. Replaced the bulk head under the door, put in new plywood where I had to remove old stuff and to get the new bulk head in and glassed up most of it. This week I should also finish the glass work there. By the weekend it will be strong enough to be structurally sound again!
Would love to get the outdrives back on it this weekend, we will see. Lots to do, still have to upload pics.
Brian
Then we dropped a motor in it! yep, one is back in. Haven't done much back there since. My exhaust manifold gaskets and thermostat housing gaskets just showed up, so I can finish bolting that stuff on tomorrow now.
Spent most of today messing around trying to get the motor aligned. Got the tool from whoya and for the life of me couldn't get it aligned. Then I got some help with them trying to get it in and me crammed in the bilge, tried again. still no go. Raising motor, leveling motor, pushing pulling etc. Nothing.
OK, take the tool over to the other engine sitting on a crate and what do you know, it will not go into the coupler! It is 1.010" on the spline end and the splines are 1.000" on the inside. So, go to the lathe and make a small sample and what do you know, it is pretty close. About another hour and it looks perfect!
So, one motor in and ready to button up, hopefully tomorrow. Tomorrow i also hope to get the other transom assembly on and set the port motor mounts, finish securing starter wires and such so we can drop in #2 on Thursday.
swim platform has been designed, cut, glued, routed and sanded: now ready for urethane.
Got the other trim tab back on today so that is done.
Trailer parts came in so started working on trailer also. Made new bushings for the leaf springs and putting in new bolts. Hopefully tomorrow or next day the electric brakes and fresh hubs will go back on.
Over the weekend I worked a lot in the cabin area. Replaced the bulk head under the door, put in new plywood where I had to remove old stuff and to get the new bulk head in and glassed up most of it. This week I should also finish the glass work there. By the weekend it will be strong enough to be structurally sound again!
Would love to get the outdrives back on it this weekend, we will see. Lots to do, still have to upload pics.
Brian
 06-03-2012, 09:11 PM
#82
Registered
hey Brain...does a 272 LS have a bilge pump in the cabin? If so how is the drain arranged and does it have a separate switch? I can't remember if my '86 272 did or didn't.
I'm adding one to my 255 because there is a deep well at the bottom of the steps below the floor that runs all the way to the bulkhead of the V Berth. I plan on putting a 500 GPH Rule Automatic in and tie the discharge to the sink drain with a wye. In a heavy rain 100 gallons could work it's way into that area and there is no way for it to run out. This is the first design flaw I have found in the boat. Every other T-Bird I have owned had a pipe connecting the rear bilge to the cabin so at least forward motion would force water aft to the main bilge.
I'm adding one to my 255 because there is a deep well at the bottom of the steps below the floor that runs all the way to the bulkhead of the V Berth. I plan on putting a 500 GPH Rule Automatic in and tie the discharge to the sink drain with a wye. In a heavy rain 100 gallons could work it's way into that area and there is no way for it to run out. This is the first design flaw I have found in the boat. Every other T-Bird I have owned had a pipe connecting the rear bilge to the cabin so at least forward motion would force water aft to the main bilge.
06-03-2012, 10:21 PM
#83
Registered
Thread Starter
hey Brain...does a 272 LS have a bilge pump in the cabin? If so how is the drain arranged and does it have a separate switch? I can't remember if my '86 272 did or didn't.
I'm adding one to my 255 because there is a deep well at the bottom of the steps below the floor that runs all the way to the bulkhead of the V Berth. I plan on putting a 500 GPH Rule Automatic in and tie the discharge to the sink drain with a wye. In a heavy rain 100 gallons could work it's way into that area and there is no way for it to run out. This is the first design flaw I have found in the boat. Every other T-Bird I have owned had a pipe connecting the rear bilge to the cabin so at least forward motion would force water aft to the main bilge.
I'm adding one to my 255 because there is a deep well at the bottom of the steps below the floor that runs all the way to the bulkhead of the V Berth. I plan on putting a 500 GPH Rule Automatic in and tie the discharge to the sink drain with a wye. In a heavy rain 100 gallons could work it's way into that area and there is no way for it to run out. This is the first design flaw I have found in the boat. Every other T-Bird I have owned had a pipe connecting the rear bilge to the cabin so at least forward motion would force water aft to the main bilge.
Brian
06-08-2012, 08:14 AM
#84
Registered
Thread Starter
Well, as usual, things seem to always go slower than I plan. Even when I plan on it to go slower, it goes slowest!
But we have motors in the bilge now! Set in place and aligned. Waiting on a new alternator to come in so we can hook that up. Electrician is going to review the boat wiring next week while I am gone. Next week will install the drives, set the carbs, and hook up the gas and try to spin them over. still a lot to do, but getting there!
I also have some more glass work to do up front, but that should only take a few days (yeah, scheduling again) which is all I have until the next camping trip.
Brian
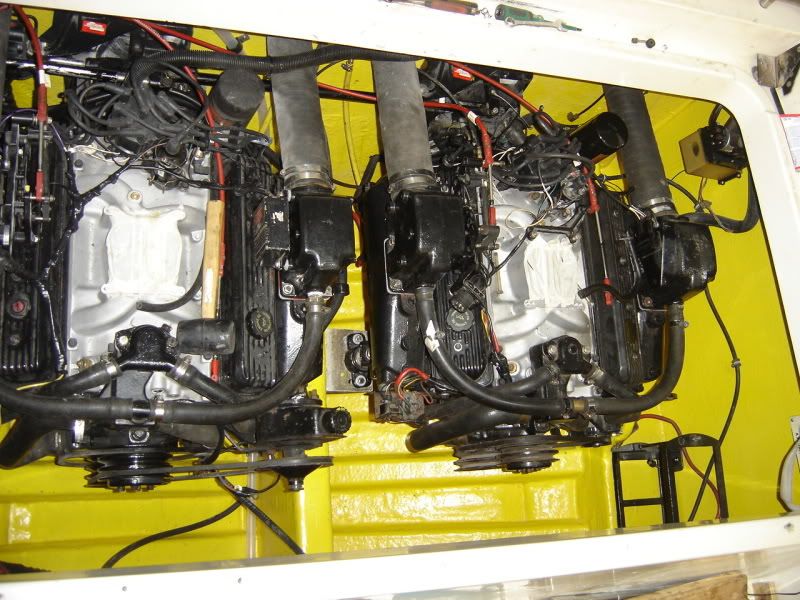
06-09-2012, 11:19 PM
#85
Registered
Well, as usual, things seem to always go slower than I plan. Even when I plan on it to go slower, it goes slowest!
But we have motors in the bilge now! Set in place and aligned. Waiting on a new alternator to come in so we can hook that up. Electrician is going to review the boat wiring next week while I am gone. Next week will install the drives, set the carbs, and hook up the gas and try to spin them over. still a lot to do, but getting there!
I also have some more glass work to do up front, but that should only take a few days (yeah, scheduling again) which is all I have until the next camping trip.
Brian
John
06-11-2012, 08:28 AM
#86
Registered
Thread Starter
It says not to use a pressure regulator with that fuel pump. I am going to see how it works. These pumps peek with a pretty reasonable pressure, so we will see.
I am pulling power for it from an accessory switch on the dashboard. The max power draw was reasonably low, so I ran it that way. If it proves to be too high, I can wire in a relay in back. I added a 12 volt accessory rail just above the battery where I can pull power from. If the always on switch idea does not work, I can use the switch to power a relay and add pressure switches in parrallel on the motors so the pump will cycle on and off automatically. I just want to be able to shut the pump off manually if ever needed.
And yes I am using the seperator as a manifold. It has two inputs and two outputs, so the two outputs will supply one line going to each motor. should be plenty of fuel flow, not even close from what they claim.
07-13-2012, 02:04 PM
#87
Registered
Thread Starter
Wow, been a month already. Work and camping trips/vacations are taking a toll on my progress.
Got the new swim platform on, looks decent and it is very strong. I weigh in at 260, so the old teak one made me very nervous.
Both engines are aligned, carb is on one, the other I am still finishing. Need to extend a wire for my starboard alternator and then install. Just put a new starter on the port motor. Both crank over nicely! That alone was great to hear! No more smoke from wires either, so that is good.
Ready to put the drives back on, will try again on Monday to do that. Just painted the trim rams so they can be installed also. Run the fuel line and we are ready untill the next ohcrap comes up.
Have been spending a lot of time on the trailer. Moving the roller bunks around getting them to fit better, what a pain that was with the boat on it. But several cut U-bolts later and some new parts, it is sitting nicely. Next week we will install the side bunks to help locate it and will be ready for a water float test hopefully. Fenders are back off being painted now, so hopefully trailer will be done next week.
Still need to get a second batter for it also.
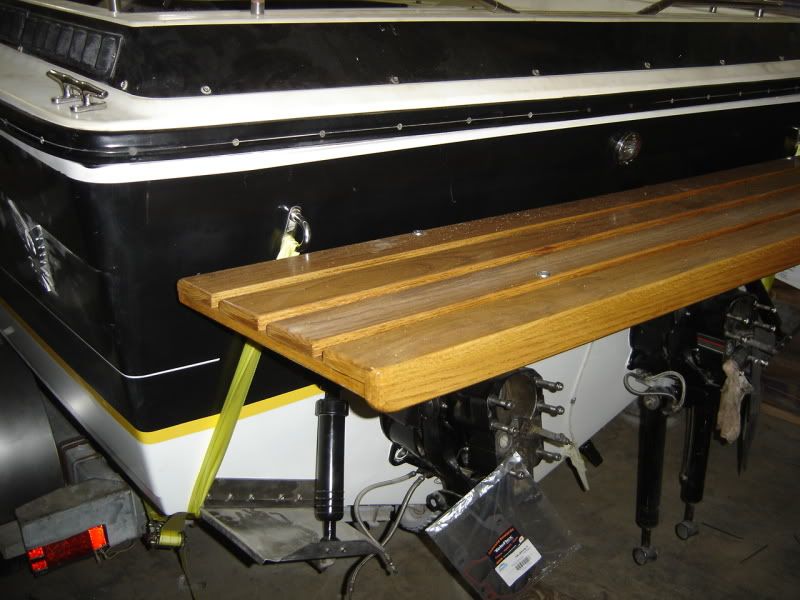
07-13-2012, 02:28 PM
#88
Registered
Thread Starter
The interior on the other hand needs lots of work still. I have also got some done in here. These pics are older. The wood on top of the stringers has been replaced now, as well as the expanding foam done. The starboard side is completely glassed in, the port side is ready for fiberglass. I tore out the front v-berth bulkhead and replaced it with 3/4" plywood and am glassing that into the boat instead of it being held in by wedging it into the carpet. Got plans for the cabin, but that can be done after it is running also.
Brian

Brian
07-13-2012, 11:29 PM
#89
Registered
Looks like you are getting closer every day.
Do you ever ask yourself " Why in THE HELL am I doing this any friggin way?"
Every time I think about all of the detailed stuff that I have to change to upgrade from log style exhaust/pre Alpha drives to Center Riser Exhaust/Bravo drives...it boggles my mind!!! Nothing's the same...I mean NOTHING!!! Hoses, pumps, steering, trim pumps, transom assembly, drives, electrical connections, brackets and on and on.
Sometimes I think that it wouldn't have been much more work to put twin Mazda Rotary engines in for all the crap I am going through...LOL.
Sorry...just venting...it's been one of THOSE weeks.
07-17-2012, 07:06 AM
#90
Registered
Thread Starter
Sprink, I definately know what you mean. I should have been doing a 302 or 311 for the amount of work I am putting into this. But I really think this 272 will fit our smaller lake boating better with good usability on Lake Michigan a few times a year.
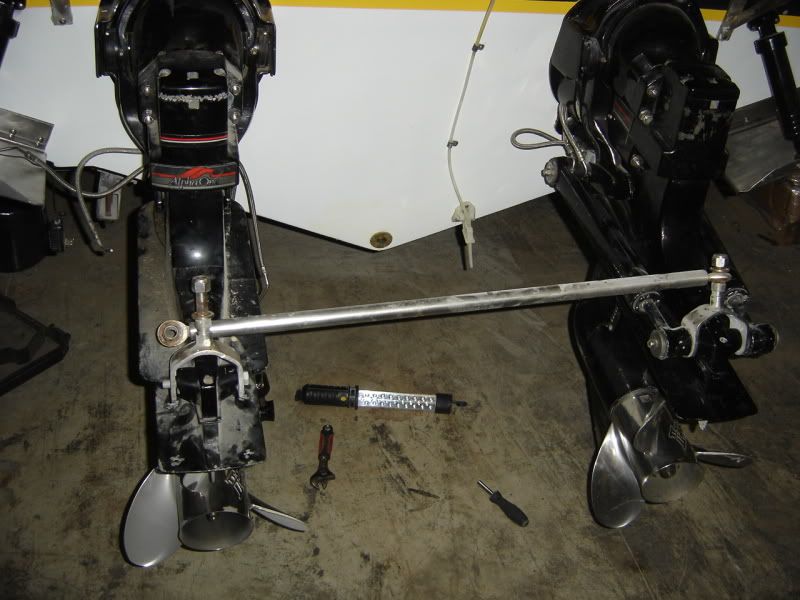
Got both drives on, so that makes me the proud new owner of a raft! Yep, with those two holes covered in the transom, it will now float. YEAH, a milestone!
Drives went on OK, ended up using a fork lift, forks slid together and slip the drive between them. Looks good.
Now for the new problem. I believe my engines/transom assemblies are 33" apart. The props are 32" apart and the drive tie bar is 34" wide. So, where the heck to the drives go on spacing? Tie bar can't get much shorter, going to end up taking it apart and throwing it in the lathe if it needs to be 33". Going to pull the internal steering connector and have to change it. Oh yeah, it is steel so it was rusted solid last time I tried moving it.... Great. Oh, and it is going to be 96 to 98 here today, not much time left to get out there.
Brian

