

Fuel tank foam 2lb or 4lb
 05-30-2015, 11:30 PM
#11
Registered
This is why you don’t foam in an aluminum tank.
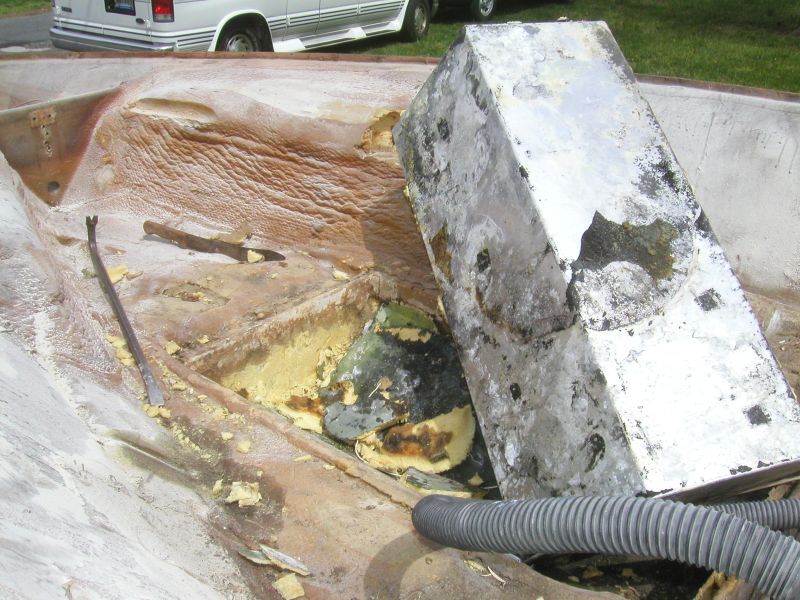
This is from a Donzi I did last year. Not a boat you want a failed fuel tank install in.
This was a mid-west boat (fresh water). Tank was less than 10 years old. The whole thing was coated in coal tar. Then put in place and foamed in. The issue was the front bow eye leaked (another impossible thing to fix in a Donzi without taking the top off). Water rolled down the drain and over the floatation foam and on top of the tank. Between it and condensation the coal tar was pulled off the tank by the foam and then the tank was turned into swiss cheese because the tank could not breathe (air circulate around it) or expand and contract.
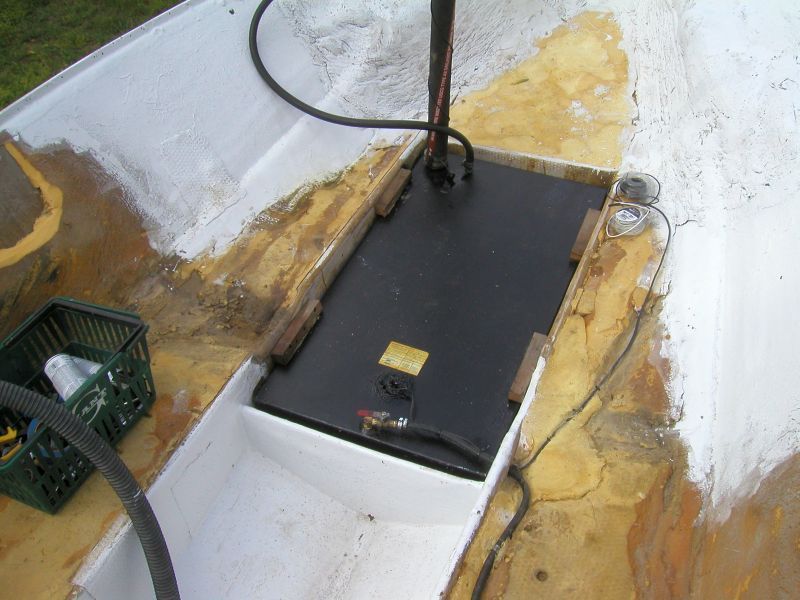
The new install is done like my 1972 Allmand SuperNova was done (43 years later and the tank is as good as the day it was made, I had it out 2 years ago just for inspection). Cut up rubber strips (I used a couple found tractor trailer mud flaps) for it to sit on and for the sides between it and the stringers so there is an air space and it’s not sitting on fiberglass anywhere. Liquid nail the strips in place and a couple more dabs on top of the rubber. Squeeze tank in place and then block it in with some teak blocks and stainless steel screws. The tank is there to stay and the way it’s installed even though this boat is on its 3rd tank it should be its last for a least a few decades.
This is from a Donzi I did last year. Not a boat you want a failed fuel tank install in.
This was a mid-west boat (fresh water). Tank was less than 10 years old. The whole thing was coated in coal tar. Then put in place and foamed in. The issue was the front bow eye leaked (another impossible thing to fix in a Donzi without taking the top off). Water rolled down the drain and over the floatation foam and on top of the tank. Between it and condensation the coal tar was pulled off the tank by the foam and then the tank was turned into swiss cheese because the tank could not breathe (air circulate around it) or expand and contract.
The new install is done like my 1972 Allmand SuperNova was done (43 years later and the tank is as good as the day it was made, I had it out 2 years ago just for inspection). Cut up rubber strips (I used a couple found tractor trailer mud flaps) for it to sit on and for the sides between it and the stringers so there is an air space and it’s not sitting on fiberglass anywhere. Liquid nail the strips in place and a couple more dabs on top of the rubber. Squeeze tank in place and then block it in with some teak blocks and stainless steel screws. The tank is there to stay and the way it’s installed even though this boat is on its 3rd tank it should be its last for a least a few decades.
 05-31-2015, 01:02 AM
#12
Registered
Join Date: Mar 2011
Posts: 30
Likes: 0
Received 0 Likes
on
0 Posts
The new install is done like my 1972 Allmand SuperNova was done (43 years later and the tank is as good as the day it was made, I had it out 2 years ago just for inspection). Cut up rubber strips (I used a couple found tractor trailer mud flaps) for it to sit on and for the sides between it and the stringers so there is an air space and it’s not sitting on fiberglass anywhere. Liquid nail the strips in place and a couple more dabs on top of the rubber. Squeeze tank in place and then block it in with some teak blocks and stainless steel screws. The tank is there to stay and the way it’s installed even though this boat is on its 3rd tank it should be its last for a least a few decades.
05-31-2015, 11:02 AM
#13
Registered
Join Date: Aug 2005
Location: Between A Womans Leggs in IL
Posts: 6,306
Likes: 0
Received 1 Like
on
1 Post
The cavity already has a 1"pvc fiberglassed into the hull to drain from bow to stern. During all the searching on this site, I found the way superboat installs there tanks and I like that method. I will probably mirror that. Also the way the manufacturer of this hull told me to do this tank is very similar to the way superboat does them.


